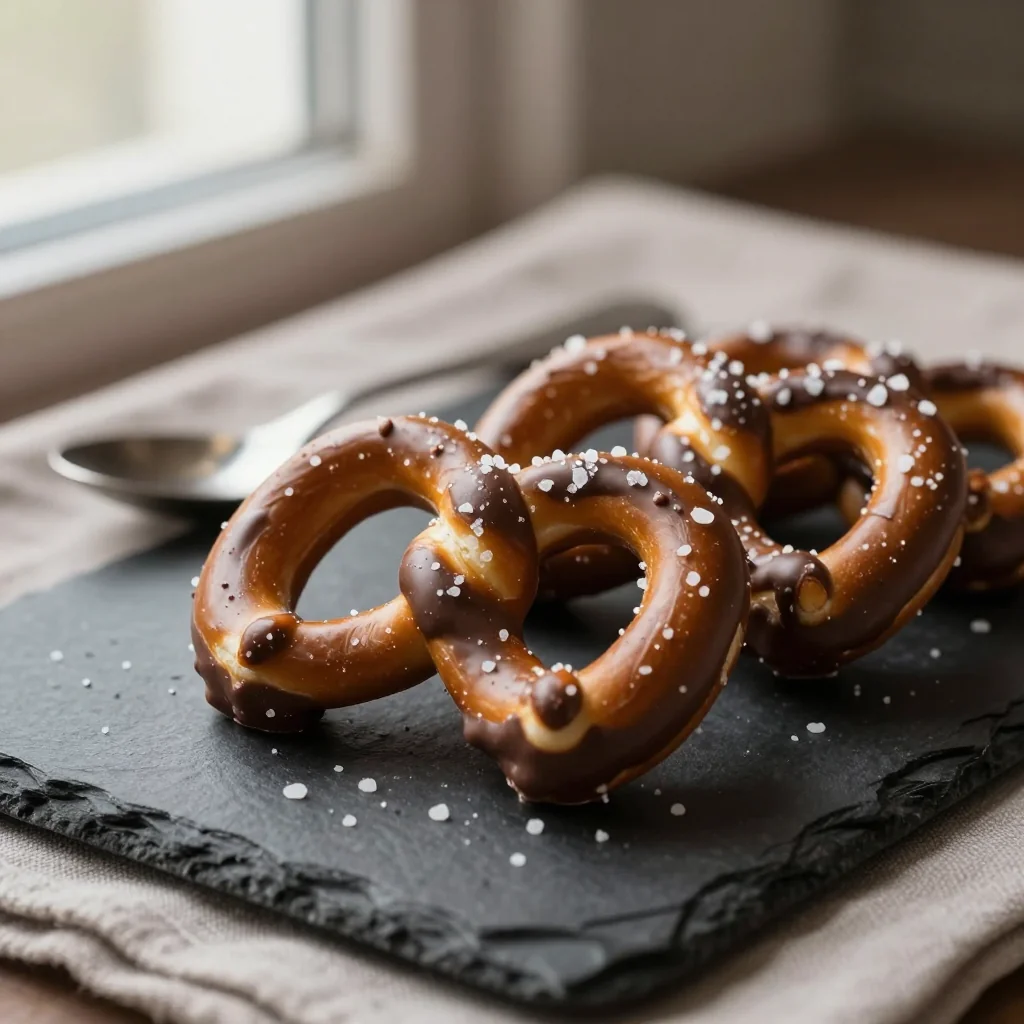
When I was a kid, the first time I tasted a pretzel dipped in glossy dark chocolate and finished with a flaky kiss of sea salt, I felt like I had discovered a secret treasure hidden in a movie theater concession stand. The combination of salty crunch and velvety chocolate sparked a memory of fireworks on a summer night, and ever since that moment, I have been on a quest to perfect the recipe.
Chocolate‑covered pretzels have their roots in German bakeries where pretzels (or “Brezeln”) were traditionally paired with sweet toppings for festive occasions. Over the decades, the snack migrated across continents, becoming a beloved treat at fairs, movie nights, and cocktail parties. The addition of flaky sea salt, a nod to the modern “sweet‑and‑salty” trend, elevates the humble pretzel into a gourmet bite.
In this article, you will learn how to choose the right pretzel shape, temper chocolate for a glossy finish, and sprinkle the perfect amount of sea salt for a balanced flavor. I’ll also share troubleshooting tips that guarantee a crack‑free coating every time.
So roll up your sleeves, preheat your oven, and let’s transform ordinary pretzels into a dazzling snack that will impress friends, family, and anyone who appreciates a little culinary magic.
🌟 Why This Recipe Will Win Your Heart
Whether you’re preparing a quick after‑school snack or an elegant appetizer for a cocktail party, this recipe offers a perfect blend of flavor, texture, and visual appeal.
- ✨ Irresistible Sweet‑Salty Contrast: The rich, slightly bitter dark chocolate pairs beautifully with the bright crunch of pretzel salt, creating a palate‑pleasing experience that keeps guests reaching for more.
- ✨ Simple Ingredient List: Only six core ingredients are needed, most of which you probably already have in your pantry, making this recipe both accessible and budget‑friendly.
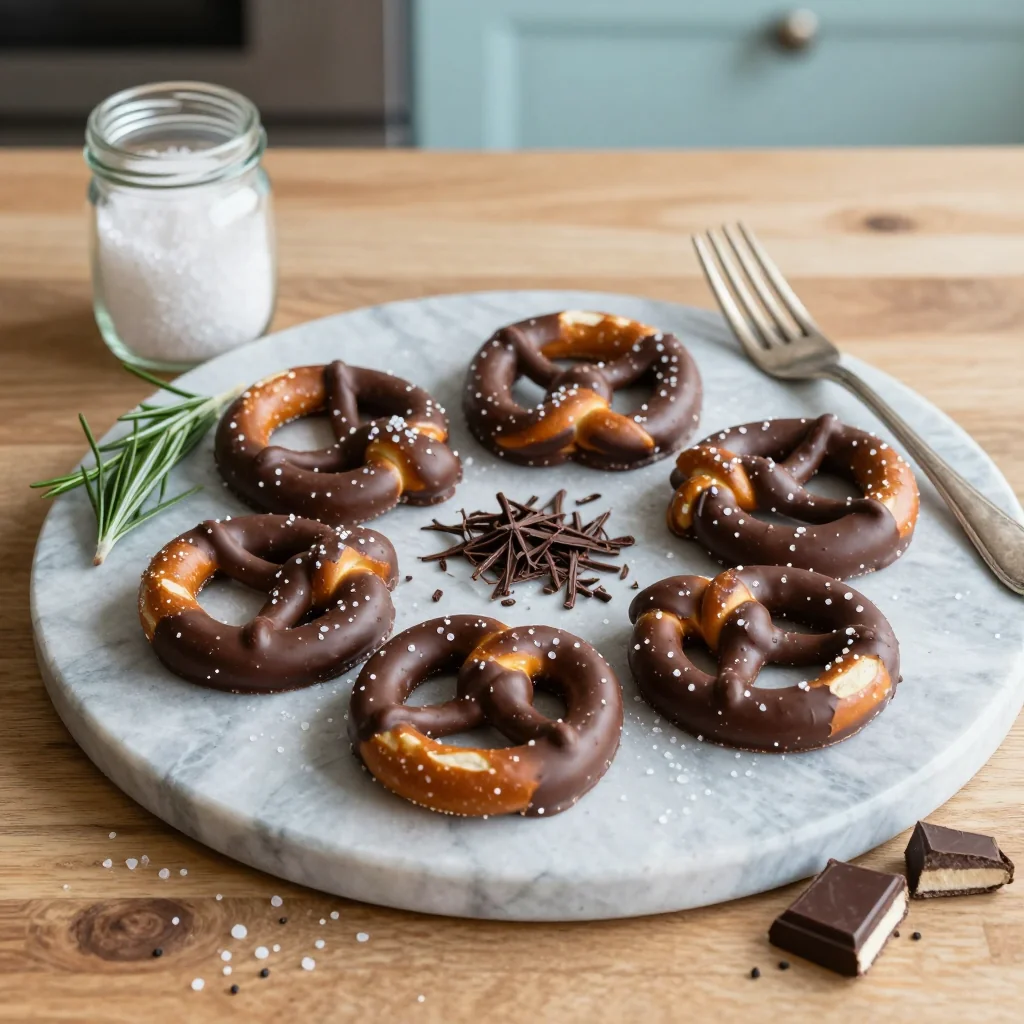
- ✨ Versatile Presentation: You can arrange the pretzels on a decorative platter, dip them in a drizzle of white chocolate, or even sprinkle edible gold flakes for a luxe touch.
- ✨ No‑Bake Flexibility: Aside from melting the chocolate, there’s no oven time required for the pretzels themselves, allowing you to multitask in the kitchen.
- ✨ Perfect for All Seasons: The snack works equally well as a summer picnic treat or a cozy winter movie‑night indulgence, thanks to its comforting chocolate flavor.
- ✨ Crowd‑Pleaser for All Ages: Kids love the salty crunch, while adults appreciate the sophisticated chocolate coating, making it a universally adored bite.
🥗 Ingredients
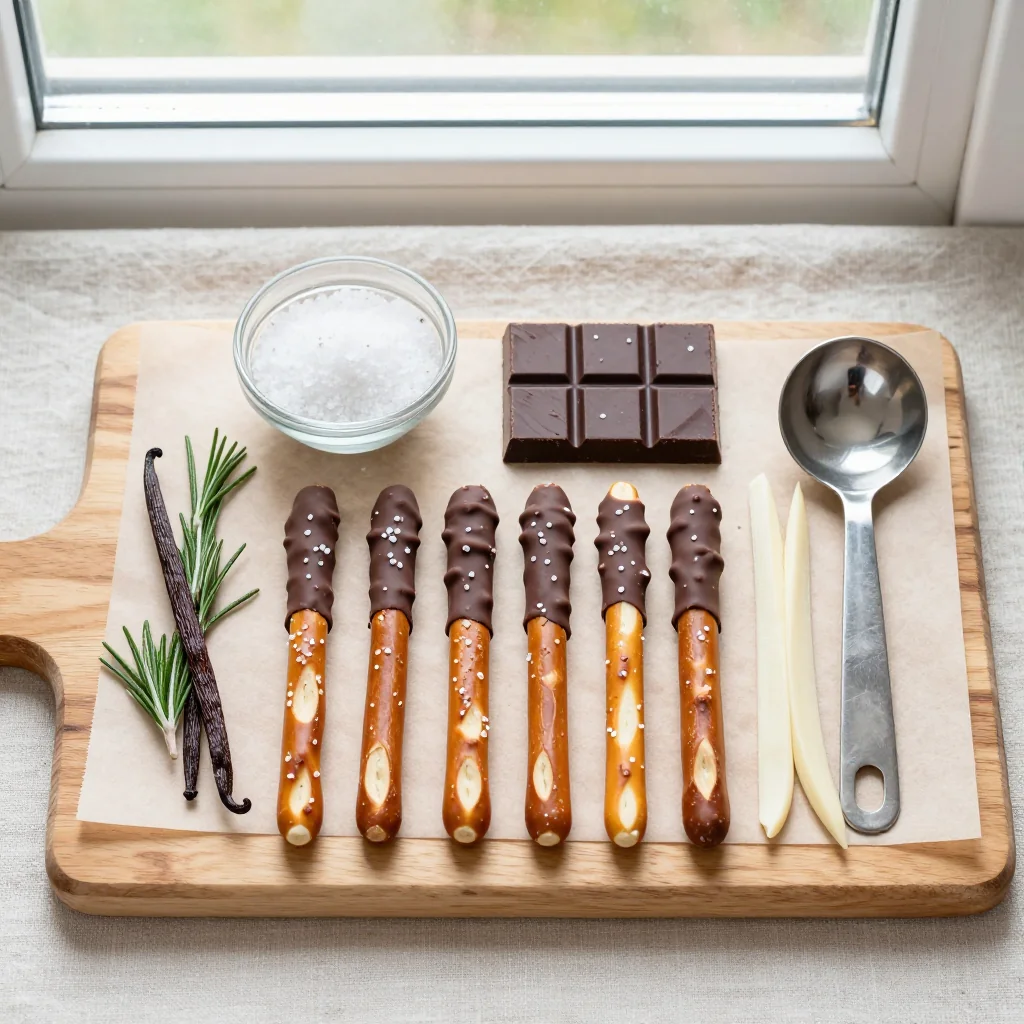
📝 Complete Ingredient List
For the Pretzel Base:
For the Chocolate Coating:
For Garnish (Optional):
🔍 Focus on Key Ingredients
Dark Chocolate (70% cacao)
Dark chocolate provides the backbone of flavor, offering a deep, slightly bitter note that balances the salty pretzel. Choose a high‑quality couverture chocolate because it contains cocoa butter, which helps achieve a glossy, snap‑ready coating. If you prefer a sweeter profile, you can substitute 55% cacao chocolate, but the final taste will be less intense.
Milk Chocolate
Milk chocolate adds creaminess and a milky sweetness that softens the intensity of the dark chocolate. It also contributes to a smoother texture when the two chocolates are combined. Opt for a chocolate with at least 30% cocoa solids to avoid a waxy finish.
Sea Salt Flakes
Fine sea salt flakes give the pretzels that signature “pop” of salty crunch without overwhelming the chocolate. The flake size matters: larger flakes provide a pleasant crunch, while finer crystals can dissolve too quickly. If you have a flaky finishing salt like Maldon, it’s the perfect choice.
🔄 Quick Substitutions
| If you don’t have… | Use instead… |
|---|---|
| Dark chocolate (70% cacao) | Semi‑sweet chocolate (60% cacao) |
| Milk chocolate | White chocolate (adjust sweetness) |
| Sea salt flakes | Fine kosher salt (sprinkle sparingly) |
👨🍳 Step‑by‑Step Instructions
Follow these detailed steps to achieve a flawless chocolate coating and a perfectly salted finish. Each phase is designed to keep the pretzels crisp while the chocolate sets into a glossy shell.
📋 Phase 1: Preparation & Mise en Place
Gather and prepare all components before you start melting chocolate to ensure a smooth workflow.
Prepare the Pretzels
Lay the pretzel twists on a large baking sheet lined with parchment paper. Lightly brush each pretzel with the melted butter, ensuring an even coating that will help the chocolate adhere. Sprinkle a pinch of sea salt over the buttered pretzels; the salt will dissolve slightly during the chocolate melt, creating tiny salty pockets.
Measure and Set Up Chocolate
Chop the dark and milk chocolate into uniform pieces (about 1 cm cubes) to promote even melting. Place both chocolates in a heat‑proof bowl, add the optional coconut oil, and set the bowl over a pot of simmering water (double‑boiler method). Stir gently until fully melted and smooth.
🔥 Phase 2: Chocolate Dipping & Baking
This phase creates the glossy coating and sets the pretzels for the final garnish.
Dip the Pretzels
Using a fork or a dedicated dipping tool, submerge each pretzel twist into the melted chocolate, allowing excess chocolate to drip back into the bowl. Arrange the chocolate‑coated pretzels back onto the parchment sheet, spacing them a few centimeters apart.
Sprinkle Sea Salt
While the chocolate is still wet, lightly dust each pretzel with a pinch of flaky sea salt. The salt should sit on top of the chocolate, not dissolve into it, to preserve the crunchy texture.
Optional Garnish
If you like extra texture, sprinkle crushed pistachios or a dusting of cocoa powder over selected pretzels. These additions create visual contrast and add a nutty or bitter note.
✨ Phase 3: Finishing & Serving
Allow the chocolate to set and then present the pretzels beautifully.
Set the Chocolate
Place the baking sheet in the refrigerator for 15‑20 minutes, or at room temperature for 30‑40 minutes, until the chocolate is firm to the touch. Avoid covering the pretzels; exposure to air helps the chocolate develop a glossy sheen.
Transfer to Serving Platter
Once set, carefully lift the pretzels using a thin spatula and arrange them on a decorative platter. For added drama, create a radial pattern or a simple stacked tower.
Serve and Enjoy
Serve the pretzels at room temperature. Pair them with a glass of chilled sparkling rosé, a cold craft beer, or a hot mug of espresso for a balanced tasting experience.
💡 Expert Tips & Tricks
🛒 Choosing the Right Ingredients
Select pretzel twists that are uniformly salted and have a firm snap; this ensures they won’t become soggy when coated. For chocolate, always opt for couverture or high‑quality baking chocolate because the cocoa butter content guarantees a glossy finish and a clean snap. If you’re buying sea salt, look for flaky varieties like Maldon – they provide the perfect crunchy burst without overwhelming the chocolate.
🔪 Preparation Techniques
Before dipping, brush the pretzels with melted butter; this thin layer acts as an adhesive, preventing the chocolate from sliding off. Use a silicone spatula to stir the chocolate gently; over‑stirring can introduce air bubbles, which cause dull spots once the chocolate sets. Keep a bowl of ice water nearby to quickly cool the melted chocolate if it starts to look too thin.
🌡️ Mastering the Chocolate Melt
Maintain the water bath at a gentle simmer – never a rolling boil – to avoid scorching the chocolate. Aim for a temperature of 45 °C for dark chocolate and 40 °C for milk chocolate. Adding a tablespoon of coconut oil is optional but helps create a smoother, more fluid coating that spreads evenly over the pretzel’s surface.
🍽️ Presentation & Service
Arrange the pretzels in a circular pattern with the chocolate‑coated side facing up for maximum visual impact. Sprinkle a final pinch of sea salt just before serving to keep the crystals crisp. For a festive touch, drizzle a thin ribbon of white chocolate over half the pretzels and dust with cocoa powder for contrast.
🏆 Pro‑Level Secrets
Professional pastry chefs treat chocolate coating as a science; mastering temperature and timing separates a good snack from a restaurant‑quality masterpiece.
- 🎯 Tempering for Snap: If you have a chocolate tempering machine, bring the dark chocolate to 45 °C, cool it to 27 °C, then reheat to 31 °C. This process aligns the cocoa butter crystals, giving the coating a glossy sheen and a firm snap that doesn’t melt on the tongue too quickly.
- 🎯 Uniform Thickness: Use a silicone brush to apply a thin first layer of chocolate, let it set, then dip again for a second thin layer. This double‑dip technique creates a uniform thickness without excess chocolate pooling at the ends.
- 🎯 Salt Timing: Add sea salt while the chocolate is still glossy but not hot; this prevents the salt from melting into the chocolate, preserving its crunchy texture.
- 🎯 Cooling Environment: Cool the pretzels in a low‑humidity environment. High humidity can cause chocolate to bloom (white streaks), ruining the visual appeal.
- 🎯 Portion Scaling: When scaling the recipe, keep the chocolate‑to‑pretzel ratio constant (approximately 30 g of chocolate per pretzel). This ensures each pretzel receives enough coating without waste.
- 🎯 Storage Science: Store the finished pretzels in an airtight container with a paper towel layer to absorb excess moisture, extending freshness up to two weeks.
"The perfect chocolate coating is the result of chemistry, patience, and a love for detail." — Pierre Hermé, Pastry Chef
🔄 Variations & Adaptations
Feel free to experiment with flavors, textures, and dietary needs. This recipe is a flexible canvas for creative twists.
🥬 Vegetarian / Vegan Version
Replace butter with a plant‑based oil such as refined coconut oil and use dairy‑free dark and milk chocolate (e.g., almond‑milk chocolate). Ensure the sea salt is free of any additives.
- Vegan butter substitute – 2 Tbsp melted coconut oil.
- Dairy‑free milk chocolate – 100 g.
🌶️ Flavor Variations
Play with sweet, spicy, or savory profiles to match the occasion.
Spicy Version:
Add ½ tsp cayenne pepper to the melted chocolate for a subtle heat that balances the sweetness.
Mediterranean Version:
Mix 1 tsp finely chopped rosemary into the butter before brushing the pretzels, then sprinkle toasted pine nuts on top of the chocolate.
Asian Fusion Version:
Stir 1 tsp toasted sesame oil and ½ tsp matcha powder into the milk chocolate for a nutty, earthy flavor.
⚠️ Dietary Adaptations
Gluten‑Free:
Use certified gluten‑free pretzel twists. Most brands now offer a gluten‑free line that mimics the classic texture.
Lactose‑Free:
Choose dairy‑free chocolate varieties and replace butter with a neutral oil like grapeseed oil.
Low‑Calorie:
Swap half of the dark chocolate with cacao nibs, reducing overall sugar while retaining a chocolatey crunch.
👶 Family / Kids Version
Kids love bright colors. Add a few drops of natural food coloring (e.g., beet juice for pink or spirulina for green) to the white chocolate drizzle. Reduce the amount of sea salt to a light sprinkle, or replace it with colored sugar crystals for a festive look.
📦 Storage & Reheating
🧊 Conservation
Refrigerator:
- Duration: 7 days
- Container: Airtight glass jar with a paper towel layer
- Tip: Keep the lid slightly ajar for the first 24 hours to prevent moisture buildup.
Freezer:
- Duration: 3 months
- Method: Place pretzels on a parchment sheet in a single layer, freeze, then transfer to a zip‑lock bag.
- Defrost: Transfer to the fridge overnight, then let sit at room temperature for 15 minutes before serving.
💡 Note: Avoid storing with other strong‑smelling foods; chocolate absorbs odors.
♨️ Reheating
🔥 Oven (Recommended):
- Preheat to 150 °C (300 °F).
- Place pretzels on a baking sheet lined with parchment.
- Heat for 5‑7 minutes until the chocolate becomes slightly soft.
- Remove and let cool for 2 minutes before serving.
⚡ Microwave (Quick):
- Arrange pretzels on a microwave‑safe plate.
- Cover with a microwave‑safe lid.
- Heat on medium power for 20‑30 seconds, then check.
- Repeat in 10‑second bursts if needed.
🍳 Stovetop:
If you prefer a quick melt, place a dry skillet over low heat, add a few pretzels, and cover for 30 seconds to warm the chocolate without burning.
🍷 Perfect Pairings
🥗 Side Dishes
- Fresh Fruit Salad: The acidity of citrus fruits cuts through the chocolate richness.
- Cheese Board: Soft cheeses like brie complement the salty pretzel while adding creaminess.
- Roasted Almonds: Adds an extra nutty crunch that mirrors the pretzel’s texture.
🍷 Wine & Beverage Pairings
- Sparkling Rosé: Its bright acidity balances the sweet‑salty profile.
- IPA Beer: The bitterness of hops enhances the dark chocolate’s depth.
- Non‑Alcoholic: Sparkling water with a splash of orange zest offers a refreshing contrast.
🍰 Completing the Meal
Start with a light mixed green salad dressed with a citrus vinaigrette, move to the chocolate‑covered pretzels as a snack or palate cleanser, and finish with a simple vanilla panna cotta topped with a berry coulis for a harmonious sweet finish.
❓ Frequently Asked Questions
Q: Can I use pretzel sticks instead of twists?
A: Absolutely! Pretzel sticks work just as well. Adjust the quantity to maintain the same total weight (approximately 300 g of pretzel pieces). The coating process remains identical.
Q: How do I prevent chocolate from blooming?
A: Bloom occurs when chocolate is exposed to temperature fluctuations or moisture. Keep the melted chocolate within the recommended temperature range, store the finished pretzels in a cool, dry place, and avoid refrigerating them in a humid environment.
Q: What if I don’t have a double‑boiler?
A: You can melt chocolate in a microwave using short 20‑second bursts, stirring between each burst. Stop when the chocolate is smooth and glossy; avoid overheating.
Q: Can I add other toppings besides sea salt?
A: Yes! Crushed candy canes for a holiday twist, toasted coconut flakes for tropical flair, or espresso powder for a mocha hint all work beautifully. Add toppings while the chocolate is still wet.
Q: Is there a lower‑sugar alternative?
A: Substitute part of the milk chocolate with unsweetened cocoa nibs or use a sugar‑free dark chocolate. The overall sweetness will decrease, so you may want to add a touch more vanilla extract.
Q: How far in advance can I prepare the pretzels?
A: You can dip and set the pretzels up to 24 hours ahead. Store them in an airtight container at room temperature, and they will retain their crispness and flavor.
🎉 Let’s Get Cooking!
This chocolate‑covered pretzel recipe combines the comforting crunch of a classic snack with the luxurious depth of fine chocolate and a whisper of sea salt. It’s simple enough for a weekday treat yet elegant enough to shine at a soirée. By following the detailed steps, you’ll achieve a glossy, crack‑ready coating that stays crisp for days.
Remember, the secret lies in quality ingredients, precise temperature control, and a little patience while the chocolate sets. Once you’ve mastered the basics, feel free to explore the variations and make the recipe truly your own.
Have you tried this recipe?
Leave a comment and rating below! Share your photos on Instagram with #PretzelChocolateDelight to be featured on our blog.
Chocolate Covered Pretzels with Sea Salt
Crisp pretzel twists drenched in dark‑milk chocolate and finished with flaky sea salt.
📝 Ingredients
Pretzel Base
Chocolate Coating
Garnish (Optional)
👨🍳 Instructions
- 1 Brush pretzel twists with melted butter and sprinkle a light pinch of sea salt.
- 2 Chop both chocolates and melt them together in a double‑boiler, adding coconut oil if desired.
- 3 Dip each pretzel into the chocolate, letting excess drip off, then place back on parchment.
- 4 While chocolate is still wet, dust each pretzel with a pinch of flaky sea salt.
- 5 Optional: Sprinkle crushed pistachios or cocoa powder on selected pretzels.
- 6 Refrigerate for 15‑20 minutes until chocolate sets firmly.
- 7 Transfer pretzels to a serving platter, arranging them aesthetically.
- 8 Serve at room temperature with your preferred beverage.
- 9 Store leftovers in an airtight container, keeping them in a cool, dry place.
- 10 Enjoy the delightful crunch and sweet‑salty harmony with friends and family.
🥗 Nutrition Facts (per serving)
*Values are estimates based on standard ingredient data.


💬 Comments & Reviews
Leave a Comment
Comments will appear here once readers start sharing their thoughts.