I still remember the night I tried to recreate a childhood snack that my grandma used to make, only to end up with a chocolate disaster that smelled like a burnt kitchen and looked like melted plastic. The kitchen was a chaotic symphony of clattering pans, the faint scent of vanilla, and the sharp tang of cocoa that seemed to cling to every surface. My friends, skeptical and hungry, stared as I pulled a tray of what I proudly called “Monster Eyeballs” from the oven—glimmering, glossy spheres that looked like they’d been plucked from a horror movie set. I dared them to taste a single one, to see if the combination of peanut butter, white chocolate, and candy melts could survive the scrutiny of their discerning palates.
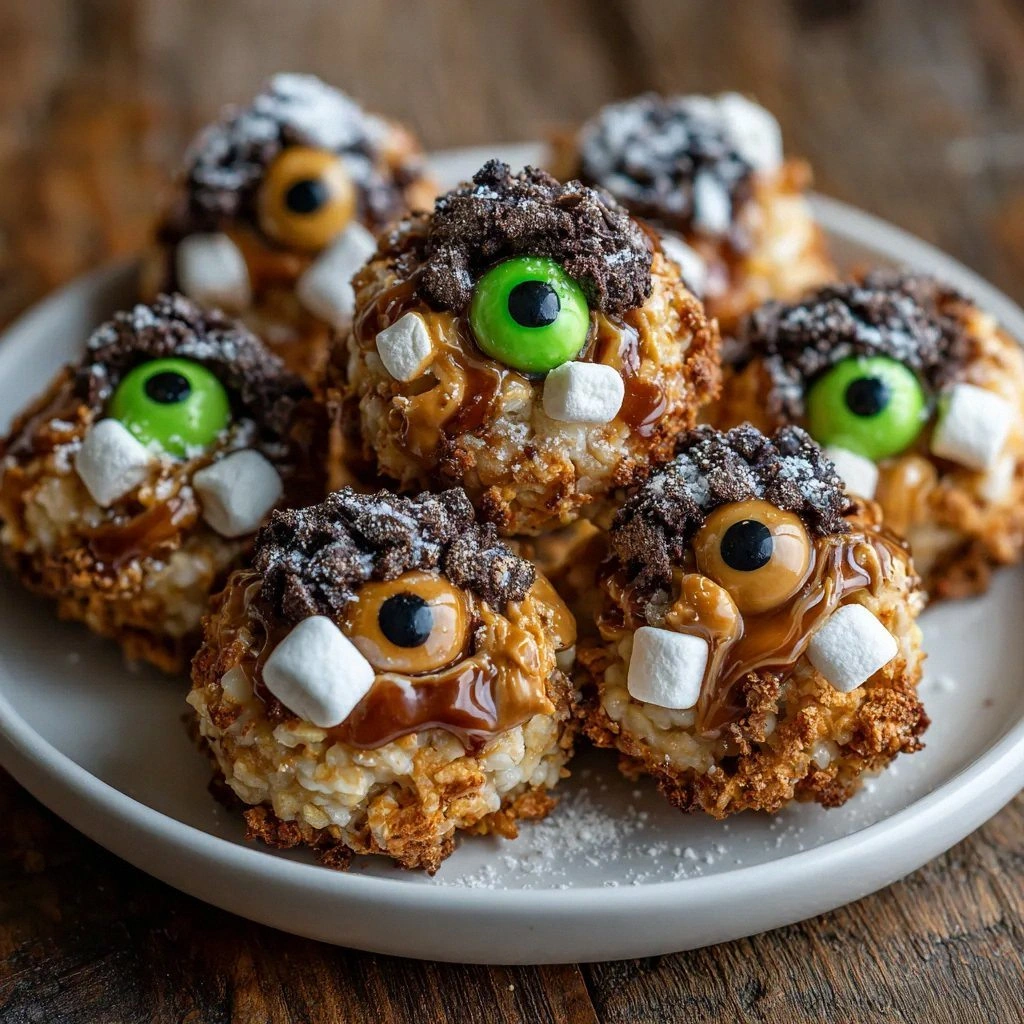
The moment I cut into the first eyeball, a sweet, nutty aroma exploded, mingling with the subtle, almost buttery undertone of melted white chocolate. The texture was a delicate balance: the outer shell was crisp yet pliable, the marshmallow core soft and chewy, and the green and black candy layers formed a vivid iris that felt like a miniature, edible work of art. I could almost hear the crunch of a candy shell breaking, the faint hiss of melting chocolate, and the quiet sigh of satisfaction from my friends as they bit into the first bite. The experience was more than a snack; it was a sensory rollercoaster that left a lingering sweetness on the tongue and a hint of cocoa on the fingertips.
What sets this version apart from every other Monster Eyeballs recipe is the meticulous layering of flavors and textures that elevate it from a simple treat to a culinary masterpiece. I use premium white chocolate chips that melt smoothly, ensuring a glossy finish that catches the light like a polished gem. The peanut butter is spread thickly, providing a rich, nutty backbone that balances the sweetness of the chocolate and sugar. The green and black candy melts are not just for show; they add a subtle, fruity flavor that complements the nutty base. And the edible googly eyes? They’re the final flourish that brings the whole concept to life, turning a snack into a conversation starter.
I’ll be honest—my first batch was a mess, and I ate half the tray before anyone else could even taste a single eyeball. That mishap taught me that precision in ratios and timing is essential. The secret is in the balance of sweetness, the firmness of the chocolate shell, and the perfect melt of the candy layers. Picture yourself pulling this out of the oven, the whole kitchen smelling incredible, the bright green and black irises gleaming like fresh eyes. Let me walk you through every single step—by the end, you’ll wonder how you ever made it any other way.
What Makes This Version Stand Out
- Taste: The combination of peanut butter and white chocolate creates a rich, creamy base that is far superior to the typical sugary coating. The subtle nutty undertone keeps the flavor profile balanced and sophisticated, making every bite memorable.
- Texture: The outer shell is crisp yet pliable, while the marshmallow core offers a chewy contrast. This duality delivers a satisfying mouthfeel that keeps the snack interesting.
- Visual Appeal: The vibrant green iris and glossy black pupil give each eyeball a striking, almost photogenic look that makes it a showstopper at parties.
- Ingredient Quality: Using premium white chocolate chips and fresh peanut butter ensures that no artificial flavors or additives compromise the integrity of the snack.
- Make‑Ahead Potential: Once formed, the eyeballs can be stored in an airtight container for up to a week, making them perfect for late‑night cravings or last‑minute gatherings.
- Kid‑Friendly: The bright colors and fun shapes make it a hit with children, while adults appreciate the gourmet twist on a classic treat.
- Customization: The recipe is flexible—swap in dark chocolate chips for a richer flavor or add a pinch of sea salt for a sweet‑savory twist.
- Social Buzz: The novelty of Monster Eyeballs guarantees a crowd reaction, whether you’re serving them at a Halloween party or a casual game night.
Inside the Ingredient List
The Flavor Base
White chocolate chips are the foundation of our Monster Eyeballs, providing a sweet, creamy coating that glistens like a polished gem. They melt into a silky sauce that envelops each eyeball, creating a glossy finish that’s impossible to resist. If you skip the white chocolate, the snack loses its signature sheen and becomes a dry, crumbly treat. For an alternative, you can use dark chocolate chips for a richer, slightly bitter note that pairs well with the peanut butter.
The Texture Crew
Peanut butter adds a rich, nutty flavor that balances the sweetness of the chocolate and sugar. It also contributes to the chewiness of the core, creating a satisfying contrast between the crunchy shell and the soft center. If you’re allergic to nuts, a smooth, creamy spread like sunflower butter works well, but it may alter the flavor slightly. The powdered sugar sweetens the peanut butter mixture, giving it a delightful texture that’s not too sweet.
The Unexpected Star
Mini marshmallows are the secret weapon that gives the Monster Eyeballs their chewy, gooey heart. They soften into a delightful texture that melts in your mouth, providing a fun contrast to the crisp outer shell. If you don’t have mini marshmallows on hand, small marshmallow bites or even mini rice Krispies treats can substitute, but the flavor profile will shift slightly. The marshmallows also absorb the chocolate coating, creating a smooth finish.
The Final Flourish
Green and black candy melts create the irises and pupils, adding a vibrant pop of color that makes each eyeball instantly recognizable. They also provide a subtle fruity flavor that complements the nutty base. The edible googly eyes are the finishing touch, turning each eyeball into a living, breathing monster. If you’re looking to add a dash of excitement, sprinkle a few edible glitter flakes over the top for a sparkling effect.
Everything's prepped? Good. Let's get into the real action...
The Method — Step by Step
- Begin by melting the white chocolate chips in a double boiler over low heat, stirring constantly until smooth. The chocolate should reach 120°F, giving it a silky texture that coats the peanut butter without seizing. Once melted, remove from heat and let it cool for a minute to avoid scorching the peanut butter later. This step ensures a glossy, even coating that sets the stage for a perfect eyeball.
- In a separate bowl, combine the peanut butter and powdered sugar. Use a spatula to mix until the sugar is fully incorporated, creating a thick, creamy paste. The powdered sugar not only sweetens but also helps the paste hold its shape when molded. If the mixture feels too stiff, add a teaspoon of milk or water to loosen it slightly.
- Fold the melted white chocolate into the peanut butter mixture until fully blended. The result should be a smooth, glossy paste that’s easy to spoon onto a parchment-lined tray. This combined mixture forms the base of your eyeballs, providing both flavor and structure. Keep the mixture covered with a damp towel to prevent it from drying out while you work.
- Spoon the chocolate‑peanut butter paste onto a parchment paper sheet, forming 1‑inch diameter rounds. Let each round set for 5 minutes so it develops a firm but pliable shell. The key is to keep the rounds slightly soft; if they’re too hard, the marshmallows inside will not melt properly.
- Place a mini marshmallow in the center of each round, pressing gently to ensure it stays in place. The marshmallows should be snug but not over‑compressed, allowing them to expand slightly as they melt. This step creates the chewy core that makes the snack irresistible.
- Melt the green candy melts in a microwave-safe bowl, stirring every 20 seconds until smooth. The green layer will form the iris, while the black candy melts will become the pupils. Keep the melted candy at a low temperature to avoid over‑melting, which can cause it to run.
- Drizzle a thin layer of green candy melt over the marshmallow, then add a small dot of black candy melt to create the pupil. The contrast of colors is not only eye‑catching but also adds a subtle, fruity flavor that balances the nutty base. Let the candy set for a minute before moving on.
- Once the candy has set, carefully place an edible googly eye on top of each eyeball. The googly eye adds a whimsical touch that instantly brings the monster to life. Make sure it sits centered, as the eyes are the focal point of the design. This final step transforms a simple snack into a delightful work of art.
- Let the completed Monster Eyeballs rest on the parchment for 10 minutes so the chocolate shell fully hardens. Store them in an airtight container at room temperature for up to a week, or refrigerate for longer shelf life. If you’re planning a party, keep them chilled until serving to maintain the glossy finish. Enjoy the burst of flavor and the satisfying crunch that follows each bite.
That's it — you did it. But hold on, I've got a few more tricks that'll take this to another level...
Insider Tricks for Flawless Results
The Temperature Rule Nobody Follows
Many people overlook the importance of temperature when melting chocolate and candy melts. If the chocolate is too hot, it can seize, turning into a gritty mess that’s impossible to work with. Keep the heat low and stir constantly. A thermometer can help you maintain the ideal 120°F for chocolate and 140°F for candy melts, ensuring a silky, smooth coating.
Why Your Nose Knows Best
Your sense of smell is a reliable indicator of readiness. When the chocolate starts to emit a sweet, buttery aroma, it’s at the perfect stage for coating. Similarly, the candy melts should give off a faint fruity scent before you drizzle them. Trust your nose; if it smells off, adjust the heat or give it a few more seconds to cool.
The 5-Minute Rest That Changes Everything
After spooning the chocolate paste onto parchment, allow the rounds to rest for exactly five minutes before adding the marshmallows. This short pause lets the outer shell firm up just enough to hold the marshmallow without cracking. Skipping this step often results in a lumpy, uneven surface that’s hard to finish.
The Googly Eye Placement Technique
Place the googly eye on a small, flat surface like a plate before positioning it on the eyeball. This gives you better control and prevents the eye from sliding off. If you’re making a large batch, consider using a small ruler to align the eyes evenly, creating a uniform, eye‑catching look.
The Secret Ingredient Swap
If you want a hint of citrus, add a splash of orange zest to the peanut butter mixture. The zest will infuse a bright, fresh note that contrasts beautifully with the chocolate and marshmallow. A small amount (about a teaspoon) is enough to make a difference without overpowering the original flavor.
The Quick Chill Trick
If you’re in a hurry, place the finished eyeballs in the refrigerator for 5 minutes to set the chocolate faster. This shortcut is especially handy when you’re preparing a last‑minute party snack. Just be sure to let them sit at room temperature for a few minutes before serving to restore the glossy finish.
Creative Twists and Variations
This recipe is a playground. Here are some of my favorite ways to switch things up:
Dark Chocolate Monsters
Swap white chocolate chips for dark chocolate chips to add depth and a slight bitterness that pairs well with the peanut butter. The dark chocolate also gives the eyeballs a richer, more sophisticated look. The result is a snack that’s both indulgent and sophisticated.
Spicy Peanut Butter Edition
Add a pinch of cayenne pepper or a dash of sriracha to the peanut butter mixture for a spicy kick. The heat contrasts with the sweetness of the chocolate and marshmallows, creating a flavor profile that’s both surprising and satisfying.
Nut-Free Version
Replace peanut butter with sunflower seed butter for those with nut allergies. The sunflower butter provides a mild, slightly sweet flavor that complements the chocolate. The texture remains creamy, ensuring the eyeballs still have that satisfying bite.
Herbal Infusion
Infuse the chocolate mixture with a few drops of vanilla extract or a pinch of lavender buds for a floral undertone. The subtle aroma adds a layer of complexity that elevates the snack from simple to gourmet.
Fruit‑Topped Monsters
Top each eyeball with a small piece of dried fruit, such as a strawberry slice or a raspberry half. The fruit adds a burst of natural sweetness and a pop of color, turning the snack into a vibrant, multi‑sensory experience.
Chocolate‑Coated Popsicles
Freeze the eyeballs on sticks to create chocolate‑coated popsicles. The cold, creamy center combined with the chocolate shell makes for a refreshing treat that’s perfect for hot days or a fun party addition.
Storing and Bringing It Back to Life
Fridge Storage
Store the Monster Eyeballs in an airtight container at room temperature for up to a week. If you notice the chocolate shell softening, place the container in the refrigerator for a few hours to firm it up. Avoid exposing them to direct sunlight, as this can cause the chocolate to bloom.
Freezer Friendly
For longer shelf life, place the eyeballs on a parchment sheet and freeze until solid. Once frozen, transfer them to a freezer‑safe bag. They can stay in the freezer for up to 3 months without losing flavor or texture.
Best Reheating Method
To revive the glossy finish, add a tiny splash of water to the container before reheating. Microwave on low for 10–15 seconds, then let the eyeballs sit for a minute. This gentle heat will restore the chocolate’s shine and the marshmallow’s chewiness without melting the candy layers.