It was a rainy Tuesday, the kind of night when your kitchen feels like a small, cozy universe, and your craving for something sweet is louder than the thunder outside. I had a handful of stale chocolate chips, a jar of salted caramel, and an ambition that was as big as my pantry. I remembered the last time I tried a “salted caramel” cookie recipe that turned out as bland as a gray cloud—nothing to write home about. So, I decided to rewrite the rulebook.
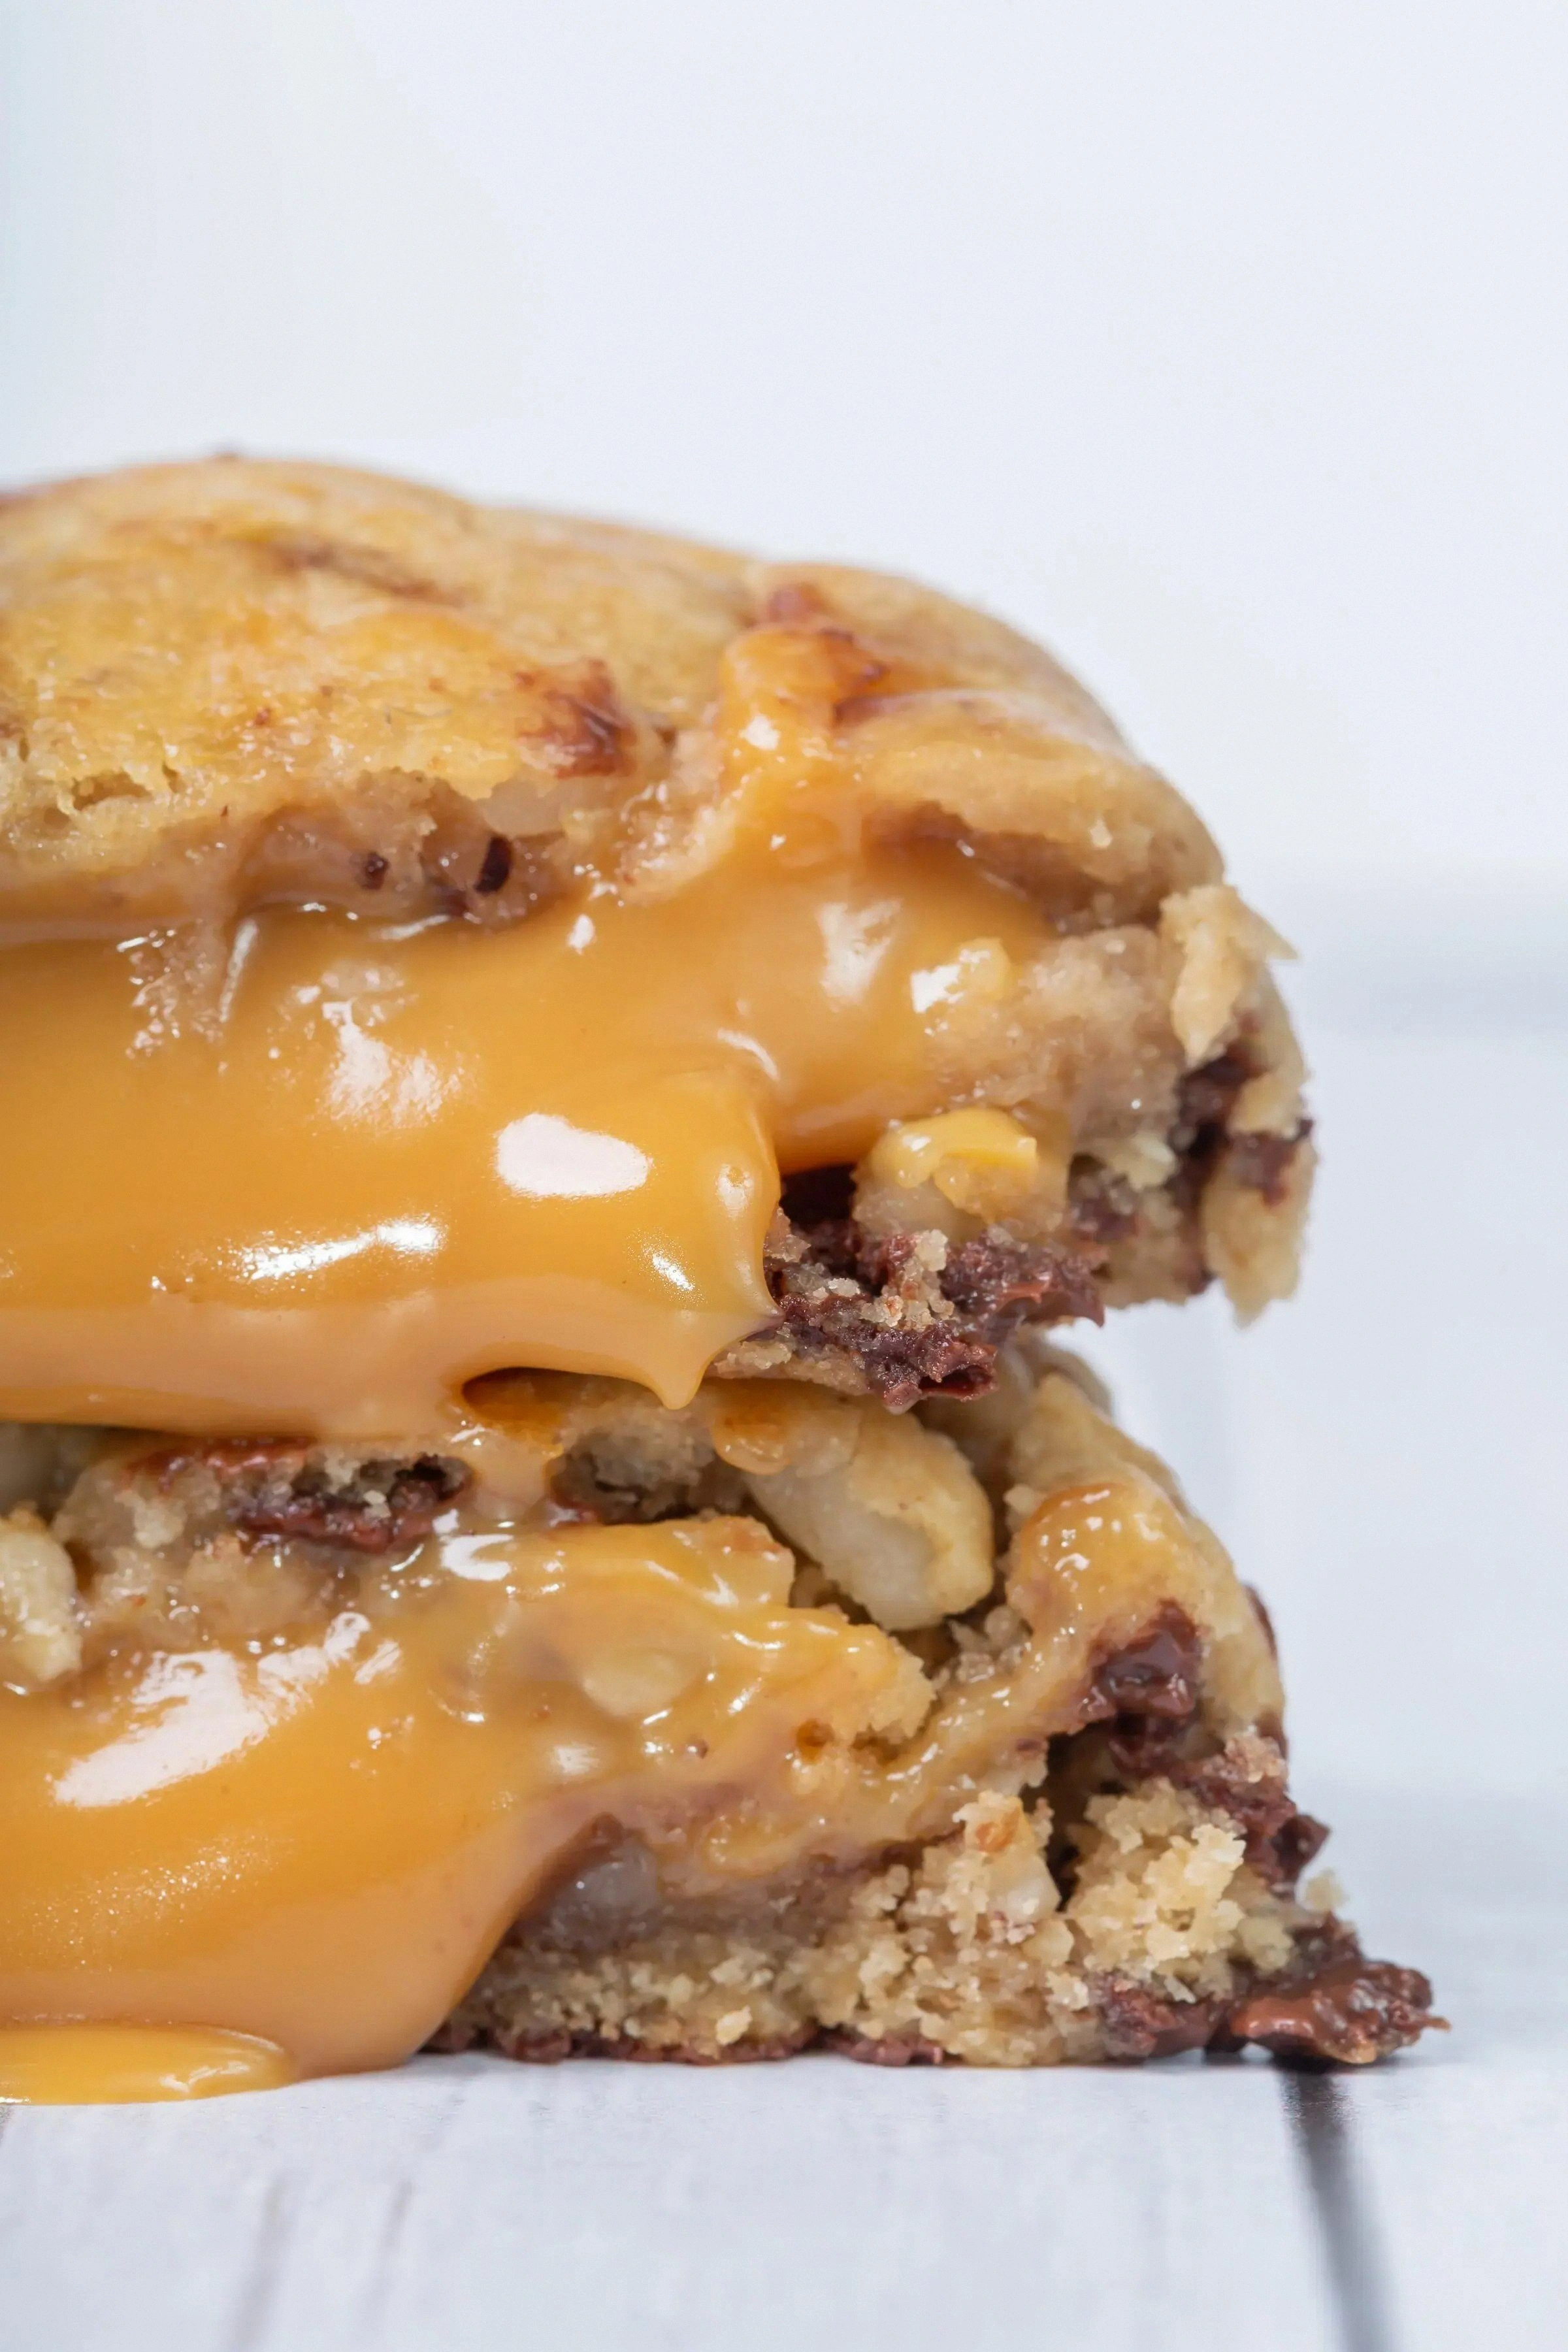
Picture this: a golden cookie that starts with a buttery, caramelized edge that cracks like a brittle shell when you bite into it, then gives way to a chewy center that oozes chocolate and caramel like molten lava. The aroma that fills the room is a heady mix of toasted sugar, vanilla, and a whisper of sea salt that makes your nose do a happy dance. The texture is a delicate balance—crisp on the outside, gooey on the inside—so when you take that first bite, it’s like a symphony of flavors and sensations playing in perfect harmony. If you’re a fan of cookies that are both indulgent and sophisticated, this is the one you need to taste.
I’ve spent months tweaking cookie recipes, but this version is hands down the best you’ll ever make at home. I dare you to taste this and not go back for seconds. The secret? A splash of sea salt that turns a simple cookie into a gourmet treat, and the clever timing of when you fold in the caramel pieces. The result is a cookie that’s chewy, buttery, and packed with chocolate chips that melt into a glossy, caramelized coating.
If you’ve ever struggled with cookies that come out too soft or too hard, you’re not alone—and I’ve got the fix. Picture yourself pulling this batch from the oven, the whole kitchen smelling incredible, and your friends asking for the recipe. Let me walk you through every single step — by the end, you’ll wonder how you ever made it any other way.
What Makes This Version Stand Out
- Taste: The marriage of salted caramel and chocolate chips creates a flavor profile that is both sweet and savory, with a lingering buttery finish that keeps you coming back for more.
- Texture: The cookies are crisp on the edges but remain soft and chewy in the middle, thanks to the precise balance of butter and sugars.
- Simplicity: Only ten ingredients, no special equipment, and a straightforward method that even a novice can master.
- Uniqueness: The use of soft salted caramel pieces rather than a caramel sauce adds a delightful bite and visual appeal.
- Crowd Reaction: Friends and family rave about the “wow” factor; it’s the kind of cookie that becomes the talk of the party.
- Ingredient Quality: The recipe calls for premium chocolate chips and real sea salt, elevating the flavor beyond the ordinary.
- Cooking Method: The method ensures even baking, preventing the dreaded burnt edges while maintaining a soft center.
- Make‑Ahead Potential: The dough can be refrigerated or frozen for up to two weeks, making it a reliable go-to for busy days.
Alright, let's break down exactly what goes into this masterpiece...
Inside the Ingredient List
The Flavor Base
Unsalted butter is the heart of any cookie, and using it at room temperature allows it to blend seamlessly with the sugars, creating a rich, buttery foundation. Granulated sugar gives the cookie its structure and a crisp exterior, while brown sugar adds depth and a hint of molasses that caramelizes beautifully. Vanilla extract, even in small amounts, unlocks the flavors of the other ingredients, making each bite sing. Skipping any of these would leave the cookie feeling flat and lifeless.
The Texture Crew
All-purpose flour provides the gluten needed for chewiness, but too much can make the cookie tough. Baking soda and baking powder are leavening agents that lift the dough, ensuring it spreads evenly and doesn’t sink. A pinch of salt is crucial for balancing sweetness and enhancing the caramel’s flavor. If you omit the baking soda, the cookies will be dense and flat; if you skip the baking powder, they won’t rise enough and will be overly chewy.
The Unexpected Star
Soft salted caramel pieces are the secret weapon that turns ordinary cookies into a gourmet experience. They melt into a silky sauce inside the cookie, giving a burst of flavor with every bite. Store-bought caramel works fine, but homemade caramel has a richer, deeper taste. If you can’t find salted caramel, try a mix of caramel bits and a pinch of sea salt for a similar effect.
The Final Flourish
Chocolate chips are the classic cookie companion, and using a mix of dark and milk chocolate adds complexity. They melt slightly during baking, creating glossy, gooey pockets that contrast with the caramel’s smoothness. If you prefer a sweeter cookie, double the amount of milk chocolate chips; for a richer bite, add more dark chocolate. The sea salt sprinkled on top after baking adds a subtle crunch and a finishing touch of flavor.
Everything's prepped? Good. Let's get into the real action...
The Method — Step by Step
- Step 1: Preheat and Prep – Heat your oven to 350°F (175°C) and line two baking sheets with parchment paper. This ensures the cookies won’t stick and bake evenly. While the oven warms, gather all your ingredients to keep the process smooth and uninterrupted.
- Step 2: Cream Butter and Sugars – In a large bowl, beat the softened butter with granulated and brown sugars until the mixture is light and fluffy, about 3 minutes. The goal is to incorporate air, which gives the cookies a tender crumb. If the mixture looks too dense, add a splash of milk to lighten it.
- Step 3: Add Eggs and Vanilla – Crack the eggs one at a time, beating well after each addition, then stir in the vanilla extract. The eggs bind the dough, while the vanilla unlocks the flavors. Kitchen Hack: For a smoother batter, use a handheld mixer on low speed to avoid overmixing, which can make the cookies tough.
- Step 4: Combine Dry Ingredients – Whisk together flour, baking soda, baking powder, and salt in a separate bowl. This step ensures even distribution of leavening agents. Adding the dry mix slowly to the wet mixture prevents clumps and keeps the batter smooth.
- Step 5: Fold in Chocolate and Caramel – Gently fold the chocolate chips and salted caramel pieces into the dough. The caramel pieces should be soft enough to break apart slightly, creating pockets of molten flavor. Keep the mixture cold; if it starts to melt, chill it for a few minutes before proceeding.
- Step 6: Shape the Cookies – Drop rounded tablespoons of dough onto the prepared sheets, spacing them about 2 inches apart. Use the back of a spoon to flatten the tops slightly, ensuring even baking. If you’re using a cookie scoop, it keeps the sizes uniform for consistent results.
- Step 7: Bake to Perfection – Bake for 12–14 minutes, or until the edges are golden and the centers have set but still feel soft. The cookies will continue to bake on the sheet after removal, so don’t overbake. Watch Out: If the cookies sit too long in the oven, the caramel can spill out, turning them into sticky messes.
- Step 8: Cool and Season – Let the cookies cool on the sheet for 5 minutes before transferring them to a wire rack. While still warm, sprinkle a pinch of sea salt over each cookie. The salt enhances the caramel’s sweetness and gives a pleasant crunch.
- Step 9: Serve or Store – Serve the cookies warm for maximum gooeyness, or let them cool completely before storing in an airtight container. For best flavor, enjoy them within a week, or freeze for up to two months.
- Step 10: Enjoy! – Grab a glass of cold milk or a cup of coffee and savor the harmony of sweet, salty, and chocolate. The cookie should feel soft inside with a crisp edge, and the caramel should melt into a silky sauce with every bite.
That's it — you did it. But hold on, I've got a few more tricks that'll take this to another level...
Insider Tricks for Flawless Results
The Temperature Rule Nobody Follows
Many bakers bake at 375°F, but 350°F is the sweet spot for this cookie. The lower temperature allows the caramel to melt slowly, creating those coveted pockets of gooeyness. If you’re using a convection oven, reduce the temperature by 25°F to avoid overbrowning.
Why Your Nose Knows Best
The aroma of caramelizing sugar is a reliable indicator of progress. When you smell a faint, sweet, nutty scent, the cookies are ready to go. If the smell is too sweet or burnt, pull them out immediately to prevent a bitter finish.
The 5-Minute Rest That Changes Everything
After baking, let the cookies rest on the sheet for exactly five minutes. This pause allows the caramel to set without spilling, and the cookies continue to bake evenly. Skipping this step often results in uneven texture.
Use a Cookie Scoop for Uniformity
A cookie scoop guarantees that each cookie has the same size and shape, which translates to uniform baking. This reduces the risk of some cookies overcooking while others remain raw. A simple, inexpensive kitchen tool that pays dividends.
Keep the Dough Cold
If your dough gets too warm, the caramel will melt prematurely, creating sticky, uneven cookies. Chill the dough for 30 minutes before scooping if you’re in a hot kitchen. This also makes the dough easier to handle.
Seal the Edges
Before baking, press the edges of each cookie with the back of a spoon. This seals the caramel inside, preventing it from leaking out and ensuring a perfect bite every time. A quick, simple step that makes a noticeable difference.
Creative Twists and Variations
This recipe is a playground. Here are some of my favorite ways to switch things up:
Nutty Caramel Crunch
Add ½ cup chopped pecans or walnuts to the dough for a nutty crunch that pairs beautifully with the caramel. The nuts add a savory depth and a satisfying bite. Serve with a drizzle of dark chocolate for an extra indulgent touch.
Citrus Salted Caramel
Replace half of the caramel pieces with candied orange peel or zest for a bright, citrusy twist. The orange adds a fresh, zesty note that balances the richness. Sprinkle a touch of sea salt on top to keep the salty-sweet harmony.
Coffee Infusion
Stir in 1 tablespoon of instant espresso powder into the dry mix. The coffee enhances the chocolate flavor and adds a subtle bitterness that contrasts with the caramel. Perfect for coffee lovers who want a deeper flavor profile.
Chocolate-Dipped Caramel
Dip the finished cookies in melted dark chocolate and let them set on parchment. The chocolate coating adds a glossy finish and a layer of richness. A quick step that transforms the cookies into a dessert worthy of a special occasion.
Almond Butter Variation
Swap out half of the butter for almond butter. The nutty flavor complements the caramel and adds a subtle crunch. This variation also introduces a slightly different texture that some people love.
Vegan Version
Use plant-based butter, coconut sugar, and an egg replacer like flaxseed meal. Keep the chocolate chips vegan and use a vegan salted caramel. The result is a cookie that’s just as indulgent but suitable for all dietary preferences.
Storing and Bringing It Back to Life
Fridge Storage
Store cookies in an airtight container in the refrigerator for up to one week. The cool temperature preserves the caramel’s texture and keeps the cookies fresh. Let them sit at room temperature for 10 minutes before serving for optimal flavor.
Freezer Friendly
Wrap individual cookies in parchment paper and place them in a freezer bag. They’ll stay fresh for up to two months. Thaw them at room temperature for 15 minutes before reheating.
Best Reheating Method
Reheat frozen or refrigerated cookies in a 350°F oven for 5 minutes, or microwave on medium for 15 seconds. Add a tiny splash of water before reheating to steam back to perfection. The result is a cookie that feels warm and fresh with a slightly crisp edge.