I’m going to start with a confession: I once tried to make a “quick” snack for game night and ended up with a sad, soggy mess that could’ve passed for a culinary crime scene. I swear I heard the onion weeping as I tossed it into the pan, and the bacon? It turned into a limp strip that looked more like a wilted lettuce leaf than anything worth bragging about. That disaster sparked a midnight dare from my roommate—“Make something that actually *pops* in the mouth and doesn’t flop on the plate.” I accepted, and what emerged was a bite‑size masterpiece that has since become the unofficial anthem of every gathering I host.
Picture this: the kitchen filled with the sweet, caramelizing perfume of onions slowly turning golden, the smoky whisper of bacon crackling as it wraps itself around a molten cheddar core, and the faint tang of barbecue sauce dancing in the air like a mischievous firefly. The sizzling sound of the bacon hitting the hot pan is a rhythmic beat that makes you want to tap your foot—think of a drum solo that’s about to explode into flavor fireworks. When you finally pull the first bomb from the oven, the crust is a deep, caramel‑brown that glistens with a glaze, and the interior? A molten river of sharp cheddar that oozes out like a lava flow, while the beef and onion filling stays juicy and perfectly seasoned. The moment you bite, the crunch of the bacon gives way to a tender, savory center that makes your taste buds do a happy dance.
Why does this version outshine every other “onion bomb” you’ve ever Googled? Most recipes treat the onion as a mere vessel, stuffing it with a bland meat mixture and then slapping on some cheese. Here, we elevate every component: the onion is caramelized to a sweet, almost caramel‑like depth, the beef is seasoned with a secret blend of garlic and onion powders, and the bacon isn’t just a wrapper—it’s a flavor‑infused armor that stays crisp even after baking. The addition of a light milk‑enriched binder keeps the meat tender, while a splash of barbecue sauce in the mix adds a tangy glaze that caramelizes into a glossy finish. In short, this is hands down the best version you’ll ever make at home, and I dare you to taste it and not go back for seconds.
But wait—there’s a twist you won’t see coming. I’m about to reveal a tiny technique that turns an ordinary kitchen staple—whole milk—into a secret weapon that makes the meat mixture silkier than a satin sheet. It’s a subtle step, but it’s the difference between “good” and “legendary.” Okay, ready for the game‑changer? Let me walk you through every single step — by the end, you’ll wonder how you ever made it any other way.
What Makes This Version Stand Out
- Flavor Explosion: The combination of caramelized onion, smoky bacon, and sharp cheddar creates layers that hit the palate like a symphony of savory notes, each bite delivering a new surprise.
- Texture Contrast: Crispy bacon, tender meat, and a gooey cheese core provide a triple‑textured experience that keeps you chewing with excitement.
- Simplicity Meets Sophistication: Despite the complex flavor profile, the ingredient list is short and the steps are straightforward enough for a weekday dinner.
- Unique Ingredient Pairing: Using whole milk in the meat binder is an unconventional move that adds richness without extra fat.
- Crowd‑Pleaser Factor: These bombs disappear faster than free pizza at a teen party, making them perfect for potlucks, game nights, or even a fancy appetizer.
- Ingredient Quality: We rely on 93% lean ground beef and sharp cheddar to keep the flavor bold while controlling excess greasiness.
- Cooking Method: Baking instead of frying reduces mess, ensures even cooking, and locks in the juices for a perfectly moist interior.
- Make‑Ahead Potential: You can prep the bombs ahead of time, freeze them, and pop them in the oven when guests arrive—no stress, all flavor.
Inside the Ingredient List
The Flavor Base
Medium-sized yellow onions are the heart of this dish. Their natural sugars caramelize beautifully, creating a sweet backdrop that balances the smoky bacon and tangy barbecue sauce. If you skip the onions or substitute with a milder white variety, you lose that deep, almost caramel‑like sweetness that makes the bombs unforgettable. Look for onions that are firm, free of bruises, and have a dry, papery skin—this ensures they’ll hold together when hollowed out.
The Texture Crew
Lean ground beef (93% lean) provides a juicy, protein‑packed core without excess grease that could sog the onion. The breadcrumbs act as a binder, giving the meat mixture a slight crumb that keeps the bombs from falling apart. A large egg adds moisture and helps everything meld together, while whole milk softens the breadcrumbs, creating a silky texture that’s often missing in meatballs. If you’re dairy‑free, almond milk works, but the result will be a touch less rich.
The Unexpected Star
Bottled barbecue sauce is the secret sauce—literally. Sweet Baby Ray’s brings a sweet‑tangy flavor that caramelizes during baking, forming a glossy glaze that makes the bacon shine. Adding a second splash just before serving gives an extra layer of flavor that makes the palate sing. If you prefer heat, stir in a pinch of smoked paprika or a dash of hot sauce.
The Final Flourish
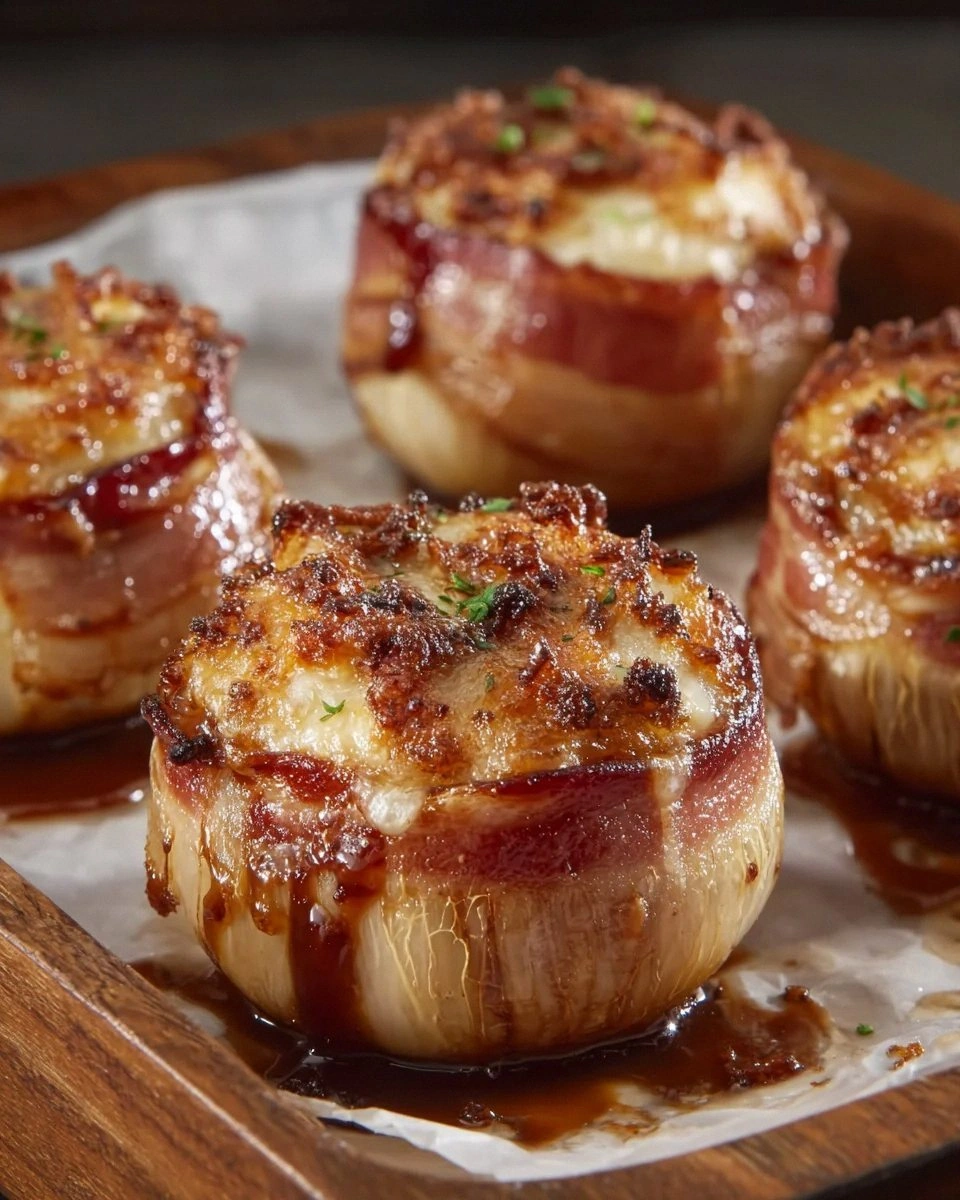
Sharp cheddar cheese cubes are the molten core that pulls the whole concept together. Their sharpness cuts through the richness of the beef and bacon, while the meltiness provides that oozy surprise in every bite. If you’re a fan of milder cheese, you could use mozzarella, but you’ll lose the bold bite that makes these bombs unforgettable. Finally, center‑cut smoked bacon wraps everything in a crisp, smoky armor that stays crunchy even after baking.
Everything's prepped? Good. Let's get into the real action…
The Method — Step by Step
Preheat your oven to 375°F (190°C) and line a baking sheet with parchment paper. While the oven warms, grab a sharp chef’s knife and slice the tops off the medium yellow onions, then carefully hollow out the centers, leaving about a ¼‑inch wall. Preserve the onion tops—they’ll become the perfect lid later. This step is crucial: a sturdy onion shell prevents leaks and gives you that beautiful “cup” shape.
Heat a large skillet over medium heat, add a drizzle of olive oil, and toss the onion flesh (the bits you removed) into the pan. Cook, stirring occasionally, until the pieces turn a deep amber and release a sweet perfume. This is the moment of truth—if you hear a faint sizzle, you’re on the right track. Watch the color, not just the time.
- Meanwhile, in a large mixing bowl, combine the lean ground beef, breadcrumbs, the large egg, and the whole milk. Add the caramelized onion bits, 1 tsp garlic powder, 1 tsp onion powder, 1 tsp salt, and ½ tsp black pepper. Mix with your hands—yes, get messy. The tactile feedback tells you when the mixture is cohesive but not over‑worked.Watch Out: If you over‑cook the onion bits, they’ll become bitter. Aim for a golden‑brown hue, not a char.
Fold in 1 cup of sharp cheddar cubes, reserving a handful for the very center of each bomb. The cheese should be evenly distributed, but keep a few cubes aside for that dramatic melt‑center surprise. I dare you to taste this and not go back for seconds; the cheese melt is addictive.
Take each hollowed onion shell and spoon the meat mixture inside, packing it gently but firmly. Place a few cheddar cubes in the very center before sealing the top with the saved onion “lid.” Press the lid down so the edges meet—this creates a sealed pocket that keeps the juices inside.
Wrap each stuffed onion with two strips of center‑cut smoked bacon, overlapping them slightly to ensure a tight seal. Secure the bacon with a toothpick if needed. The bacon not only adds flavor but also acts as a barrier that keeps the onion from drying out.
In a small bowl, mix ¼ cup barbecue sauce with 1 tbsp melted butter. Brush this glaze generously over the bacon-wrapped bombs. The butter helps the sauce caramelize, creating that glossy, restaurant‑quality finish. Place the bombs on the prepared baking sheet, spacing them evenly.
Bake for 25‑30 minutes, or until the bacon is crisp and the cheese inside is bubbling. Halfway through, rotate the sheet for even browning. When you see the edges of the onion pulling away slightly and the glaze turning a deep amber, you know it’s done. That sizzle when it hits the pan? Absolute perfection.
Remove from the oven and let the bombs rest for 5 minutes. This short rest lets the juices settle and prevents the cheese from spilling out the moment you cut into them. While they rest, drizzle a final thin layer of barbecue sauce for an extra glossy finish.
Serve hot, with extra barbecue sauce on the side for dipping. Picture yourself pulling this out of the oven, the whole kitchen smelling incredible, and your guests reaching for seconds before you even finish the first bite. And now the fun part—watch them devour every last crumb.
Insider Tricks for Flawless Results
The Temperature Rule Nobody Follows
Never bake these bombs straight from the fridge at a low temperature. Starting at 375°F ensures the bacon crisps quickly while the onion interior cooks evenly. If you lower the heat, the bacon will render too much fat before the meat sets, leading to soggy edges. I once tried a “gentle bake” at 325°F and ended up with limp, greasy bombs—lesson learned. The high heat locks in moisture and creates that coveted caramelized glaze.
Why Your Nose Knows Best
Your sense of smell is the ultimate doneness gauge. When the barbecue glaze starts to smell nutty and slightly caramelized, you’re within five minutes of perfection. Trust that nose more than the timer; ovens can vary by up to ten degrees. A friend once relied solely on the timer and ended up with burnt bacon—let’s just say the smoke alarm got a workout.
The 5‑Minute Rest That Changes Everything
Allowing the bombs to rest after baking is non‑negotiable. Those five minutes let the internal juices redistribute, preventing a cheesy waterfall when you cut into them. It also lets the onion walls firm up just enough to hold their shape on the plate. Skipping this step is a rookie mistake that turns a masterpiece into a sloppy mess.
Bacon Tightening Technique
When wrapping the bacon, overlap the strips by about a quarter inch and press them together with the back of a spoon. This creates a seal that keeps the bacon from unraveling during baking. If you find the bacon slipping, secure it with a toothpick—just remember to remove them before serving.
Cheese Placement Strategy
Reserve a handful of cheddar cubes for the very center of each bomb. This creates a molten core that bursts out when you bite, delivering a dramatic visual and flavor payoff. If you sprinkle all the cheese on top, you’ll still get melt, but you’ll miss that “cheese volcano” moment that makes guests gasp.
Creative Twists and Variations
This recipe is a playground. Here are some of my favorite ways to switch things up:
Spicy Jalapeño Bombs
Add finely diced jalapeños to the meat mixture and swap the sharp cheddar for pepper jack. The heat pairs beautifully with the sweet onion, and the pepper jack adds an extra layer of meltiness. Perfect for those who like a little fire.
BBQ Pulled Pork Fusion
Replace half of the ground beef with shredded pulled pork. The pork’s smoky sweetness melds with the barbecue glaze, creating a richer, more complex flavor profile. Great for a southern‑style twist.
Mediterranean Delight
Swap the barbecue sauce for a mixture of olive oil, lemon zest, and oregano. Use feta cheese cubes instead of cheddar, and add chopped kalamata olives to the meat. The result is a bright, tangy bomb that transports you to a Greek tavern.
Breakfast Bombs
Add a spoonful of cooked, crumbled breakfast sausage to the meat mixture and use mozzarella cheese. Serve with a drizzle of maple‑infused barbecue sauce for a sweet‑savory breakfast twist. Ideal for brunch gatherings.
Vegan Version
Replace the beef with a plant‑based mince, use oat milk instead of whole milk, and swap the cheddar for a firm vegan cheese that melts. Use tempeh bacon strips for the wrap. The flavor changes, but the concept stays deliciously the same.
Storing and Bringing It Back to Life
Fridge Storage
Place cooled bombs in an airtight container and store them in the refrigerator for up to 3 days. They’ll retain most of their texture, but the bacon may lose some crispness. Reheat in a preheated 350°F oven for 10‑12 minutes, and you’ll revive that original crunch.
Freezer Friendly
Wrap each bomb tightly in plastic wrap, then place them in a zip‑top freezer bag. They’ll keep for up to 2 months. When you’re ready to serve, bake from frozen at 375°F for 25‑30 minutes, adding an extra 5 minutes if needed. The key is to avoid thawing first; it preserves the bacon’s texture.
Best Reheating Method
For the ultimate reheating, use a hot oven rather than a microwave. Before reheating, add a tiny splash (about a teaspoon) of water to the bottom of the baking sheet and cover the bombs loosely with foil. The steam generated keeps the interior moist while the oven restores the crisp bacon exterior.