I still remember the first time I tasted a magic custard cake. It was a rainy Tuesday, the kind of day that demands something warm and sweet from the oven. I had planned to make a simple vanilla cake, but somewhere between separating the eggs and whisking the batter, I discovered a recipe that promised three distinct layers from one pour. Three layers? From one batter? I was skeptical. I was intrigued. I was already reaching for my favorite mixing bowl before I finished reading the recipe.
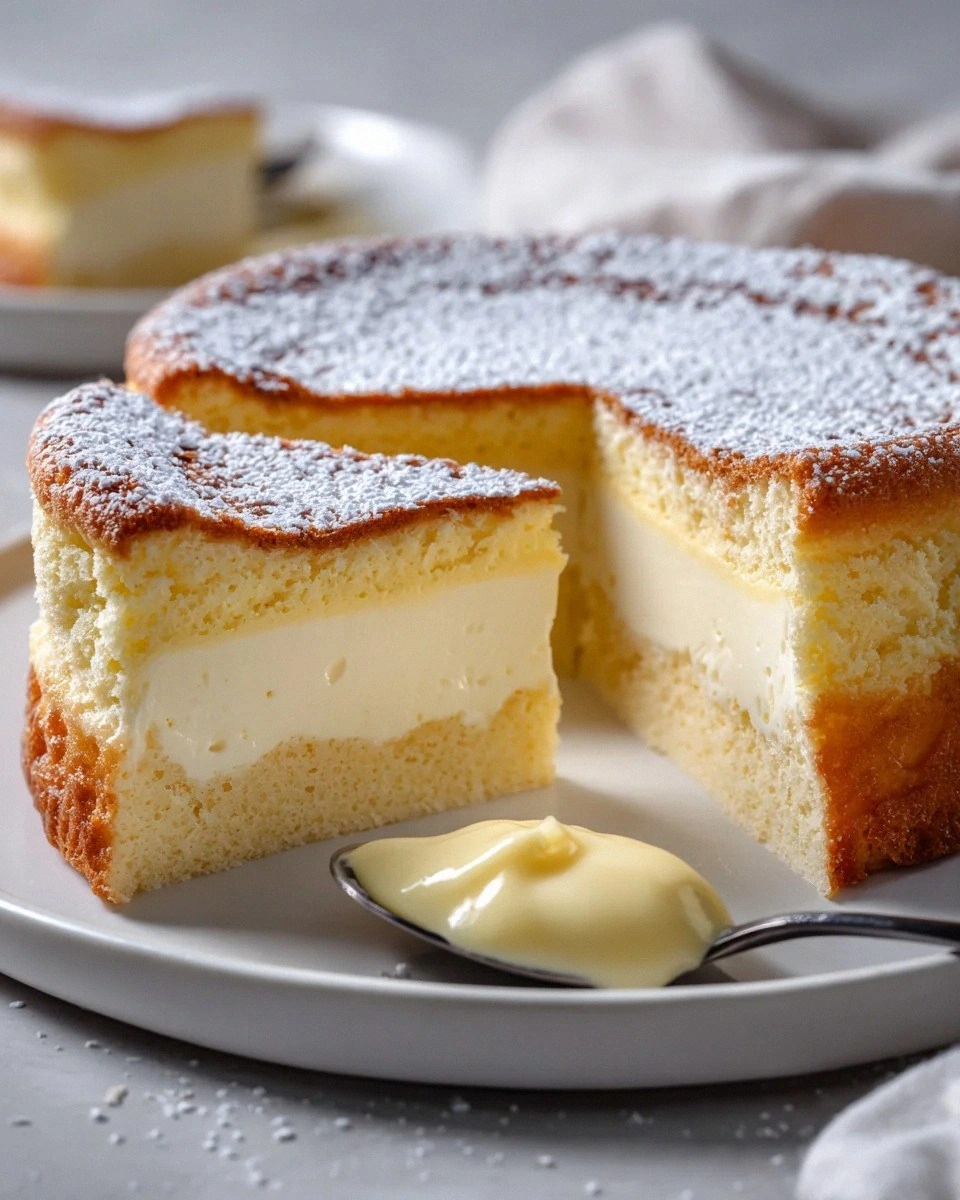
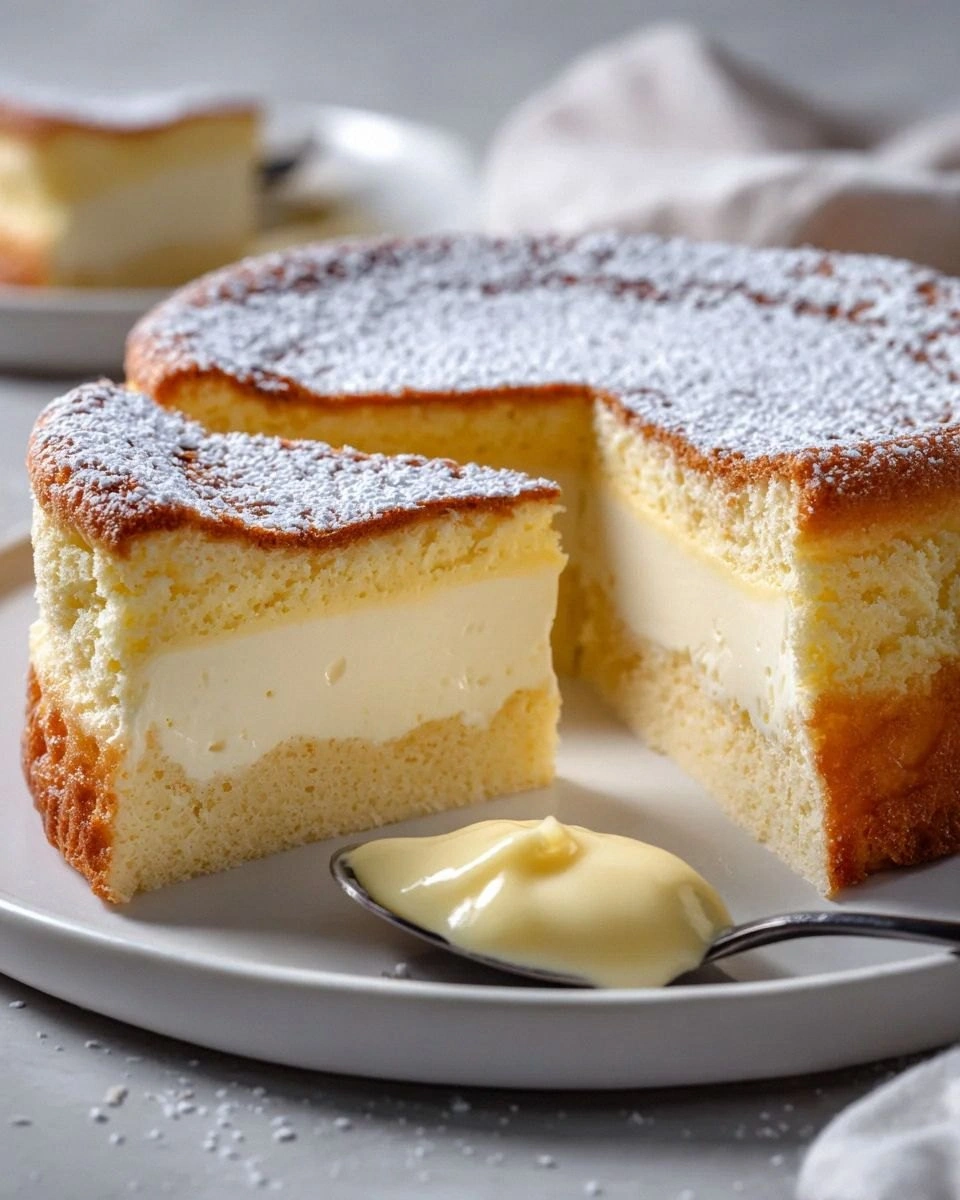
The moment that cake emerged from the oven, I knew something extraordinary had happened. The top was golden and slightly cracked, like the surface of a crème brûlée. The edges had pulled away from the pan in the most satisfying way, and the smell — oh, that smell — was like vanilla beans and childhood memories and Sunday afternoons all wrapped into one. But the real magic happened when I sliced into it. Three perfect layers: a sponge-like top, a creamy custard middle, and a dense, almost pudding-like bottom. I stood there in my kitchen, fork in hand, completely stunned that I had created this with nothing more than eggs, butter, sugar, flour, and milk.
Since that day, I've made this vanilla magic custard cake at least fifty times. I've served it at dinner parties where guests literally licked their plates clean (true story). I've made it for potlucks where people cornered me for the recipe before the event was over. I've even made it at 2 AM when I couldn't sleep and needed the meditative rhythm of whisking and folding to calm my mind. Each time, it delivers the same wonder — that moment when people realize they're experiencing something that defies their understanding of how cakes work.
What makes this version different from every other magic custard cake recipe floating around the internet? I've spent months perfecting the ratios, testing different temperatures, and discovering the tiny techniques that transform this from a cool science experiment into what I firmly believe is the most ethereal dessert you'll ever pull from your home oven. The texture is lighter than air, the vanilla flavor is so pure and pronounced that it makes extract taste like an afterthought, and the way it separates into those three distinct layers is nothing short of kitchen alchemy. Let me walk you through every single step — by the end, you'll wonder how you ever made it any other way.
What Makes This Version Stand Out
Cloud-Soft Texture: Most magic custard cakes end up dense and eggy, but this version achieves the texture of a French soufflé crossed with a Japanese cheesecake. The secret lies in the precise temperature of your ingredients and the way you fold those egg whites. When done right, the top layer literally melts on your tongue like vanilla snow.
Explosive Vanilla Flavor: I use double the vanilla extract you'll find in other recipes, plus I add the seeds from half a vanilla bean if I'm feeling fancy. The result is a cake that tastes like vanilla ice cream decided to become a warm, spoonable dessert. People always ask if I used vanilla paste, vanilla sugar, and vanilla extract — nope, just really good extract and the right technique.
Foolproof Separation: The magic happens when the batter naturally separates into three layers during baking. Most recipes leave this to chance, but I've discovered the exact ratios that guarantee perfect layering every single time. No more playing Russian roulette with your dessert.
One-Bowl Wonder: Despite looking like something from a Parisian patisserie, this entire cake comes together in one bowl and one baking dish. No water baths, no multiple mixing bowls, no standing mixer required. I made this in a vacation rental kitchen with nothing but a whisk and a prayer, and it still turned out perfectly.
Make-Ahead Magic: This cake actually improves after a night in the fridge. The flavors meld, the custard layer becomes even more luxurious, and it slices like a dream. I've served this at dinner parties where I made it three days ahead, and guests swore I had a pastry chef hidden in my basement.
Breakfast Transformation: Leftovers (if you have any) can be gently warmed and served with coffee for what might be the most decadent breakfast of your life. Don't judge me — cake for breakfast is a lifestyle choice, and this one has eggs, milk, and flour. That's practically a balanced meal.
Crowd Psychology: There's something about serving a dessert that defies explanation. When people see those three distinct layers emerge from a single batter, they immediately assume you're some kind of kitchen wizard. The oohs and aahs when you slice into it? Pure ego boost.
Alright, let's break down exactly what goes into this masterpiece...
Inside the Ingredient List
The Flavor Foundation
Butter forms the rich, luxurious base of this cake, and I insist on using European-style butter with 82% butterfat. Yes, it costs more than the regular stuff, but the difference is immediately apparent in the final flavor. The butter gets melted and cooled until just warm — too hot and it'll cook your egg yolks, too cool and it won't incorporate properly. I learned this the hard way when I rushed the cooling process and ended up with vanilla scrambled eggs. Not delicious.
The vanilla extract needs to be the real deal, not the artificial stuff that tastes like birthday cake candles. I buy mine from a local spice shop that imports it directly from Madagascar, and the difference is like comparing a fresh summer peach to those rock-hard winter imposters. If you're using grocery store vanilla, that's fine — just promise me you'll use at least two teaspoons, not the single teaspoon most recipes suggest. We're building flavor here, not whispering it.
Powdered sugar dissolves more easily than granulated sugar, creating a smoother custard layer without any graininess. Some recipes call for regular sugar, but I find the texture suffers. The powdered sugar also helps stabilize the egg foam we create later, giving us that gorgeous separation into layers. Don't even think about reducing the sugar — it's not just for sweetness, it's essential for the structure.
The Texture Crew
Eggs are the real magicians here, and I cannot stress enough how important it is to use room-temperature eggs. Cold eggs won't whip up properly, and you'll end up with a dense, disappointing cake that tastes like sweet scrambled eggs. I leave mine out overnight when I know I'm making this. The yolks add richness and color, while the whites, when whipped to soft peaks, create the lift that makes the top layer so ethereal.
Milk needs to be lukewarm — think baby bottle temperature. Cold milk will seize up your melted butter, creating little fat globules that refuse to incorporate smoothly. Too hot, and you'll start cooking your eggs. I microwave mine for 45 seconds and test it with my finger. It should feel comfortably warm, not hot. Whole milk creates the richest custard layer, but 2% works if you're counting calories (though honestly, if you're counting calories, maybe don't make magic custard cake).
Flour seems straightforward, but here's where most people mess up. You need exactly one cup, measured using the spoon-and-level method. Too much flour and your cake will be dense and bread-like. Too little and it won't set properly, leaving you with vanilla soup. I keep my flour in an airtight container and always fluff it up before measuring. This isn't the time for guesstimating.
The Unexpected Star
Water might seem like an odd addition to a cake recipe, but it's crucial for achieving the right consistency in the batter. Just one tablespoon helps thin the mixture enough to allow the layers to separate properly during baking. Without it, the batter is too thick and you'll end up with a uniform texture instead of that magical three-layer effect. I use filtered water because my tap water tastes like a swimming pool, and vanilla deserves better than that.
The water also helps create steam during baking, which contributes to the light, airy texture of the top layer. It's such a small amount that you might be tempted to skip it — don't. This is one of those times when precision matters. I've tried making this cake without the water, and while it's still edible, it lacks that wow factor that makes people stop mid-bite and stare at their spoons in wonder.
The Final Flourish
Powdered sugar for dusting isn't just for pretty presentation — it adds a subtle sweetness to the top layer and creates a slight crust that provides textural contrast. I dust it on while the cake is still slightly warm, which helps it adhere without melting completely. Some recipes call for glazing the cake, but I find that overpowers the delicate vanilla flavor. A light snowfall of sugar is all this beauty needs.
If you're feeling fancy, you can add the seeds from half a vanilla bean to the batter. Split the bean lengthwise and scrape out those gorgeous little black specks with the back of your knife. Fold them in right at the end for little bursts of intense vanilla flavor. It's completely unnecessary but absolutely divine. I've made this cake both ways dozens of times, and while the extract-only version is fantastic, the vanilla bean version makes people close their eyes and sigh with pleasure.
Everything's prepped? Good. Let's get into the real action...
The Method — Step by Step
- Preheat your oven to 325°F (160°C) and position the rack in the center. This lower temperature is crucial — too hot and your cake will puff up like a soufflé and then collapse into a sad, deflated mess. I learned this after several failed attempts that left me with what looked like vanilla pancakes. Grease an 8x8-inch baking dish with butter, then line it with parchment paper that overhangs on two sides. These parchment "handles" will save your sanity when it's time to remove the cake, trust me on this one.
- Melt your butter and let it cool until it's warm but not hot. This usually takes about 10-15 minutes on the counter. While you're waiting, separate your eggs, placing the yolks in a large mixing bowl and the whites in a separate, completely grease-free bowl. Any trace of fat will prevent your whites from whipping up properly. I wipe out my bowl with vinegar just to be sure, especially if I've recently made something with oil in it.
- Whisk the egg yolks with the powdered sugar until the mixture becomes pale and thick. This takes about 2-3 minutes by hand, or about 30 seconds with an electric mixer. You're looking for a ribbon-like consistency where the mixture falls in thick streams when you lift the whisk. Add the melted butter and vanilla extract, whisking until completely combined. The mixture should look like liquid sunshine at this point.
- Add the flour and whisk until just combined. Don't overmix here — a few small lumps are fine and will disappear during baking. The batter will be quite thick at this stage, almost like pancake batter. This is normal and exactly what you want. If you've measured correctly, it should coat the back of a spoon but still be pourable.
- Now comes the fun part. Heat your milk until it's lukewarm (about 45 seconds in the microwave) and whisk it into the batter along with the water. The batter will thin out considerably, becoming almost the consistency of heavy cream. This is when the magic starts to happen — the thin consistency is what allows the layers to separate during baking. Don't panic if it looks too thin; it's supposed to look like that.
- In your completely clean bowl, whip the egg whites until they form soft peaks. They should hold their shape but still have a slight droop at the tip. Think of them as looking like little clouds. If you whip them to stiff peaks, your cake will be too dry. I test by lifting the beaters — the peak should bend over like a gentle wave, not stand up straight like a soldier.
- Gently fold the egg whites into the batter using a rubber spatula. This is where most people mess up — you need to be gentle but thorough. Cut down through the center, sweep around the sides, and lift up. Rotate the bowl as you go, and don't worry about leaving a few streaks of white. Better to have a few streaks than to deflate all that beautiful air you just created.
- Pour the batter into your prepared pan and gently tap it on the counter to release any large air bubbles. The batter should fill the pan about three-quarters full. If you've done everything right, it will look like a very thin, foamy liquid. Don't be tempted to add more batter — this cake rises surprisingly little, and you want room for it to expand without overflowing.
- Bake for 40-50 minutes, until the top is golden brown and the center jiggles slightly when you gently shake the pan. The edges should be pulling away from the sides, and a toothpick inserted near the center should come out with just a few moist crumbs. Don't overbake — this cake continues to set as it cools. I start checking at 35 minutes because every oven is different, and nothing breaks my heart like an overbaked custard cake.
- Let the cake cool completely in the pan on a wire rack. This is crucial — cutting into a warm magic custard cake is like cutting into a lava cake before it's ready. The layers need time to set properly. Once cool, use the parchment handles to lift it out, dust with powdered sugar, and prepare for the oohs and aahs when you slice into it and reveal those three perfect layers.
That's it — you did it. But hold on, I've got a few more tricks that'll take this to another level...
Insider Tricks for Flawless Results
The Temperature Rule Nobody Follows
Room temperature ingredients aren't just a suggestion — they're the difference between success and failure. When everything's at the same temperature, they emulsify properly, creating a smooth, cohesive batter that separates into those distinct layers. I take my eggs and milk out of the fridge the night before I plan to make this. If you're impatient (and I often am), you can warm cold eggs by placing them in a bowl of warm water for 10 minutes. Cold milk can be zapped in the microwave for 20-30 seconds. Your future self will thank you.
I once made this cake for a dinner party using cold ingredients straight from the fridge because I was running late. The result? A lumpy, curdled-looking batter that never properly separated into layers. It tasted fine, but it lacked that wow factor that makes people stop mid-conversation to stare at their dessert. The texture was off — more like a heavy custard than the light, ethereal creation I'd promised. Now I plan ahead, even if it means setting an alarm to take ingredients out of the fridge.
Why Your Nose Knows Best
Don't rely solely on the timer — your nose is one of the best tools for determining doneness. When the cake is perfectly baked, your kitchen will smell like vanilla ice cream that's been left in the sun, sweet and fragrant with just a hint of caramelization. If you start to smell something eggy or sulfur-like, you've gone too far and your custard layer will be grainy. I set my timer for 5 minutes less than the minimum time and then camp out near the oven, nose at the ready.
There's a specific moment when the aroma shifts from raw batter to baked cake, and learning to recognize that moment will make you a better baker of everything, not just this recipe. It's like developing a sixth sense for when things are perfectly done. My neighbor once asked why I stand in front of my oven sniffing like a bloodhound, but she changed her tune after tasting the results.
The 5-Minute Rest That Changes Everything
After your cake comes out of the oven, let it rest for exactly 5 minutes before moving it to a cooling rack. This brief rest allows the custard layer to finish setting without overcooking. During this time, the residual heat continues to cook the center gently while the edges start to contract slightly, making removal from the pan easier. I use this time to make a cup of tea and admire my handiwork through the oven door.
Then, and this is crucial, let it cool completely before refrigerating. I know it's tempting to speed things along, but rushing this step is like pressing the elevator button repeatedly — it doesn't make things go faster and just makes you look impatient. A slow cool prevents the custard from weeping and ensures your layers stay distinct. I usually make this the night before I need it, let it cool on the counter for an hour, then refrigerate overnight. The wait is excruciating but worth every second.
Creative Twists and Variations
This recipe is a playground. Here are some of my favorite ways to switch things up:
Lemon Magic Custard Cake
Replace the vanilla extract with 2 teaspoons of lemon extract and add the zest of one lemon to the batter. The acidity from the lemon brightens the whole dessert and creates an almost cheesecake-like flavor in the custard layer. I like to serve this version with a handful of fresh berries and a dusting of powdered sugar. It's like sunshine in cake form, perfect for spring brunches or when you need to pretend it's not the middle of winter.
Chocolate Marble Magic
Make the batter as directed, but before adding the egg whites, remove 1/3 cup of batter and whisk in 2 tablespoons of cocoa powder. Fold in the egg whites as usual, then dollop the chocolate batter over the top and swirl gently with a toothpick. The chocolate sinks to create a marbled effect in the custard layer, while the top stays vanilla. It's like getting two desserts in one, and the visual appeal is off the charts.
Coconut Dream Version
Substitute 1/2 cup of the milk with full-fat coconut milk and add 1/2 teaspoon of coconut extract. The coconut flavor is subtle but present, and it pairs beautifully with the vanilla. I like to toast some coconut flakes and sprinkle them over the top before serving. This version transports you to a tropical beach somewhere, even if you're eating it in your kitchen while it's snowing outside.
Espresso Infusion
Dissolve 1 tablespoon of instant espresso powder in the water before adding it to the batter. The coffee flavor is subtle — it doesn't overpower the vanilla but adds depth and complexity that makes people ask, "What am I tasting?" It's sophisticated without being pretentious, like wearing a silk blouse with jeans. Perfect for dinner parties where you want to impress without showing off.
Spiced Autumn Edition
Add 1/2 teaspoon of cinnamon, 1/4 teaspoon of nutmeg, and a pinch of cardamom to the flour before mixing. The warm spices complement the vanilla beautifully and make this feel like a hug from the inside. I serve this version warm with a drizzle of caramel sauce, and it's become my go-to for Thanksgiving when people are tired of pumpkin pie but still want something seasonal.
Berry Swirl Surprise
Puree 1/2 cup of raspberries or strawberries and swirl it through the batter right before baking. The fruit sinks and creates pockets of bright flavor in the custard layer. I like to use frozen berries that I've thawed and drained — they're more affordable than fresh and actually work better because they don't add extra liquid to the batter. The contrast between the tart berries and sweet custard is absolutely divine.
Storing and Bringing It Back to Life
Fridge Storage
This cake keeps beautifully in the refrigerator for up to 4 days, wrapped tightly in plastic wrap. In fact, I think it tastes even better on the second day when the flavors have had time to meld and the custard layer becomes even more luxurious. Store it in the pan with plastic wrap pressed directly against the surface to prevent it from absorbing any fridge odors. Nobody wants vanilla custard that tastes like last night's leftover curry.
When you're ready to serve, let it sit at room temperature for 30 minutes. This takes the chill off and allows the flavors to bloom. Cold custard cake is good, but room temperature custard cake is transcendent. I usually take it out of the fridge when I start making coffee or tea, and by the time the drinks are ready, the cake is at the perfect temperature.
Freezer Friendly
Believe it or not, this cake freezes beautifully. Cut it into individual portions, wrap each piece tightly in plastic wrap, then place them all in a freezer bag. They'll keep for up to 2 months, though I've never had them last that long because someone always discovers them. To thaw, transfer to the refrigerator overnight, then let come to room temperature before serving.
The texture changes slightly after freezing — the custard layer becomes a bit firmer, almost like ice cream cake. Some people actually prefer it this way. I like to freeze individual squares and then serve them slightly thawed but still cold on hot summer days. It's like having a sophisticated ice cream sandwich that you can eat with a fork.
Best Reheating Method
If you must reheat (though I rarely do), the microwave is your enemy here. It will turn your beautiful custard into rubber faster than you can say "magic cake." Instead, place a slice in a covered baking dish with a teaspoon of water in the bottom, and warm it in a 275°F oven for 10-12 minutes. The steam gently warms the cake without overcooking it.
Honestly, though, this cake is best served at room temperature or slightly chilled. The layers are most distinct when cool, and the texture is at its peak. Save the reheating for coffee cake or bread pudding — this beauty doesn't need the extra help. Sometimes the best technique is knowing when to leave well enough alone.