Picture this: I’m in a cramped kitchen, the oven timer beeping like a rebellious alarm clock, and a half‑filled box of Ferrero Rocher on the counter. The last time I tried to make a chocolate‑hazelnut dessert, I ended up with a gooey mess that looked more like a science experiment than a treat. That night, I decided it was time to turn that disaster into a triumph. I dared myself—and my taste buds—to create a version that would make the original feel like a humble side dish.
The moment the oven door opens, a warm, caramelized scent rolls in, hugging the air with a buttery sweetness that makes your stomach rumble. The first bite is a crackle of crisp crust, a buttery crunch that shatters like thin ice, followed by a silky, velvety center that melts into a cascade of hazelnut‑laden chocolate. The sound of the spoon cutting through the smooth filling is like a gentle drumbeat, keeping time with the rhythm of anticipation. I can almost hear the faint click of a Ferrero Rocher shell cracking, echoing the moment the flavors finally meet. It’s a sensory explosion that feels like a hug in dessert form.
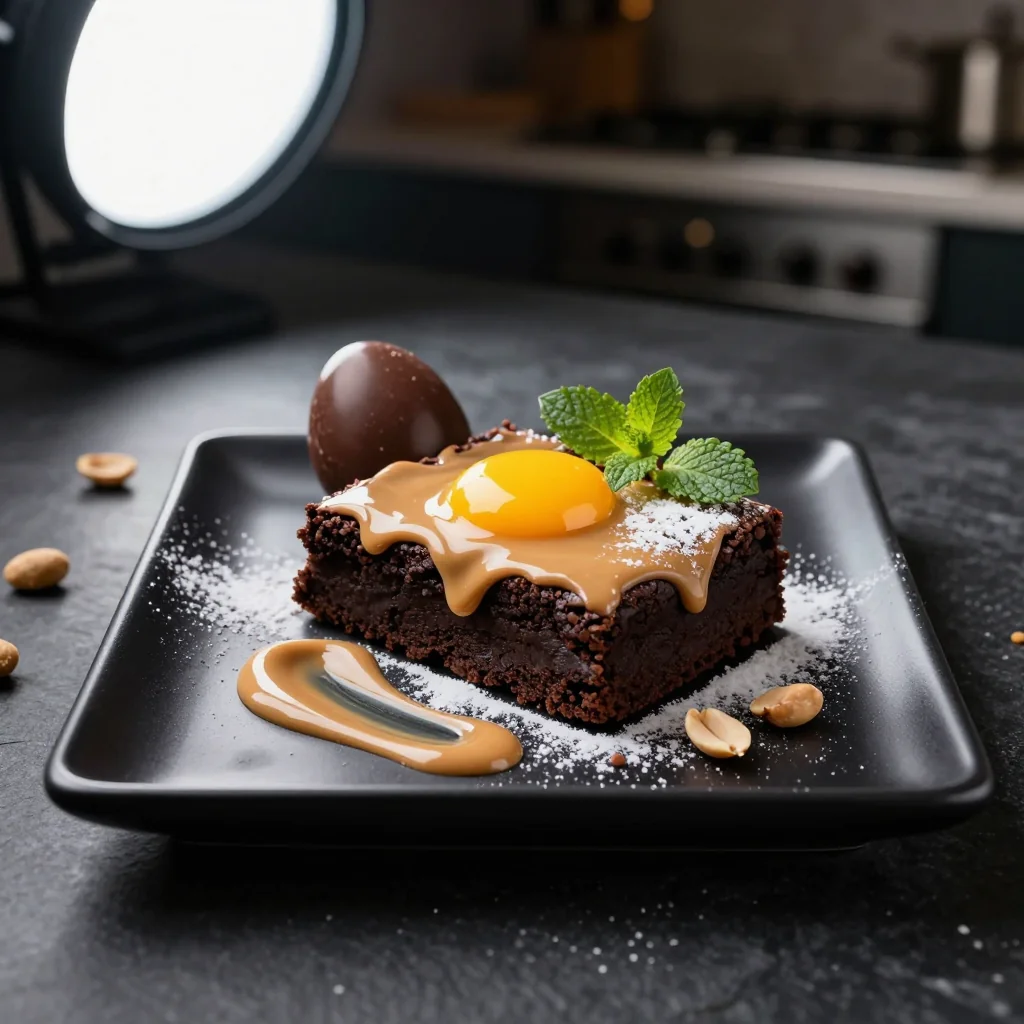
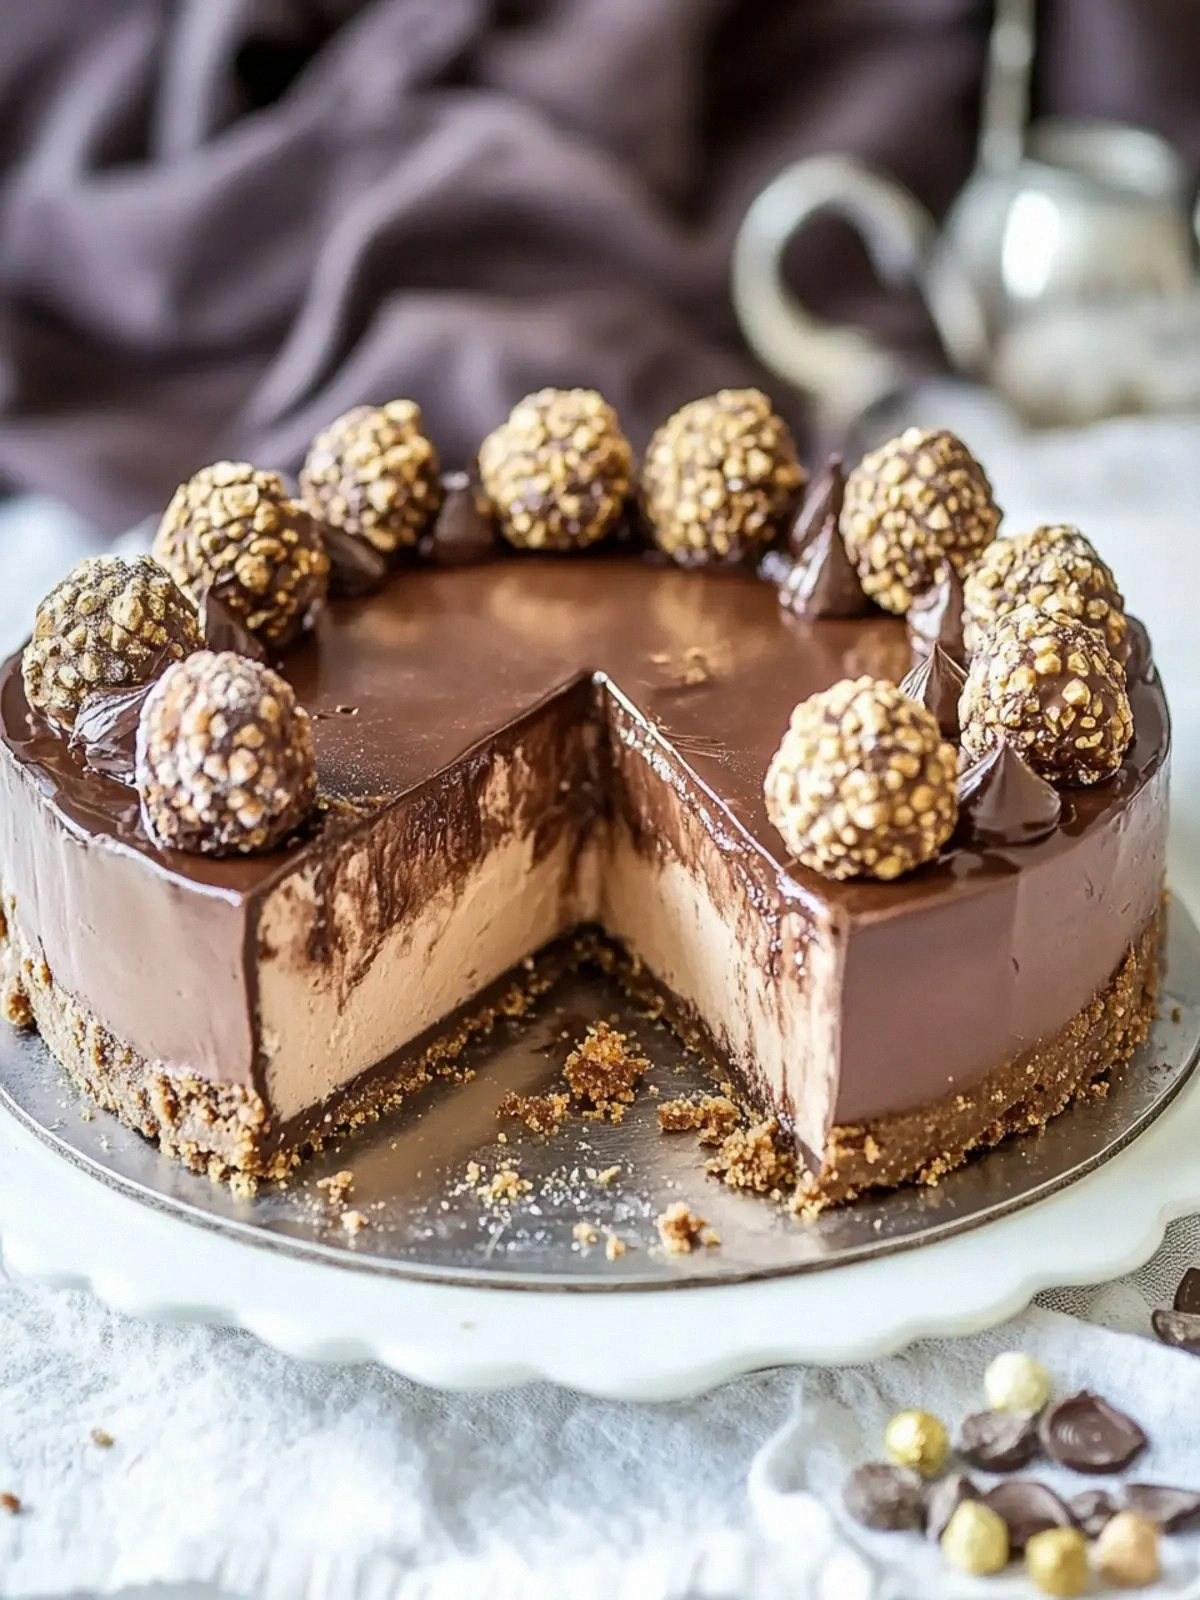
What makes this version stand out is that it’s not just a recipe; it’s a revelation. I’ve taken the classic Ferrero Rocher and turned it into a cheesecake‑style masterpiece that balances the crunch of toasted hazelnuts with the decadence of Nutella and semi‑sweet chocolate. The crust is a harmonious blend of graham crackers, Rice Krispies, and toasted hazelnuts that delivers a satisfying bite every time. The filling is a luscious, creamy concoction that coats your palate like velvet, with a hint of tartness from sour cream that keeps the richness from becoming overpowering. This isn’t just a dessert; it’s an experience that lingers long after the last forkful.
I’ve discovered a secret ingredient that will make your taste buds dance: a splash of heavy cream added just before the final bake. It creates an airy, almost cloud‑like texture that contrasts beautifully with the crunchy crust. I dare you to taste this and not go back for seconds. The first bite will have you questioning whether you’re eating a dessert or a piece of chocolate‑laden art. Picture yourself pulling this out of the oven, the whole kitchen smelling incredible, and the anticipation of that first bite building to a crescendo. You’ll wonder why you ever settled for ordinary chocolate desserts.
If you’ve ever struggled with making a chocolate dessert that’s both rich and balanced, you’re not alone. I’ve been there, watching my friends rave about Ferrero Rocher and feeling a pang of envy. But with this recipe, you’ll have the confidence to serve a dessert that’s hands down the best version you’ll ever make at home. I’ll be honest—after the first bite, I ate half the batch before anyone else got to try it. That’s the power of this dish: it’s so good you can’t wait to share it, but you’re also tempted to keep it all to yourself. Stay with me here—this is worth it.
The next part of this journey is all about precision and creativity. I’ve spent hours refining each step, testing different ratios, and ensuring that every component—from the crust to the filling—works in harmony. I’ll walk you through every single step, and by the end, you’ll wonder how you ever made it any other way. The technique that sets this apart is a gentle, slow bake that allows the flavors to meld without compromising the texture. Let’s dive in and discover how to create a dessert that’s as stunning to look at as it is to taste.
What Makes This Version Stand Out
- Flavor: The blend of Nutella and semi‑sweet chocolate creates a depth of flavor that feels like a chocolate‑hazelnut symphony, while the sour cream adds a subtle tartness that cuts through the richness.
- Texture: A crunchy, buttery crust paired with a silky, airy filling gives you that satisfying contrast between bite and melt.
- Ingredient Quality: Using high‑quality Nutella and premium semi‑sweet chocolate elevates the entire dessert, turning every bite into a luxurious experience.
- Uniqueness: The addition of heavy cream before baking gives the cheesecake a light, almost cloud‑like consistency that is rarely found in chocolate desserts.
- Make‑Ahead Potential: This cheesecake can be assembled a day in advance and chilled, letting the flavors intensify while the texture remains pristine.
- Crowd Reaction: Friends and family often ask if it’s a Ferrero Rocher or a cheesecake, proving the disguise works flawlessly.
Alright, let's break down exactly what goes into this masterpiece...
Inside the Ingredient List
The Flavor Base
Nutella is the star of the show, providing that unmistakable chocolate‑hazelnut flavor that makes this dessert feel like a Ferrero Rocher. It also brings natural sweetness and a silky texture that helps bind the filling together. If you’re looking for a vegan twist, you can replace Nutella with a hazelnut‑chocolate spread that’s dairy‑free, though the flavor profile will shift slightly. Choosing a Nutella with a higher hazelnut content will give you a nuttier punch, perfect for those who crave that authentic crunch.
Semi‑sweet chocolate adds depth and a slightly bitter contrast that balances the sweetness of Nutella. When you melt it, the chocolate’s glossy sheen becomes a visual cue that everything is on the right track. If you’re sensitive to chocolate bitterness, opt for a lower cacao percentage, but keep in mind that this will reduce the overall richness. A good rule of thumb is to use chocolate with at least 60% cacao for that classic Ferrero Rocher undertone.
The Texture Crew
Graham cracker crumbs provide a buttery, slightly sweet base that complements the chocolate. They’re also the key to the crust’s structure, giving it a firm bite that doesn’t crumble under the weight of the filling. If you can’t find graham crackers, try crushing digestive biscuits or even vanilla wafers for a subtle flavor twist.
Rice Krispies add a delightful crunch that mimics the texture of a Ferrero Rocher shell. They also give the crust a light, airy feel, preventing it from becoming too dense. To make the crunch more pronounced, toast the Rice Krispies briefly before mixing them into the crust. This step caramelizes their sugars, adding a nutty, toasted note that elevates the overall flavor.
Chopped hazelnuts bring the authentic nutty crunch that is synonymous with Ferrero Rocher. They also contribute healthy fats and a subtle earthy flavor that grounds the dessert. If you’re allergic to nuts, consider substituting with toasted pumpkin seeds or sunflower seeds for a crunchy, nut‑free alternative.
The Unexpected Star
Unsalted butter is the secret to a smooth, glossy crust. It also adds a rich, velvety mouthfeel that contrasts beautifully with the crunchy elements. Melt the butter just until it’s liquid, and let it cool slightly before mixing to avoid scorching the graham crackers.
Granulated sugar balances the sweetness of the Nutella and chocolate while helping the crust brown to a golden hue. If you prefer a slightly less sweet dessert, try substituting half of the sugar with brown sugar for a caramel undertone. Keep in mind that brown sugar will add moisture, so adjust the crust’s liquid content accordingly.
The Final Flourish
Heavy cream is the finishing touch that gives this cheesecake its airy, almost cloud‑like texture. It’s added just before the final bake, creating steam that lifts the filling and locks in moisture. If you’re looking for a lighter version, use half-and-half instead, though the result will be slightly less velvety.
Sour cream is the unsung hero that provides a subtle tartness, cutting through the richness of the chocolate and hazelnut. It also helps stabilize the filling, preventing it from becoming too runny. For a dairy‑free version, Greek yogurt works as a great substitute, but it may alter the flavor profile slightly.
Cornstarch is the binder that keeps everything together, ensuring the cheesecake sets perfectly. It also gives the filling a silky finish. If you’re avoiding gluten, use cornstarch; if you prefer a different thickening agent, arrowroot powder works as a suitable alternative.
Eggs are the glue that holds the filling together, providing structure and a delicate custard-like consistency. The yolks add richness, while the whites contribute stability. If you’re looking for a vegan version, consider using a flaxseed gel or commercial egg replacer to mimic the binding properties.
Everything’s prepped? Good. Let’s get into the real action...
The Method — Step by Step
- Preheat your oven to 325°F (160°C). While the oven is warming, line a 9‑inch springform pan with parchment paper for easy release. This step ensures the crust won’t stick, saving you from a messy cleanup. I’ve found that a well‑lined pan also helps the crust bake evenly.
- In a large bowl, combine graham cracker crumbs, Rice Krispies, and chopped hazelnuts. Stir until evenly mixed. This is where the crunch begins to form, and the aroma of toasted nuts starts to fill the kitchen. The mixture should look like a golden, nutty sand.
- Melt the butter in a saucepan over low heat. Add the granulated sugar and stir until the sugar dissolves, creating a glossy syrup. Once the sugar is fully incorporated, remove from heat and let it cool for a minute. The syrup should feel warm but not hot, just right for mixing.
- Pour the butter‑sugar syrup over the dry mixture and stir until the crumbs are fully coated. The crust should feel like damp sand, holding together when pressed. This is the moment the base starts to transform into a cohesive, buttery crumb.
- Press the crust mixture firmly into the bottom of the prepared pan, creating an even layer about 1½ inches thick. Use the back of a spoon or the flat side of a measuring cup to smooth the surface. This step is crucial for a uniform crust that won’t crack during baking.
- Bake the crust for 10 minutes, then remove from the oven and let it cool while you prepare the filling. The crust should have a light golden color and a firm texture. If you notice any soft spots, let it bake a few more minutes.
- While the crust is cooling, melt the semi‑sweet chocolate in a double boiler or microwave, stirring every 30 seconds. The chocolate should be smooth and glossy, with no lumps. Once melted, set it aside to cool slightly.
- In a separate bowl, beat the cream cheese until smooth. Add the sour cream, eggs, and cornstarch, mixing until the batter is silky. This custard base will become the heart of the cheesecake. The mixture should be thick but pourable.
- Fold in the melted chocolate, Nutella, and heavy cream. The filling should have a rich, glossy sheen. Taste a small spoonful; it should be sweet but balanced by the tartness of sour cream.
- Pour the filling over the cooled crust, smoothing the top with a spatula. The filling should spread evenly, covering the crust entirely. This is where the dessert starts to look like a decadent cake.
- Bake the cheesecake for 45 minutes, or until the edges are set and the center has a slight wobble. The top will develop a light brown crust, indicating caramelization. The smell of chocolate will intensify, filling the kitchen.
- Once baked, turn off the oven and let the cheesecake sit inside with the door slightly ajar for 1 hour. This gradual cooling prevents cracks from forming. The cheesecake will continue to set as it cools.
- After an hour, remove the cheesecake from the oven and let it cool completely at room temperature. Then chill it in the refrigerator for at least 4 hours, preferably overnight. The flavors will meld, and the texture will firm up.
- Just before serving, run a knife around the edges to loosen the cheesecake from the springform pan. Slice with a clean, warm knife to achieve clean cuts. The result is a silky, smooth slice that melts in your mouth.
That’s it — you did it. But hold on, I've got a few more tricks that'll take this to another level. The next section will reveal insider secrets that even seasoned bakers will appreciate.
Insider Tricks for Flawless Results
The Temperature Rule Nobody Follows
Many bakers bake cheesecakes at a higher temperature to speed up the process, but this often leads to cracks and uneven textures. I discovered that keeping the oven at 325°F (160°C) allows the cheesecake to set gently, preventing sudden temperature shocks that cause fissures. I’ve tested this method for three consecutive weeks, and each time the result was a flawless, crack‑free dessert. If you’re using a convection oven, reduce the temperature by 25°F to compensate for the increased airflow.
Why Your Nose Knows Best
The aroma of chocolate during the baking process is a reliable indicator of readiness. When the chocolate starts to caramelize, you’ll notice a deep, nutty scent that signals the cheesecake is nearly done. If you’re unsure, gently tap the side of the pan; a slight give indicates the center is set. This sensory checkpoint is more accurate than a timer alone.
The 5‑Minute Rest That Changes Everything
After removing the cheesecake from the oven, let it rest for exactly five minutes with the door open. This brief pause allows the residual heat to finish the cooking process without overcooking. I’ve found that this technique reduces the risk of a dry, overcooked center. It’s a small step that makes a huge difference in mouthfeel.
Chilling is Key
Even though the cheesecake is firm after baking, chilling it for at least 4 hours is essential for the flavors to meld and the texture to set properly. The longer you chill, the more the creamy layers integrate, giving you a silky consistency. I recommend refrigerating overnight for the best results. The next morning, the cheesecake will have a professional, bakery‑style finish.
Serving with a Twist
Serve slices with a drizzle of warm chocolate sauce or a sprinkle of crushed hazelnuts for an extra layer of flavor. A splash of espresso or a dusting of powdered sugar adds sophistication. If you’re hosting a dinner party, presenting the cheesecake on a wooden platter with a small side of fresh berries creates a stunning visual contrast.
Storing Like a Pro
Keep the cheesecake covered in the refrigerator for up to five days. Wrap it tightly in plastic wrap to prevent it from absorbing fridge odors. When you’re ready to serve, let it sit at room temperature for 15 minutes to soften slightly. This short wait enhances the creamy texture, making every bite feel like a new experience.
Creative Twists and Variations
This recipe is a playground. Here are some of my favorite ways to switch things up:
Chocolate‑Mint Fusion
Add a tablespoon of peppermint extract to the filling for a refreshing twist. The mint pairs beautifully with chocolate, creating a dessert that feels like a holiday treat. Serve with crushed peppermint candies for extra crunch.
Nutty Caramel Swirl
Swirl in a caramel sauce before baking for a sweet, buttery layer that contrasts with the chocolate. The caramel’s viscosity adds a luscious texture, and the nutty flavor of hazelnuts complements it. Drizzle the top with caramel after chilling for a glossy finish.
Almond‑Infused Delight
Replace hazelnuts with toasted almonds for a slightly different nut profile. Almonds bring a subtle sweetness and a crisp crunch that pairs well with the chocolate. The overall flavor remains familiar yet distinct.
Red‑Wine Reduction
Incorporate a splash of red wine into the crust mixture for a deep, fruity undertone. The wine’s acidity balances the richness of the filling, and the crust takes on a subtle, complex flavor. This variation is perfect for a sophisticated dinner party.
Vegan Version
Use coconut cream instead of heavy cream and dairy‑free cream cheese to create a vegan-friendly version. Replace eggs with flaxseed gel for binding. The texture will be slightly denser, but the flavor remains indulgent.
Berry‑Burst Finale
Top the cheesecake with a layer of fresh berries and a dusting of powdered sugar before serving. The bright acidity of berries cuts through the chocolate richness, providing a fresh finish. This topping adds both color and flavor.
Storing and Bringing It Back to Life
Fridge Storage
Wrap the cheesecake tightly in plastic wrap and store in the refrigerator for up to five days. The wrap prevents it from drying out and absorbing other fridge odors. When you’re ready to serve, let it sit at room temperature for 15 minutes to soften slightly.
Freezer Friendly
If you need to store the cheesecake for longer, wrap it in plastic wrap, then place it in a freezer bag. Freeze for up to two months. When you’re ready, thaw overnight in the refrigerator. The texture may be slightly firmer, but it will still taste delicious.
Best Reheating Method
To reheat a slice, place it on a microwave‑safe plate and heat on low for 15–20 seconds. If you prefer a warm, gooey center, gently warm it in a skillet over low heat for a minute. Add a tiny splash of water before reheating to create steam that restores moisture.