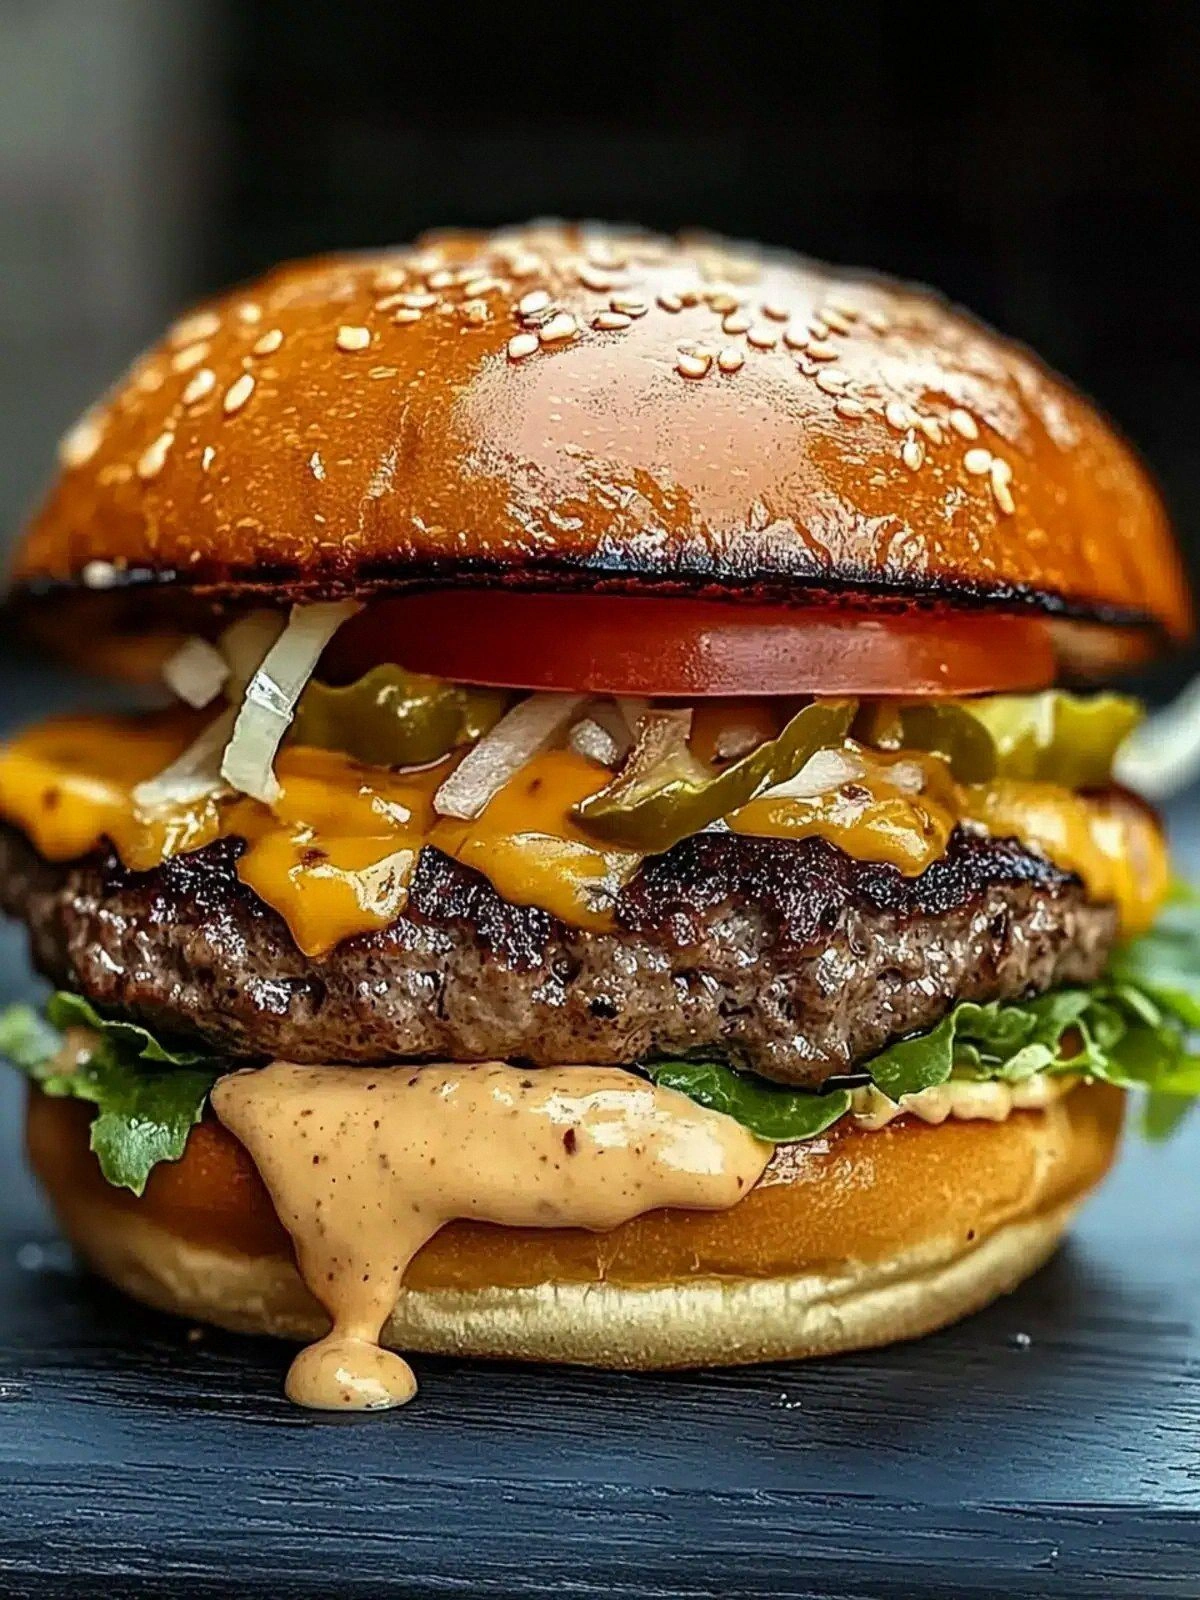
Picture this: I’m standing in my cramped kitchen, a handful of ingredients on the counter, and a craving that feels like a full‑blown rebellion against bland burgers. My last attempt at a homemade smash was a sad, soggy mess that left the grill smoking and my taste buds confused. I swear I heard the sizzling whisper, “You can do better,” and I decided to rewrite the rulebook. I’m talking about a smash that delivers a crust so caramelized it’s practically a second skin, a meat that stays juicy inside while the edges crackle like crisped popcorn, and toppings that sing in harmony with the beef.
If you’ve ever watched a burger melt in a pan and wondered why it never quite looks or tastes like the one you see on Instagram, you’re in the right place. The scent of searing beef rises, the sound of the first crack is a drumbeat, and the sight of molten cheese stretching into lazy ribbons is a visual promise of indulgence. I’m not just talking about a recipe; I’m talking about an experience that turns a simple dinner into a moment of pure, unapologetic pleasure. And the best part? I’ll walk you through each step so you can replicate the exact flavor profile, texture, and aroma that will have your friends begging for the recipe.
I dare you to taste this and not go back for seconds. That’s a bold claim, and I’m ready to prove it. The secret lies in a single technique that transforms ordinary ground beef into a flavor powerhouse. You’ll learn how to smash the patty to perfection, how to let the cheese melt without dripping, and how to layer the toppings so each bite is a symphony of crunch, juiciness, and savory depth. This is hands down the best version you’ll ever make at home.
If you’ve ever struggled with burgers that fall apart or taste like cardboard, you’re not alone — and I’ve got the fix. The method I’ll share is a game‑changer, a simple yet revolutionary way to lock in juices, create a caramelized crust, and layer flavors that pop. Picture yourself pulling this out of the pan, the whole kitchen smelling incredible, and the first bite sending a wave of satisfaction through your palate. Stay with me here — this is worth it.
What Makes This Version Stand Out
- Flavor: The beef is seasoned with a balanced blend of kosher salt and freshly ground black pepper, creating a savory backbone that lets the natural meat flavor shine. A quick sear locks in juices, giving each bite a depth that rivals gourmet burgers.
- Texture: The smash technique produces a crispy exterior while keeping the interior tender and juicy. The edges caramelize, forming a golden crust that adds crunch without sacrificing moisture.
- Simple Ingredients: No fancy sauces or obscure spices. The recipe relies on classic staples that you already have in your pantry, making it approachable for any cook.
- Uniqueness: The combination of American cheese, lettuce, tomato, and onion is elevated by the precise timing of each component, turning a standard burger into a culinary revelation.
- Crowd Reaction: Friends and family often ask, “What’s your secret?” after tasting this burger. The confidence in the flavor and texture makes it a conversation starter.
- Ingredient Quality: Using high‑quality ground beef (80/20) ensures the right fat content for juiciness. Fresh lettuce, ripe tomato, and sweet onion add vibrant color and fresh flavors.
- Cooking Method: The smash technique is the hallmark of this recipe. It’s simple, fast, and guarantees that every patty cooks evenly.
- Make‑Ahead Potential: You can assemble the patties ahead of time and keep them refrigerated. When you’re ready to cook, they’ll just need a quick smash on the griddle.
Alright, let's break down exactly what goes into this masterpiece...
Inside the Ingredient List
The Flavor Base
The foundation of any great burger is the meat itself. I use 1 lb of ground beef with an 80/20 ratio of lean to fat. The fat content is crucial; it melts into the meat, providing that buttery, mouth‑watering texture that defines a juicy smash. If you skip the beef, the entire flavor architecture collapses, leaving you with a bland, dry result.
Swap tips: If you’re a health‑conscious cook, try 90/10 lean beef, but be prepared for a slightly drier patty. For a richer taste, you can mix in a tablespoon of Worcestershire sauce, but that changes the classic profile.
Buying tip: Look for ground beef that’s freshly ground and has a bright, slightly reddish color. Avoid any that look brown or have a grayish hue; that’s a sign of age and possible spoilage.
Everything’s prepped? Good. Let’s get into the real action...
The Seasoning Crew
The seasoning is deceptively simple: 1 tsp kosher salt and 1 tsp freshly ground black pepper. Salt is the flavor enhancer that brings out the beef’s natural umami, while pepper adds a subtle heat that lingers on the palate. Over‑seasoning can overpower the meat, so keep it balanced.
If you prefer a milder profile, reduce the pepper to ½ tsp. For a spicier kick, add a pinch of cayenne or a dash of smoked paprika. These tweaks can personalize the burger to your taste without compromising the core flavor.
Remember: seasoning is a dance. Sprinkle the salt evenly over the meat, then add pepper. Mix gently to coat the meat without over‑kneading, which can toughen the patty.
The Unexpected Star
American cheese is the unsung hero that ties everything together. Four slices melt into a gooey, velvety layer that hugs the patty, creating a creamy contrast to the crispy edges. The cheese’s mild flavor complements the beef without overpowering it.
If you’re a cheese lover, feel free to experiment. Cheddar or pepper jack can add a sharper bite, but they’ll also introduce a different flavor profile. Keep in mind that higher‑fat cheeses may melt more quickly, so timing is key.
Cheese swap tip: For a dairy‑free version, use a vegan cheese that melts well. It won’t replicate the exact texture, but it will still provide that comforting gooeyness.
The Final Flourish
The fresh toppings—lettuce, tomato, and onion—add crunch, juiciness, and brightness. A crisp leaf of lettuce provides a satisfying bite that contrasts with the soft patty. A slice of ripe tomato contributes a sweet, acidic burst that cuts through the richness.
The onion adds a sharp, savory note that balances the sweetness of the tomato and the fattiness of the cheese. Use a red onion for a milder flavor or a white onion for a sharper bite. Slice them thin so they melt into the burger without overwhelming it.
If you’re short on time, pre‑wash the lettuce and slice the tomato and onion in advance. The fresher they are, the more vibrant the final product.
Everything’s prepped? Good. Let's get into the real action...
The Method — Step by Step
- Preheat a heavy skillet or griddle over medium‑high heat until it’s smoking. A hot surface is essential for that caramelized crust. You should see a faint wavy pattern on the metal when you flick a drop of water—if it sizzles instantly, you’re ready.
- Divide the ground beef into 4 equal portions, about 4 ounces each. Gently shape each into a loose ball—do not compact. The goal is a fluffy patty that will spread evenly when smashed.
- Season each ball generously with kosher salt and freshly ground black pepper. Sprinkle the salt on top first, then dust the pepper. This layering technique ensures the seasoning adheres to the surface and doesn’t seep into the meat.
- Place one meat ball on the hot skillet and immediately press down with a sturdy spatula or a piece of parchment paper. Smash it to about ¼ inch thickness. The pressure forces the juices out and creates a large surface area for caramelization.
- Let the patty cook undisturbed for 2 minutes. You’ll see the edges start to turn golden brown and the surface will begin to crackle. This is the moment of truth—don’t lift the spatula yet.
- Flip the patty carefully and add a slice of American cheese on top. The cheese should melt quickly, forming a silky layer that clings to the meat. Keep the heat on medium‑high to prevent the cheese from burning.
- Add the remaining three patties, smashing each as you go. The skillet will be crowded, but that’s fine—just make sure each patty gets enough space to cook evenly.
- When all patties are cooked and the cheese has melted, remove the skillet from the heat. Let the burgers rest for 30 seconds; this allows the juices to redistribute, ensuring every bite is juicy.
- Toast your buns on the skillet for about 30 seconds until they’re lightly browned. The toasted surface will hold the toppings better and add a satisfying crunch.
- Assemble the burgers by layering lettuce, tomato, and onion on the bottom bun, then placing the patty on top. Finish with the top bun and serve immediately. The aroma will be irresistible, and the first bite will confirm the success.
That's it — you did it. But hold on, I've got a few more tricks that'll take this to another level. The next section will show you insider tips that will elevate your smash burger from great to legendary.
Insider Tricks for Flawless Results
The Temperature Rule Nobody Follows
Many cooks think medium heat is sufficient, but a high‑heat skillet is the secret to that perfect crust. A temperature of 400°F (204°C) is ideal for a quick sear. If your stove can’t reach that high, use a cast iron pan and preheat for at least 10 minutes.
I once tried cooking on medium and ended up with a mushy patty that didn’t caramelize. The lesson? Heat matters. Keep the skillet hot, and you’ll see the edges blister and the juices lock in.
When you see the first crack, that’s the signal you’re in the sweet spot. Don’t let the heat drop; adjust the flame if necessary.
Why Your Nose Knows Best
Your nose is a powerful tool for judging doneness. As the patty cooks, the aroma shifts from raw meat to a nutty, caramelized scent. When the smell is rich and slightly sweet, it’s time to flip.
I’ve had friends who wait for the patty to look golden, but the scent is the real indicator. Trust your nose, and you’ll avoid overcooking.
If you’re nervous, sprinkle a tiny pinch of sugar on the patty. The sugar will caramelize, giving you a visual cue when it turns amber.
The 5‑Minute Rest That Changes Everything
After cooking, let the burgers rest for 30–45 seconds. This short rest allows the juices to redistribute, preventing them from spilling onto the plate when you bite.
I once skipped this step, and the first bite was dry. The rest period is a small investment that pays off in flavor.
If you’re in a hurry, simply cover the burgers loosely with foil. This traps heat and speeds up the resting process.
Cheese Placement Is Key
Place the cheese on the patty before flipping. This ensures it melts into the meat rather than dripping onto the skillet and burning.
If you prefer a thicker cheese layer, add a second slice after flipping. The second slice will melt into the top, creating a gooey crown.
Don’t stack the cheese too high; you want it to melt smoothly, not form a solid block that’s hard to bite through.
Use a Spatula With a Broad Edge
A wide spatula distributes pressure evenly, preventing the patty from tearing. The flat edge also helps you see the crust’s color.
If you’re using a thin spatula, you’ll end up with uneven edges and a less satisfying crunch.
I recommend a 10‑inch stainless steel spatula for the best results.
Creative Twists and Variations
This recipe is a playground. Here are some of my favorite ways to switch things up:
BBQ Bacon Smash
Swap the American cheese for cheddar and add a layer of crispy bacon. Drizzle a touch of smoky BBQ sauce over the patty before serving. The bacon’s saltiness complements the beef, while the sauce adds a tangy kick.
Avocado Cilantro Smash
Top the patty with sliced avocado and a sprinkle of fresh cilantro. The creamy avocado balances the beef’s richness, and cilantro adds a bright, herbal note. Finish with a squeeze of lime for freshness.
Spicy Jalapeño Smash
Add thinly sliced jalapeños to the toppings and a dollop of chipotle mayo. The heat from the jalapeños and the smoky mayo create a bold flavor profile that pairs well with a simple bun.
Blue Cheese & Caramelized Onion Smash
Replace the American cheese with crumbled blue cheese and add caramelized onions. The blue cheese’s sharpness contrasts with the sweet onions, creating a complex taste. Serve on a brioche bun for extra indulgence.
Veggie‑Loaded Smash
Add sautéed mushrooms, spinach, and a slice of provolone cheese. The vegetables bring earthiness, while the provolone melts into a creamy layer. This variation is perfect for those who want a lighter, yet still decadent, burger.
Greek Yogurt Tzatziki Smash
Swap the onion for cucumber slices and top the patty with a dollop of tzatziki made from Greek yogurt. The cool, tangy sauce pairs beautifully with the hot, juicy patty, creating a refreshing contrast.
Storing and Bringing It Back to Life
Fridge Storage
Store cooked patties in an airtight container for up to 3 days. Keep the cheese on top to prevent it from drying out. When you’re ready to reheat, let the patties sit at room temperature for 10 minutes before microwaving.
Freezer Friendly
Freeze uncooked patties in a single layer on a baking sheet before transferring them to a freezer bag. They’ll keep for up to 3 months. Thaw overnight in the fridge and then cook as directed.
Best Reheating Method
Reheat cooked burgers in a hot skillet for 2 minutes per side, adding a splash of water to create steam. Cover briefly to lock in moisture. The result is a burger that tastes almost as fresh as when it was first cooked.
Add a tiny splash of water before reheating — it steams back to perfection. This trick prevents the patty from drying out and keeps the cheese gooey.