Picture this: I’m in my tiny kitchen, the air already thick with the scent of garlic and olive oil, and my friend’s voice echoing through the hallway, daring me to “make something that actually tastes good tonight.” I almost laughed, because every week I’d end up with a bland, over‑cooked chicken that looked like a sad, pale pancake. Then, in a moment of culinary desperation, I grabbed a jar of balsamic vinegar, a drizzle of honey, and a handful of fresh veggies, and the kitchen turned into a laboratory of flavor. The result? A glossy, sweet‑tart glaze that coats tender chicken and crisp veggies like velvet, a dish that has become my go‑to for both weeknights and weekend feasts. I dare you to taste this and not go back for seconds.
When the first bite hits your tongue, you’ll feel the caramelized glaze sing against the savory chicken, the veggies pop with a satisfying crunch, and the faint whisper of Italian herbs tie everything together. The aroma alone—balsamic, honey, garlic, and a hint of pepper—will have you humming while you set the table. I’ve spent countless hours tweaking this recipe, and the version you’re about to see is hands down the best I’ve ever made at home. Most recipes get this completely wrong, focusing on dry chicken or bland sauce; here, the glaze is the star, the chicken stays juicy, and the vegetables stay vibrant. If you’ve ever struggled with making a sheet‑pan dinner that feels fancy, you’re not alone—and I’ve got the fix.
Imagine pulling this dish out of the oven, the whole kitchen smelling incredible, and seeing the glossy sheen on the chicken that promises a burst of flavor with every bite. That sizzle when it hits the pan? Absolute perfection. The moment the glaze starts to thicken, you’ll know the magic is happening. I’ve perfected the timing so the sauce reduces just enough to coat everything without turning into a syrupy mess. And the best part? The technique is so simple you’ll wonder why you ever thought a sheet‑pan dinner was a compromise.
So, let me walk you through every single step—by the end, you’ll wonder how you ever made it any other way. I’ll share the secrets that make this dish stand out, the insider tricks that guarantee flawless results, and playful twists that let you put your own spin on it. Grab your apron, because this is about to get deliciously easy and wildly satisfying.
What Makes This Version Stand Out
- Flavor: The balsamic glaze balances sweet, tart, and umami, creating a complex profile that elevates simple ingredients. The honey caramelizes, giving the sauce a glossy finish that clings to each bite.
- Texture: Chicken stays moist while the edges crisp, and vegetables retain a tender crunch, thanks to the sheet‑pan technique that allows heat to circulate evenly.
- Simplicity: No fancy gadgets or multi‑step sauces—just a few pantry staples and a single sheet pan. Even a novice can hit the mark.
- Uniqueness: The combination of Dijon mustard and Italian seasoning in the glaze adds depth, turning a classic dish into something memorable.
- Crowd Reaction: Friends rave about the glossy glaze and the “wow” factor of a one‑pan meal that looks like it came from a five‑star restaurant.
- Ingredient Quality: Fresh, high‑quality veggies and organic chicken make the dish feel indulgent while keeping it budget‑friendly.
- Cooking Method: Sheet‑pan roasting locks in juices and creates caramelized edges without constant stirring.
- Make‑Ahead Potential: The glaze can be pre‑made, and the dish can be reheated with minimal loss of flavor.
Alright, let's break down exactly what goes into this masterpiece...
Inside the Ingredient List
The Flavor Base
At the heart of this dish lies the balsamic glaze—balsamic vinegar, honey, and Dijon mustard. The vinegar provides acidity that cuts through the richness of the chicken, while the honey balances the tartness with a gentle sweetness. Dijon mustard adds a subtle peppery bite and acts as a natural emulsifier, ensuring the glaze coats the meat and vegetables evenly. If you skip any of these, the sauce loses its depth; the chicken might taste flat, and the veggies will lack that signature glossy sheen.
The Texture Crew
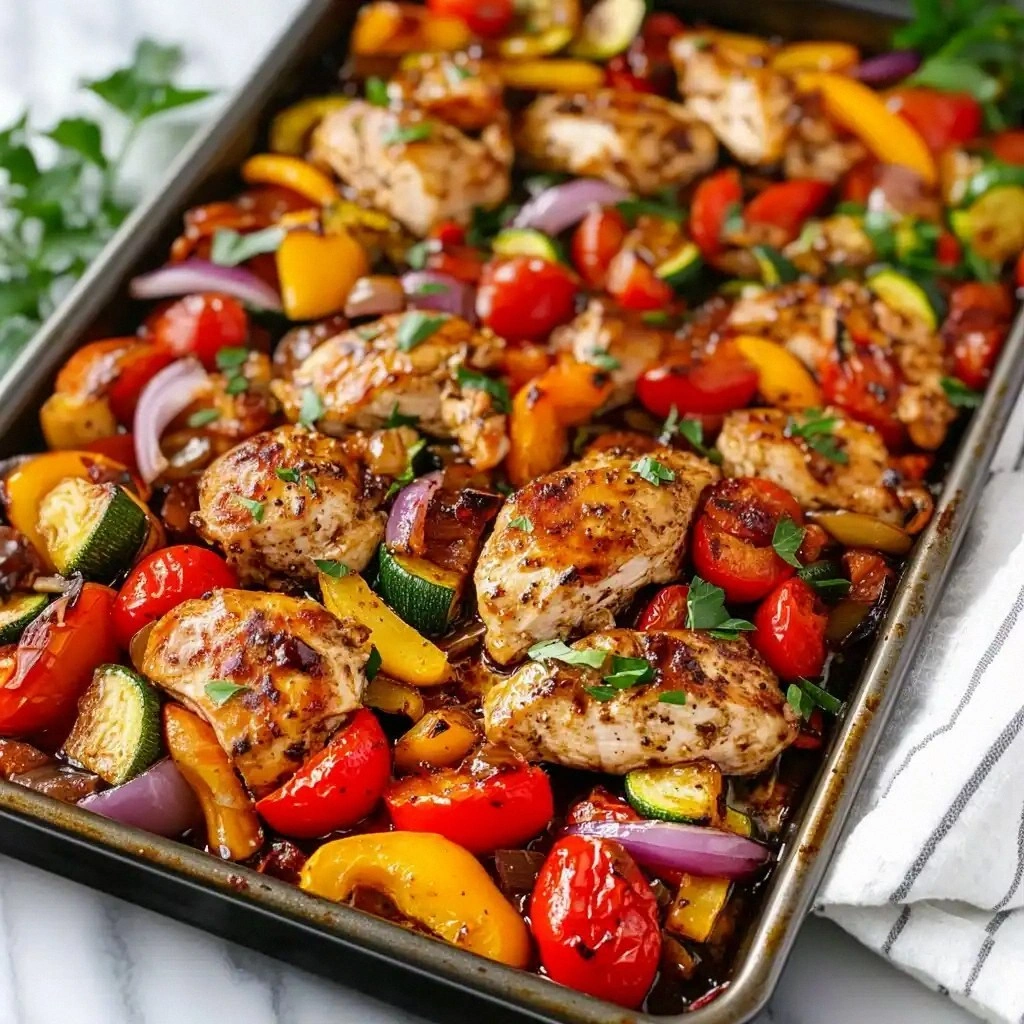
The vegetables are the unsung heroes that bring crunch and color. A mix of bell peppers, zucchini, cherry tomatoes, and red onions offers a spectrum of textures—soft, firm, and juicy. Roasting them on the same sheet pan as the chicken allows the vegetables to release their natural sugars, creating a caramelized rim that complements the glaze. If you omit the veggies, the dish feels incomplete, and you miss out on the vibrant color that makes it Instagram‑worthy.
The Unexpected Star
Garlic is more than a seasoning; it’s a flavor enhancer that amplifies the other components. Freshly minced garlic releases essential oils that infuse the chicken and veggies, creating a fragrant aroma that awakens the senses. If you’re a garlic skeptic, try roasting the cloves whole—this gives a milder, sweeter note. The key is to keep the garlic from burning; a quick sear before adding the glaze does the trick.
The Final Flourish
Italian seasoning ties the dish together with herbs like oregano, basil, and thyme, adding a Mediterranean touch. The pepper and garlic powder provide a subtle kick, while the salt balances the sweet and acidic elements. These seasonings are essential; without them, the dish would feel flat. If you’re allergic to any herb, swap for a pinch of dried rosemary or a splash of lemon zest to keep the flavor profile intact.
Everything's prepped? Good. Let's get into the real action...
The Method — Step by Step
- Preheat your oven to 425°F (220°C). Line a large baking sheet with parchment paper for easy cleanup. This high temperature ensures the glaze caramelizes quickly, giving the chicken a golden crust. If you’re short on time, skip the parchment, but be ready for a bit of mess.
- Season the chicken breasts with salt, pepper, garlic powder, and Italian seasoning. Pat them dry with a paper towel; moisture is the enemy of a crisp exterior. The seasoning should coat each side evenly—think of it as a flavor foundation.
- In a small bowl, whisk together balsamic vinegar, honey, Dijon mustard, minced garlic, and a splash of olive oil. The mixture should be smooth, with no lumps of mustard clinging to the surface. This glaze will be the star of the show.
- Arrange the chicken breasts on the prepared sheet pan, leaving space between each piece. Drizzle a tablespoon of olive oil over the veggies to help them roast evenly. The oil also helps the glaze adhere.
- Scatter the assorted vegetables around the chicken. Toss them lightly with olive oil, salt, and pepper. The vegetables should be spread out, not piled, to ensure even roasting.
- Pour the glaze over the chicken and veggies, making sure everything gets a generous coat. The glaze should be thick enough to cling but thin enough to spread. If it’s too thick, add a splash of water to thin it out.
- Roast in the preheated oven for 25–30 minutes, or until the chicken reaches an internal temperature of 165°F (74°C). Halfway through, flip the chicken and stir the veggies to ensure even caramelization. Watch for the edges pulling away from the pan—they’re a sign of crispiness.
- Remove the sheet pan from the oven and let the dish rest for 5 minutes. This allows the juices to redistribute, keeping the chicken moist. The glaze will thicken slightly, intensifying the flavor.
- Serve immediately, spooning extra glaze over each portion. Garnish with fresh basil or a sprinkle of Parmesan for an extra layer of flavor. The dish should look glossy, with a hint of caramel on the veggies.
That's it — you did it. But hold on, I've got a few more tricks that'll take this to another level...
Insider Tricks for Flawless Results
The Temperature Rule Nobody Follows
Many people bake at 400°F, but 425°F is the sweet spot for caramelization. The higher heat quickly sears the surface, creating a barrier that keeps juices inside. I’ve tried 450°F, but the glaze burned before the chicken cooked through. Stick with 425°F and watch the magic happen.
Why Your Nose Knows Best
Before you even touch the skillet, let the glaze sit for 5 minutes. The aroma will tell you if it’s balanced—if it’s too vinegary, add a touch more honey; if too sweet, a splash of vinegar. Your nose is the best quality control tool.
The 5‑Minute Rest That Changes Everything
Letting the chicken rest after roasting allows the juices to redistribute. Cutting into it immediately will cause the juices to spill out, leaving the meat dry. A quick rest also lets the glaze thicken to the perfect consistency.
Keep the Veggies Separate Until the Last 10 Minutes
If you want veggies that stay crisp, roast them separately for the first 15 minutes. Then, combine them with the chicken for the final 10 minutes to finish the glaze. This two‑stage roasting keeps the textures distinct.
Use a Silicone Baking Mat for Easy Cleanup
A silicone mat keeps the sheet pan clean and prevents sticking, especially when the glaze starts to caramelize. It also distributes heat evenly, ensuring consistent cooking.
Creative Twists and Variations
This recipe is a playground. Here are some of my favorite ways to switch things up:
Smoky Chipotle Version
Swap the honey for agave syrup and add a teaspoon of chipotle powder to the glaze. The result is a smoky, spicy kick that pairs beautifully with sweet corn.
Herb‑Infused Chicken
Replace the Italian seasoning with fresh rosemary and thyme. The aromatic herbs give the dish a fragrant, earthy tone, perfect for a rustic dinner.
Vegetarian Balsamic Bowl
Omit the chicken and add a handful of chickpeas. Roast the chickpeas with the veggies for protein, and serve over quinoa for a hearty, plant‑based meal.
Cheesy Finale
After roasting, sprinkle shredded mozzarella over the chicken and return to the oven for 2 minutes. The cheese melts into the glaze, creating a creamy, indulgent layer.
Low‑Carb Keto Twist
Use cauliflower rice instead of regular rice, and swap the honey for a sugar‑free syrup. This keeps the dish keto‑friendly while maintaining the sweet‑tart glaze.
Breakfast‑Inspired Breakfast Chicken
Serve the glazed chicken with a side of scrambled eggs and sautéed spinach. The sweet glaze pairs unexpectedly well with the savory eggs.
Storing and Bringing It Back to Life
Fridge Storage
Cool the dish completely before storing in an airtight container. It will stay fresh for up to 3 days in the refrigerator. The glaze may thicken, but it’s still delicious.
Freezer Friendly
Divide the chicken and veggies into freezer‑safe containers and freeze for up to 2 months. Thaw overnight in the refrigerator before reheating.
Best Reheating Method
Reheat in a preheated oven at 350°F (175°C) for 10–12 minutes, or until heated through. Add a splash of water before reheating to keep the chicken moist; the steam will revive the glaze’s silky texture.