

When I was a teenager, my family would gather every Friday for a “pizza night” that felt like a small, chaotic celebration. I remember the scent of yeast rising in the kitchen, the laughter over mismatched toppings, and the warm, golden crust that seemed to bring everyone together. It was more than just food; it was a ritual that turned an ordinary weekday into a memory we all cherished.
Pizza dough has humble origins in the streets of Naples, where resource‑poor bakers turned simple flour, water, and a pinch of salt into a canvas for endless creativity. Over the centuries, this staple has traveled the globe, adapting to local tastes while preserving its core identity—soft, airy, and slightly crisp on the edges.
In this guide, you’ll learn how to master a dough that’s both forgiving for beginners and rewarding for seasoned cooks. I’ll share the exact ratios, the science behind each step, and the little tricks that guarantee a consistent rise every single time. Whether you’re topping it with classic marinara and mozzarella or experimenting with exotic ingredients, this dough will be the perfect foundation.
Let’s roll up our sleeves, preheat the oven, and embark on a culinary adventure that will make your pizza nights unforgettable.
🌟 Why This Recipe Will Captivate You
From the first knead to the final bake, this dough delivers texture, flavor, and versatility that will keep you coming back for more.
- ✨ Consistent Rise Every Time: The precise balance of instant yeast and warm water creates a reliable fermentation, eliminating the guesswork of “over‑proofed” or “under‑proofed” dough.
- ✨ Soft, Chewy Interior with Crispy Edges: A short resting period and a hot oven give the crust that coveted contrast—airy inside, golden outside.
- ✨ Simple Ingredient List: Only six pantry staples are required, making it easy to stock and quick to assemble.
- ✨ Flexible Scaling: The built‑in portion adjuster lets you double or halve the recipe without recalculating measurements manually.
- ✨ Ideal for Any Topping: The neutral flavor profile pairs perfectly with everything from traditional tomato sauce to white garlic sauce, or even a sweet dessert topping.
- ✨ Time‑Saving Technique: By using a single‑rise method, you shave minutes off the traditional two‑rise process while still achieving optimal texture.
🥗 The Ingredients
📝 Complete Ingredient List
For the Dough:
For the Simple Tomato Sauce (optional):
For Topping Suggestions:

🔍 Focus on Key Ingredients
Bread Flour
Bread flour contains a higher protein content than all‑purpose flour, which develops more gluten during kneading. This gluten network traps the carbon dioxide released by the yeast, giving the crust its signature chewiness and allowing it to rise beautifully. Look for flour labeled “bread flour” or “high‑gluten flour” at your local grocery store. If you’re using a lower‑protein flour, you may notice a slightly softer crumb.
Instant Dry Yeast
Instant dry yeast is a reliable leavening agent that activates quickly when mixed with warm liquid. Unlike active dry yeast, it doesn’t need to be dissolved first, saving you a step. Its fine granules ensure even distribution throughout the dough, leading to a uniform rise. Store yeast in a cool, dry place; once opened, keep it sealed in an airtight container.
Olive Oil
Extra‑virgin olive oil adds richness and a subtle fruity note that penetrates the dough during the short rest. It also helps to soften the crust, making it easier to stretch without tearing. Choose a cold‑pressed, first‑press oil for the best flavor profile, and avoid overly bitter varieties.
🔄 Quick Substitutions
| If you don’t have... | Use instead... |
|---|---|
| Bread flour | All‑purpose flour (add 1 extra tsp gluten) |
| Instant dry yeast | Active dry yeast (double the amount, dissolve first) |
| Olive oil | Vegetable oil or melted butter |
👨🍳 Step‑by‑Step Instructions
Follow these detailed steps to create a dough that’s airy, tender, and ready for any topping you desire.
📋 Phase 1: Preparation and Mise en Place
Gather all ingredients, measure precisely, and set up a clean work surface.
Combine Dry Ingredients
In a large mixing bowl, whisk together the bread flour, instant yeast, fine sea salt, and granulated sugar. Make sure the salt and yeast are evenly distributed but not directly touching, as salt can inhibit yeast activity if placed on top of it.
Activate the Liquid
Warm the water to about 110°F (43°C). It should feel warm to the touch but not hot. Pour the water into a separate measuring cup, add the olive oil, and give it a quick stir.
🔥 Phase 2: Mixing, Kneading, and First Rise
Transform the mixture into a cohesive dough and let it develop flavor.
Form the Dough
Create a well in the center of the dry mixture and slowly pour in the warm water‑oil blend while stirring with a wooden spoon. As the flour absorbs the liquid, the mixture will come together into a shaggy mass.
Knead the Dough
Turn the dough onto a lightly floured surface and knead for about 8‑10 minutes. The dough should become smooth, elastic, and slightly tacky. If it feels too sticky, sprinkle a few extra grams of flour; if too dry, add a splash of water.
First Rise
Shape the dough into a ball, lightly coat it with a drizzle of olive oil, and place it in a clean bowl. Cover the bowl with plastic wrap or a damp kitchen towel and let it rise in a warm spot (around 75°F/24°C) for 45‑60 minutes, or until it has doubled in size.
✨ Phase 3: Shaping, Final Proof, and Baking
Shape the dough, add toppings, and bake to perfection.
Deflate and Divide
Gently punch down the risen dough to release excess air. Divide it into two equal portions for 12‑inch pizzas, or keep it whole for a larger family‑size pizza.
Shape the Crust
On a floured surface, stretch each portion by hand or use a rolling pin to achieve a thin center with a slightly thicker edge. Aim for a 12‑inch diameter for a classic round pizza.
Add Sauce and Toppings
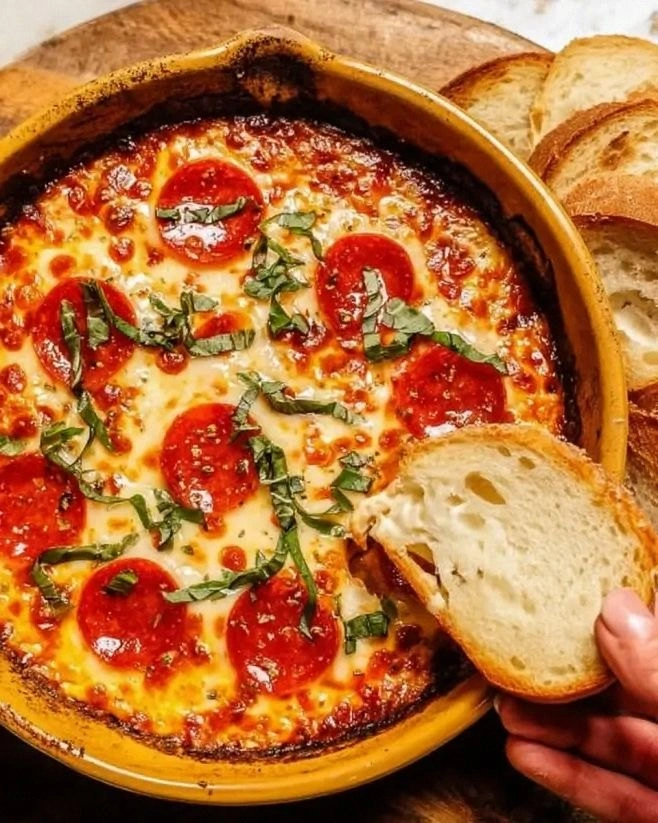
Spread a thin layer of the simple tomato sauce, leaving a small border for the crust. Distribute mozzarella slices, fresh basil leaves, and a sprinkle of parmesan. Feel free to customize with your favorite vegetables, meats, or cheeses.
Bake the Pizza
Preheat your oven to its highest setting (250°C / 482°F) with a pizza stone or inverted baking sheet inside for at least 30 minutes. Transfer the assembled pizza onto a parchment‑lined peel, slide it onto the hot stone, and bake for 10‑12 minutes, or until the crust is golden and the cheese bubbles.
Cool and Serve
Remove the pizza from the oven, let it rest for 2‑3 minutes to allow the cheese to set, then slice with a pizza cutter. Serve hot, accompanied by a drizzle of extra‑virgin olive oil or a sprinkle of chili flakes if desired.
💡 Expert Tips and Tricks
🛒 Choosing the Right Ingredients
Always select flour with a protein content of at least 12% for the best gluten development. When buying yeast, check the expiration date; stale yeast can lead to a flat crust. Opt for extra‑virgin olive oil for a nuanced flavor, and use filtered water to avoid mineral buildup that can affect dough texture.
🔪 Preparation Techniques
Let the dough rest after kneading for 10 minutes before shaping; this relaxes the gluten and makes stretching easier. Use a bench scraper to handle sticky dough without tearing it. When shaping, avoid over‑pressing the edges; a slightly thicker rim creates a satisfying chew.
🌡️ Mastering the Bake
Preheating the stone or steel is essential; a hot surface gives an instant oven‑spring, producing those coveted air pockets. If your oven cannot reach 250°C, use the convection setting and place the pizza on the lowest rack to mimic a wood‑fired environment.
🍽️ Presentation and Service
Finish each pizza with a handful of fresh basil leaves just after it comes out of the oven; the residual heat wilts the leaves without cooking them. Slice with a sharp pizza wheel, wipe the blade between cuts for clean slices, and serve on a wooden board for rustic charm.
🏆 Pro Tips
Professional pizzaiolos rely on precision, timing, and a few hidden tricks to elevate a simple dough into an art form.
- 🎯 Cold Fermentation: After the first rise, refrigerate the dough for 12‑24 hours. This slows yeast activity, allowing enzymes to develop deeper flavor and a chewier crumb.
- 🎯 Autolyse Method: Mix flour and water first, let rest for 20‑30 minutes before adding yeast and salt. This improves gluten formation and yields a more extensible dough.
- 🎯 Use a Pizza Steel: A steel conducts heat more efficiently than stone, creating a crispier bottom in less time. Preheat it for at least 45 minutes for optimal results.
- 🎯 Hydration Adjustments: For a super‑light crust, increase water to 65% of flour weight. Be prepared for a stickier dough that requires a well‑floured surface and a bench scraper.
- 🎯 Steam Burst: Place a shallow pan of water on the oven floor during the first 2 minutes of baking. The steam delays crust formation, allowing the dough to expand fully.
- 🎯 Flavor Infusion: Add a teaspoon of dried rosemary or a pinch of smoked paprika to the dough for an aromatic twist without affecting rise.
"The secret to great pizza is not the toppings, but the dough. Treat it with respect, and it will reward you with flavor and texture." — Chef Massimo Bottura
🔄 Variations and Adaptations
This versatile dough can be tweaked to suit dietary preferences, flavor cravings, and seasonal ingredients.
🥬 Vegetarian / Vegan Version
Replace the dairy‑based mozzarella with vegan cheese alternatives such as cashew mozzarella or almond‑based feta. Use a tomato sauce enriched with roasted red peppers for extra depth, and top with sautéed mushrooms, artichokes, and fresh arugula.
- Vegan cheese (store‑bought or homemade) – 200 g
- Roasted red pepper sauce – ½ cup
🌶️ Flavor Variations
Explore the world through your toppings and dough infusions. Below are three popular directions.
Spicy Version:
Add ½ teaspoon of crushed red pepper flakes to the dough, and top with spicy chorizo, jalapeños, and a drizzle of hot honey after baking.
Mediterranean Version:
Incorporate 1 tablespoon of dried oregano and a pinch of black olives into the dough. Top with feta, sun‑dried tomatoes, and a sprinkle of za’atar.
Asian Fusion Version:
Mix 1 teaspoon of toasted sesame oil into the dough and use a hoisin‑based sauce, thinly sliced scallions, and a topping of shredded nori and toasted sesame seeds.
⚠️ Dietary Adaptations
Gluten‑Free:
Swap bread flour for a gluten‑free blend containing rice flour, tapioca starch, and xanthan gum (500 g). Increase hydration to 65 ml water per 100 g flour to compensate for the lack of gluten.
Lactose‑Free:
Use dairy‑free cheese alternatives and ensure any added butter or cream cheese is replaced with plant‑based equivalents.
Low‑Calorie:
Reduce oil to 5 ml, use part‑skim mozzarella, and increase vegetable toppings like zucchini, bell peppers, and mushrooms to add volume without many extra calories.
👶 Family / Kids Version
Kids love simple flavors. Keep the sauce mild, use shredded mozzarella, and add fun toppings like sliced olives shaped like stars or mini pepperoni circles. Serve with a side of carrot sticks to balance the meal.
📦 Storage and Reheating
🧊 Conservation
In the Refrigerator:
- Duration: 3 days
- Recommended container: Airtight plastic container or zip‑lock bag
- Tip: Lightly coat the dough with olive oil to prevent drying.
In the Freezer:
- Duration: 2 months
- Method: Portion the dough, wrap each ball tightly in plastic wrap, then place in a freezer bag.
- Defrosting: Transfer to the refrigerator overnight, then let sit at room temperature for 30 minutes before shaping.
💡 For best texture after freezing, allow the dough to undergo a short second rise (30‑45 min) before baking.
♨️ Reheating
🔥 In the Oven (Recommended):
- Preheat to 190°C (375°F).
- Cover the pizza loosely with aluminum foil to retain moisture.
- Reheat for 8‑10 minutes.
- Remove foil and bake an additional 2‑3 minutes to crisp the crust.
⚡ In the Microwave (Quick):
- Place a slice on a microwave‑safe plate.
- Cover with a microwave‑safe lid or paper towel.
- Heat on medium power for 45 seconds, then check and continue in 15‑second increments.
🍳 In a Skillet:
Heat a non‑stick skillet over medium heat, add a tiny drizzle of oil, place the slice in, cover, and cook for 2‑3 minutes until the cheese melts and the bottom crisps.
🍷 Perfect Pairings
🥗 Side Dishes
- Arugula Salad: Peppery arugula tossed with lemon vinaigrette balances the richness of cheese.
- Garlic Roasted Broccoli: Lightly charred broccoli adds a crunchy, savory contrast.
- Caprese Skewers: Fresh mozzarella, cherry tomatoes, and basil on a stick echo the pizza flavors.
🍷 Wine / Beverage Pairings
- Chianti Classico: Its bright acidity cuts through the cheese and highlights tomato sauce.
- Prosecco: Bubbles cleanse the palate between bites, perfect for a festive mood.
- Non‑Alcoholic: Sparkling water with a slice of citrus or a rosemary‑infused iced tea.
🍰 To Complete the Meal
Start with a light bruschetta appetizer, follow the pizza with a crisp Caesar salad, and finish with a simple tiramisu or lemon sorbet for a refreshing dessert that doesn’t overpower the palate.
❓ Frequently Asked Questions
Q: Can I use active dry yeast instead of instant?
A: Yes, you can substitute active dry yeast, but you’ll need to double the amount (about 14 g) and dissolve it in the warm water for 5 minutes before mixing with the flour. This extra step ensures the yeast is fully activated.
Q: Why does my dough feel too sticky?
A: Stickiness often results from high hydration or insufficient flour on the work surface. Sprinkle a light dusting of flour on the counter and use a bench scraper to lift the dough. If the problem persists, add a tablespoon of flour at a time until the dough becomes manageable.
Q: How can I make a thinner crust?
A: After the first rise, divide the dough into more portions (e.g., four instead of two) and roll each piece out to a larger diameter. A hotter oven and a preheated stone will also help achieve a crisp, thin crust.
Q: What’s the best way to store leftover dough?
A: Lightly oil the dough, wrap it tightly in plastic wrap, and keep it in the refrigerator for up to three days. For longer storage, freeze the dough in individual portions, then thaw in the refrigerator before using.
Q: Can I add herbs directly into the dough?
A: Absolutely. Adding dried herbs like oregano, rosemary, or Italian seasoning to the dry ingredients enhances aroma. For fresh herbs, fold them in after the first rise to preserve their bright flavor.
Q: How far in advance can I prepare the dough?
A: You can prepare the dough up to 24 hours ahead and let it cold‑ferment in the refrigerator. This slow fermentation deepens flavor and improves texture. Just bring the dough to room temperature before shaping.
🎉 To Your Oven!
This Easy Homemade Pizza Dough combines simplicity with professional‑grade results. By mastering the balance of flour, water, and yeast, you gain a reliable foundation that welcomes endless toppings, from classic Margherita to adventurous global flavors. The portion adjuster ensures the recipe scales effortlessly, and the tips throughout guarantee a perfect rise, crust, and flavor every time.
Give it a try tonight, snap a photo of your masterpiece, and share your experience in the comments below. Your feedback helps the community grow, and your creativity inspires others to experiment.
Have you tried this recipe?
Leave a comment and rating below! Share your photos on Instagram with #PizzaNightDough to be featured.
Easy Homemade Pizza Dough for Pizza Night
A soft, airy, and perfectly chewy base that turns any night into a pizza party.
📝 Ingredients
For the Dough
Optional Tomato Sauce
👨🍳 Instructions
- 1
Whisk together flour, yeast, salt, and sugar in a large bowl.
- 2
Warm water to 110°F, add olive oil, and pour into the dry mixture.
- 3
Stir until a shaggy dough forms, then knead on a floured surface for 8‑10 minutes.
- 4
Place the dough in an oiled bowl, cover, and let rise 45‑60 minutes.
- 5
Punch down, divide, and shape into desired pizza size.
- 6
Add sauce, cheese, and toppings of choice.
- 7
Bake on a preheated stone at 250°C for 10‑12 minutes.
- 8
Rest 2‑3 minutes, slice, and serve hot.
- 9
Store leftovers in the refrigerator for up to three days.
- 10
Enjoy your homemade pizza night with friends and family!
🥗 Nutritional Information (per serving)
*Values are estimates based on standard ingredients.
📚 You Might Also Like
Classic Margherita Pizza
Four‑Cheese Pizza
Spicy Pepperoni Pizza


💬 Comments and Reviews
Leave a Comment
No comments yet. Be the first to share your thoughts!