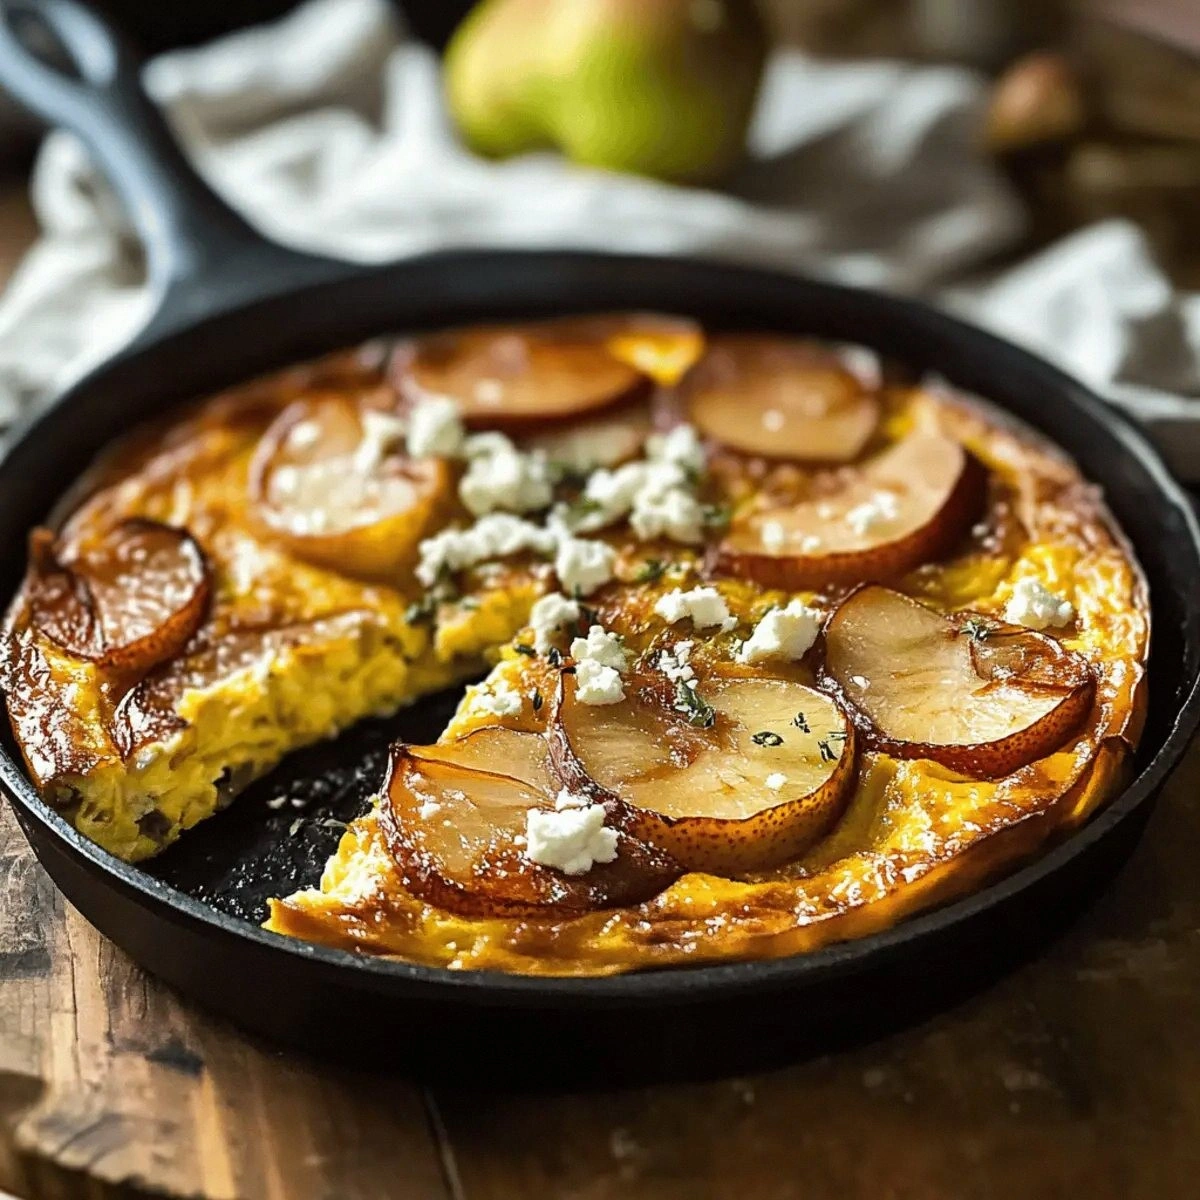
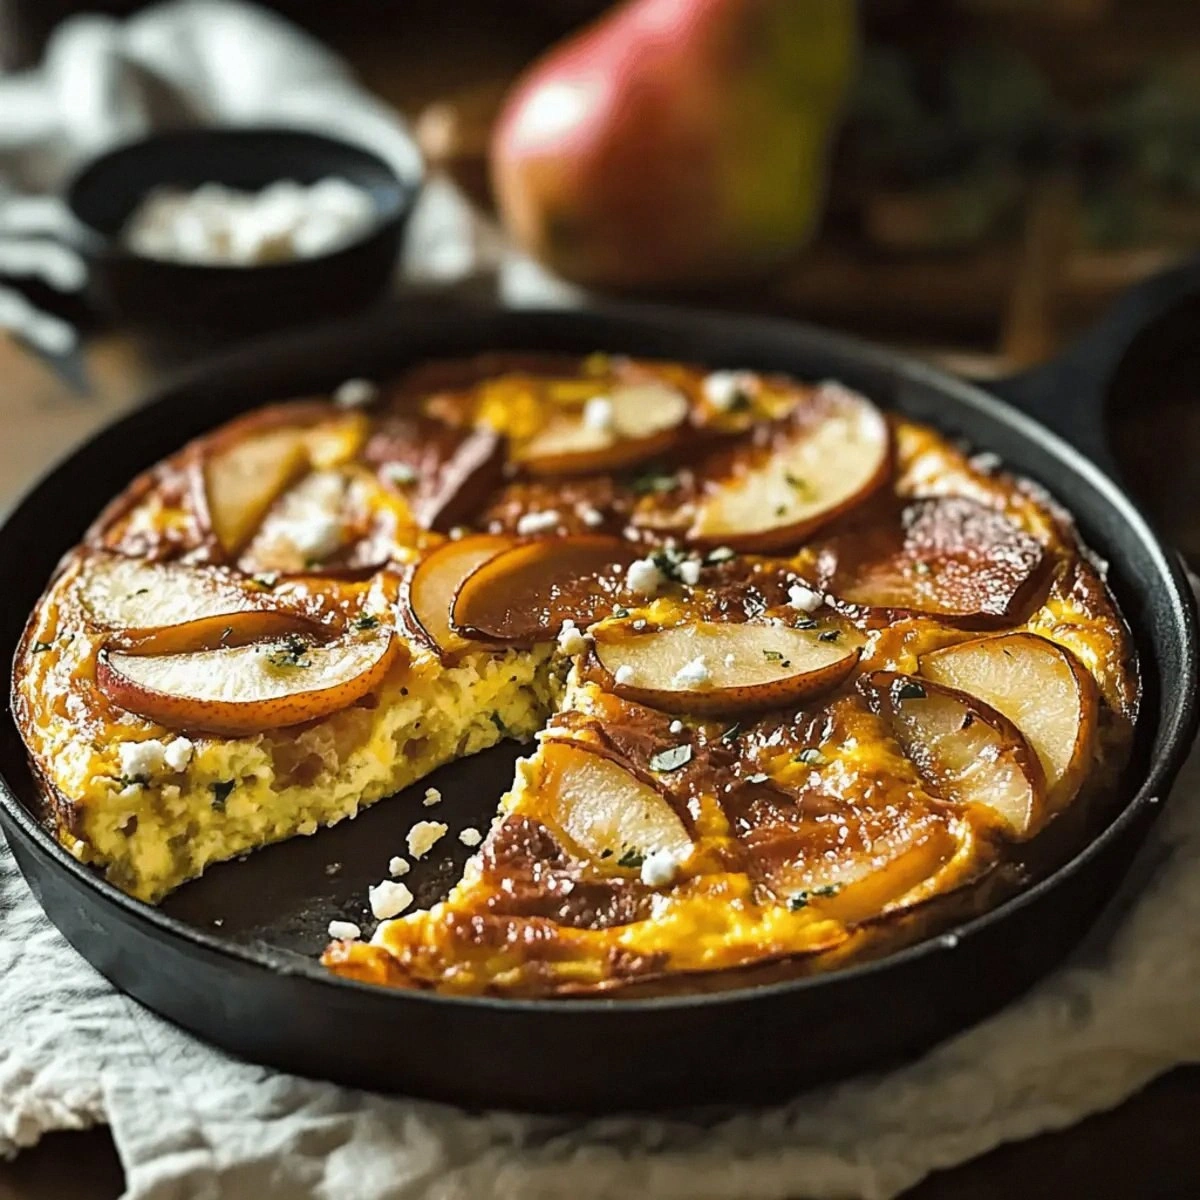
I burned the first three attempts at this frittata so badly that my smoke alarm filed for worker's compensation. There I stood in my pajamas at 7:23 AM, waving a dish towel at the ceiling like some deranged matador, while pears blackened into charcoal briquettes in my oven. But here's the thing — those spectacular failures led me to discover something magical about pears and eggs that nobody talks about. The way roasted pears caramelize into honey-sweet jewels that nestle into fluffy eggs like hidden treasures, creating pockets of autumn sunshine in every bite. This isn't just another breakfast recipe; this is the breakfast that made my brunch-obsessed friend cancel her Saturday reservations because she can make something better at home. Picture this: golden edges that shatter like thin ice, revealing creamy custard studded with warm spices and melty cheese that stretches into Instagram-worthy strands. The aroma alone will have your neighbors knocking on your door with empty plates. I dare you to taste this and not go back for seconds — I certainly couldn't, which is why I now make a double batch every time. Let me walk you through every single step — by the end, you'll wonder how you ever made it any other way.
The morning I finally cracked the code, I was running on three hours of sleep and a prayer. My in-laws were visiting from out of town, and I'd promised them something special for breakfast. The pressure was real, folks. But as I stood there watching those pears transform from firm fruit into these glossy, amber beauties in the oven, something clicked. That sizzle when they hit the pan? Absolute perfection. The way the eggs puffed up around them like they were giving them a warm hug — I knew I was onto something extraordinary. This recipe stands out because it breaks every frittata rule you've ever learned. Most recipes get this completely wrong — they tell you to just throw everything together and hope for the best. Here's what actually works: roasting the pears separately concentrates their sweetness into something almost candy-like, while the garlic gets this nutty, mellow flavor that makes people ask "what's that amazing taste?"
Here's the kicker that nobody expects: the pears need to be slightly underripe when they go into the oven. I know, I know — everyone tells you to use overripe fruit for baking. But stay with me here — this is worth it. Underripe pears hold their shape during roasting, then soften into these perfect tender morsels that don't turn to mush when you fold them into the eggs. Future pacing moment: Picture yourself pulling this out of the oven, the whole kitchen smelling like a French bakery had a baby with an apple orchard, steam rising as you cut that first wedge and the cheese stretches like you're in a food commercial. Your family will think you've been secretly taking cooking classes. If you've ever struggled with watery frittatas that taste more like scrambled egg soup, you're not alone — and I've got the fix.
What started as a desperate attempt to use up some sad-looking pears in my fruit bowl has become my signature brunch dish. Friends try to guess the secret ingredient (some swear it's vanilla, others are convinced there's bourbon involved), but it's just the magic that happens when pears meet high heat and patient roasting. The confessions keep coming: I'll be honest — I ate half the batch before anyone else got to try it, standing at my kitchen counter in my robe, making little happy noises with each bite. This version has ruined restaurant frittatas for me forever — they're always too dry, too bland, too boring after you've tasted what happens when fruit gets the respect it deserves.
What Makes This Version Stand Out
This is hands down the best version you'll ever make at home, and I'm not just saying that because I spent months perfecting it. Every element has been tested, tweaked, and tested again until it hits that perfect sweet spot between impressive and achievable. Your guests will think you're hiding a French grandmother somewhere in your family tree.
- Roasted Pear Magic: While other recipes toss raw fruit into eggs and hope for the best, we roast the pears until their edges caramelize into dark amber lace. This concentrates their sweetness into something almost honey-like, creating little pockets of autumn in every bite that make people close their eyes involuntarily when they taste it.
- Garlic That Behaves: Instead of harsh, raw garlic that punches you in the face, we slow-roast it alongside the pears until it melts into this nutty, mellow paste that whispers rather than shouts. The result is this mysterious depth that has everyone asking for your secret.
- The Cheese Strategy: Most frittatas overload on cheese, making them heavy and greasy. We use just enough to create those Instagram-worthy cheese pulls, but not so much that it overpowers the delicate pear flavor. The cheese acts like a supporting actor who steals just enough scenes to be memorable.
- Texture Perfection: Through careful temperature control and a two-stage cooking method, we achieve what most home cooks only dream of — custardy, trembling centers with crispy, lacy edges that shatter like a crème brûlée top. It's the textural contrast that makes people involuntarily hum while eating.
- Make-Ahead Friendly: Unlike salads or soufflés that collapse if you look at them wrong, this frittata tastes even better at room temperature after the flavors have mingled and married. Perfect for brunch parties where you want to actually enjoy your guests instead of being stuck at the stove.
- Seasonal Flexibility: While pears are the star here, the technique works with apples in fall, peaches in summer, even persimmons in winter. Master this method and you've got a year-round showstopper that adapts to whatever fruit is calling your name at the market.
Alright, let's break down exactly what goes into this masterpiece — because once you understand why each ingredient matters, you'll never need another frittata recipe again.
Inside the Ingredient List
Every ingredient in this frittata pulls its weight and then some. There's no filler, no "meh" components that you could skip without consequences. Each element has been chosen for maximum impact, creating a breakfast that's far greater than the sum of its parts. When you understand why each ingredient matters, you'll taste the difference in the final dish.
The Flavor Foundation
The eggs aren't just eggs here — they're the canvas that carries all the other flavors. Use the freshest eggs you can find, preferably from a farmers market where the yolks stand up tall and proud in shades of deep orange rather than pale yellow. Those yolks contain more flavor compounds than you can imagine, and when they meet the roasted pears, something magical happens. The garlic, slow-roasted until it melts into a sweet paste, becomes the umami backbone that makes people say "I don't know what you did, but this tastes like more than just eggs and cheese."
Olive oil plays double duty — it coats the pears for roasting and greases the pan for that perfect non-stick release. Don't use the cheap stuff here; a good quality extra virgin olive oil adds peppery notes that wake up your palate. The salt isn't just for seasoning — it helps draw moisture from the pears during roasting, concentrating their flavor into something almost jam-like. Skip the salt and you'll end up with bland, watery results that taste like disappointment.
The Texture Crew
Pears are the textural wildcard that makes this frittata unforgettable. Choose Bosc or Anjou pears that are still firm when pressed — they'll hold their shape during roasting instead of collapsing into mush. As they roast, the natural sugars caramelize on the edges, creating these dark, sticky bits that taste like nature's candy. The contrast between these soft, sweet pockets and the fluffy eggs is what makes people close their eyes when they take a bite.
Cheese selection matters more than you think. A good aged cheddar brings sharpness that cuts through the pear's sweetness, while Gruyère melts into nutty, stretchy perfection. Avoid pre-shredded cheese — it's coated with cellulose that prevents smooth melting and gives you that grainy, separated texture that screams "amateur hour."
The Unexpected Star
Fresh herbs are the plot twist that elevates this from good to legendary. A handful of thyme leaves adds earthy notes that ground the sweetness, while a whisper of fresh rosemary makes the pears taste more pear-like (it's like turning up the color saturation on a photo). The key is using fresh herbs, not dried — dried herbs would taste like hay and ruin everything you've worked for.
Black pepper isn't just a seasoning here — it creates tiny sparks of heat that make the sweet pears taste even sweeter by comparison. Freshly cracked is non-negotiable; pre-ground pepper tastes like sawdust and will flatten all the other flavors you've carefully built.
The Final Flourish
The olive oil for finishing isn't the same as the cooking oil — this is the good stuff, grassy and peppery, that you drizzle on just before serving. It adds a glossy sheen that makes the frittata look like it belongs in a magazine, while the raw oil flavor provides contrast to the cooked elements. Think of it as the difference between a photograph and a painting — both are beautiful, but the painting has texture and depth that draws you in.
Everything's prepped? Good. Let's get into the real action...
The Method — Step by Step
- Preheat your oven to 425°F (220°C) — and don't argue with me about the temperature. This high heat is crucial for getting those pears to caramelize properly instead of just steaming in their own juices. While it's heating, grab a rimmed baking sheet and line it with parchment paper. Trust me on the parchment; without it, you'll be chiseling caramelized pear bits off your pan like an archaeologist. Slice your pears into 1/2-inch wedges, removing the core but keeping the skin on for color and texture.
- Toss the pear slices with olive oil, salt, and pepper in a bowl until every piece is glossy and seasoned. This is the moment of truth — those pears should look like they're wearing tiny tuxedos, ready for their transformation. Spread them in a single layer on your prepared sheet, making sure they're not crowded (work in batches if needed). Crowding = steaming = soggy pears = sad breakfast. Throw in the garlic cloves still in their papery skins — they'll roast alongside and turn into sweet, mellow gems.
- Slide the pan into the oven and set your timer for 20 minutes. Don't walk away from the oven here — around the 15-minute mark, you'll want to check on them. The edges should be turning golden, and your kitchen should smell like you live inside a pear tart. Flip them gently with a spatula and roast for another 5-10 minutes until the edges are dark amber and sticky. Remove and let cool while you prep the eggs — the garlic should be soft enough to squeeze out of its skins like toothpaste.
- Lower the oven temperature to 375°F (190°C) for the frittata cooking stage. Crack your eggs into a large bowl and whisk them like you mean it — you're not just combining here, you're incorporating air that will make the frittata rise like a soufflé. Add a generous pinch of salt and several grinds of pepper. The eggs should look pale yellow and frothy, like liquid sunshine. Squeeze the roasted garlic out of its skins directly into the eggs — it should melt immediately into the mixture.
- Heat an oven-safe skillet (cast iron is perfect here) over medium heat. Add olive oil and swirl to coat — the pan should shimmer but not smoke. Pour in the egg mixture and let it cook undisturbed for 30 seconds. Now here's the game-changer: use a spatula to pull the cooked edges toward the center, letting the uncooked egg flow underneath. Do this four times around the pan, creating valleys of soft egg with lacy edges.
- Arrange the roasted pear slices artfully on top — or just throw them on haphazardly like I do when I'm hungry. Both methods taste the same, but the Instagram likes might differ. Sprinkle the cheese over everything, making sure some gets into those valleys you created. The cheese should look like a light snowfall, not an avalanche. Too much cheese will weigh everything down and give you that dense, rubbery texture that makes frittatas the punchline of brunch jokes.
- Transfer the skillet to the preheated oven and bake for 12-15 minutes. This next part? Pure magic. The top should puff up slightly and turn golden, the cheese should bubble and form those little browned spots that taste like toasted nuts. Jiggle the pan gently — the center should tremble like it's doing a little dance, but not slosh around like a wave pool. If it sloshes, give it another 2-3 minutes.
- Remove from the oven and let it rest for 5 minutes — I know, I know, you're starving and it smells incredible. But these five minutes are when the eggs finish cooking from residual heat and everything sets up properly. Slice into wedges and serve warm or at room temperature. The first piece might stick a bit (chef's treat!), but after that, they should slide out like they're on a waterslide. Garnish with fresh herbs and a drizzle of good olive oil, then prepare for the compliments to roll in.
That's it — you did it. But hold on, I've got a few more tricks that'll take this to another level...
Insider Tricks for Flawless Results
After making this frittata more times than I care to admit (my neighbors think I have a secret brunch catering business), I've discovered some game-changing techniques that separate the good from the legendary. These aren't just nice-to-know tips — they're the difference between a frittata that makes people say "this is good" versus one that makes them stop mid-chew and stare at you with wonder.
The Temperature Rule Nobody Follows
Here's what actually works: start your eggs at room temperature, not straight from the fridge. Cold eggs hit a hot pan and immediately seize up, creating that rubbery, overcooked texture that gives frittatas a bad reputation. Take them out 30 minutes before cooking — set a timer if you're forgetful like me. A friend tried skipping this step once — let's just say it didn't end well. Her frittata had the texture of a tennis ball, and her brunch guests politely excused themselves early, probably to hit the drive-thru on the way home.
The pan temperature matters even more than the oven temperature. Too hot and the bottom burns before the top sets; too cool and you get a pale, flabby mess that tastes like cafeteria eggs. The oil should shimmer like a mirage but not smoke — if it's smoking, you've gone too far and your frittata will taste bitter. I test by dropping a tiny bit of egg in — it should sizzle gently, not sound like it's being electrocuted.
Why Your Nose Knows Best
Forget timers — your nose is the most sophisticated kitchen tool you own. When the pears are perfectly roasted, your kitchen will smell like you're living inside a caramel apple. When the garlic is ready, it'll smell sweet and nutty, not sharp and aggressive. When the frittata is done, it'll smell like the best breakfast you've ever had is about to happen. Most recipes get this completely wrong — they give you rigid timings that don't account for your oven's quirks or your pan's temperament.
I learned this the hard way when I trusted a timer over my senses and served a frittata that could've doubled as a frisbee. Now I set timers as reminders, not as dictators. When that pear aroma hits you like a warm hug from your grandmother, pull them out immediately. Waiting even two more minutes can take them from perfect to burnt, and burnt pears taste like bitter disappointment with a side of regret.
The 5-Minute Rest That Changes Everything
This next part? Pure magic. That 5-minute rest after baking isn't just about being civilized — it's when the proteins finish setting and the flavors redistribute themselves like guests finding their seats at a dinner party. Cut too early and you get a watery mess that falls apart like a bad relationship. Wait those crucial minutes and you get clean slices that hold their shape like they went to finishing school.
During this rest, cover the frittata loosely with foil — not tightly, or it'll steam and get rubbery. Think of it as a spa treatment for your breakfast. The residual heat finishes cooking the center gently, while the top sets into that perfect texture that makes people ask if you went to culinary school in France. A friend once texted me in a panic because her frittata looked wet in the middle after baking — I told her to trust the process and wait. She did, and now she makes this every Sunday for her book club.
Creative Twists and Variations
This recipe is a playground. Here are some of my favorite ways to switch things up — each variation has been tested multiple times because I'm apparently the kind of person who spends weekends perfecting breakfast recipes instead of having a social life. But hey, my brunch game is strong, and that's what matters.
The Savory Sweet Swap
Replace half the pears with roasted butternut squash for a version that tastes like autumn decided to throw a party in your mouth. The squash brings an earthy sweetness that plays beautifully with sage instead of thyme. Use goat cheese instead of cheddar for tang that cuts through the richness. This variation is perfect for those friends who claim they "don't like sweet things for breakfast" — the squash makes it feel more like a sophisticated side dish than dessert masquerading as breakfast.
The Mediterranean Vacation
Trade pears for roasted cherry tomatoes and swap the cheddar for feta. Add some chopped olives and a sprinkle of oregano, and suddenly you're eating breakfast on a Greek island. The tomatoes burst and concentrate into little umami bombs that make the eggs taste more eggy. Finish with a drizzle of the best olive oil you can afford — this is the time to break out the fancy stuff you've been saving.
The Winter Warmer
Use apples instead of pears, add a pinch of cinnamon and nutmeg, and use sharp white cheddar for a version that tastes like someone figured out how to turn apple pie into breakfast. The apples hold up even better than pears and give you that nostalgic comfort food vibe. This one disappears fastest at holiday brunches — something about apples and cinnamon makes people feel like they're eight years old and someone's grandmother loves them.
The Fancy Brunch
Add crumbled bacon and use Gruyère for a version that tastes like you paid $24 for it at a trendy brunch spot. The bacon fat mingles with the pear juices and creates this unctuous sauce that coats everything in porky, fruity magic. Finish with chives for color and a touch of onion flavor. Your guests will try to book return visits before they even leave your table.
The Vegan Victory
Okay, this one stretches the definition of "frittata," but hear me out — use chickpea flour mixed with water to create an egg-free base that actually sets up beautifully. The roasted pears and garlic work just as well with the nutty chickpea flavor. Use nutritional yeast for cheesy umami notes and add some chopped nuts for protein. Even egg-loving friends have been surprised by how satisfying this version tastes.
The Spicy Surprise
Add a diced jalapeño to the roasting pan with the pears, use pepper jack cheese, and finish with a drizzle of hot honey. The sweet-spicy combination is addictive — the heat makes the pears taste even sweeter, while the cool eggs provide relief. This version has converted more "I don't eat spicy food" people than I can count — the heat is present but not overwhelming, like a gentle wake-up call rather than a fire alarm.
Storing and Bringing It Back to Life
Here's the beautiful truth about this frittata — it's actually better the next day. The flavors have time to mingle and marry, creating something more complex and interesting than when it's fresh from the oven. This make-ahead magic means you can prep brunch for a crowd without waking up at dawn or being stuck in the kitchen while everyone else is having fun.
Fridge Storage
Let the frittata cool completely before storing — I know it's tempting to wrap it up warm, but the steam will create condensation that makes everything soggy and sad. Cut it into individual portions and store in an airtight container between layers of parchment paper. This prevents the pieces from sticking together like dysfunctional family members at a reunion. Properly stored, it'll keep for up to 4 days in the fridge, though honestly, mine never lasts more than 2 because people keep "just having a small piece" until it's gone.
The key is wrapping each piece individually if you're storing portions — this prevents the fridge from drying out the edges and keeps everything tasting fresh. Use plastic wrap pressed directly against the surface to prevent that weird skin from forming on the eggs. Nobody wants to peel plastic wrap off their breakfast like it's some kind of culinary banana.
Freezer Friendly
Yes, you can freeze this frittata — and no, it won't turn into a rubbery mess like you might expect. The trick is freezing it in individual portions so you can grab breakfast on busy mornings without defrosting the whole thing. Wrap each piece tightly in plastic wrap, then in foil, and label with the date (future you will thank present you for this small kindness). They'll keep for up to 2 months in the freezer, though they're at their peak within the first month.
Thaw overnight in the fridge, not on the counter — room temperature thawing is a one-way ticket to Bacteria Town, and nobody wants to visit there. If you're in a rush, you can microwave from frozen, but add a tiny splash of water and cover loosely to create steam that keeps everything moist. The texture won't be quite as perfect as fresh, but it'll still be leagues better than any drive-through breakfast sandwich.
Best Reheating Method
The oven is your friend here — 325°F (165°C) for 8-10 minutes brings back that just-baked magic. Add a tiny splash of water to the baking dish before reheating — it steams back to perfection and prevents the dreaded dry edges. Cover loosely with foil to prevent over-browning, but remove it for the last 2 minutes to crisp up the top again. The result tastes almost as good as fresh, which is more than you can say for most reheated egg dishes.
Microwave works in a pinch, but use 50% power and add a small cup of water to the microwave to create steam. Heat in 30-second bursts, checking after each one — eggs go from perfect to rubber faster than you can say "breakfast is ready." A toaster oven is the sweet spot between speed and quality if you have one — it reheats in about 5 minutes and brings back some of that original texture.