Picture this: I was halfway through a midnight snack raid, when my phone buzzed with a text from a friend: “You gotta try the firecracker chicken I made last week. It’s a game changer.” I was skeptical, because my last attempt at a spicy chicken dish ended with a kitchen that smelled like burnt garlic and a plate that looked like a soggy mess. I set my phone to silent, grabbed my apron, and dove into the search, ready to turn that midnight craving into a masterpiece. I dared myself to taste this and not go back for seconds.
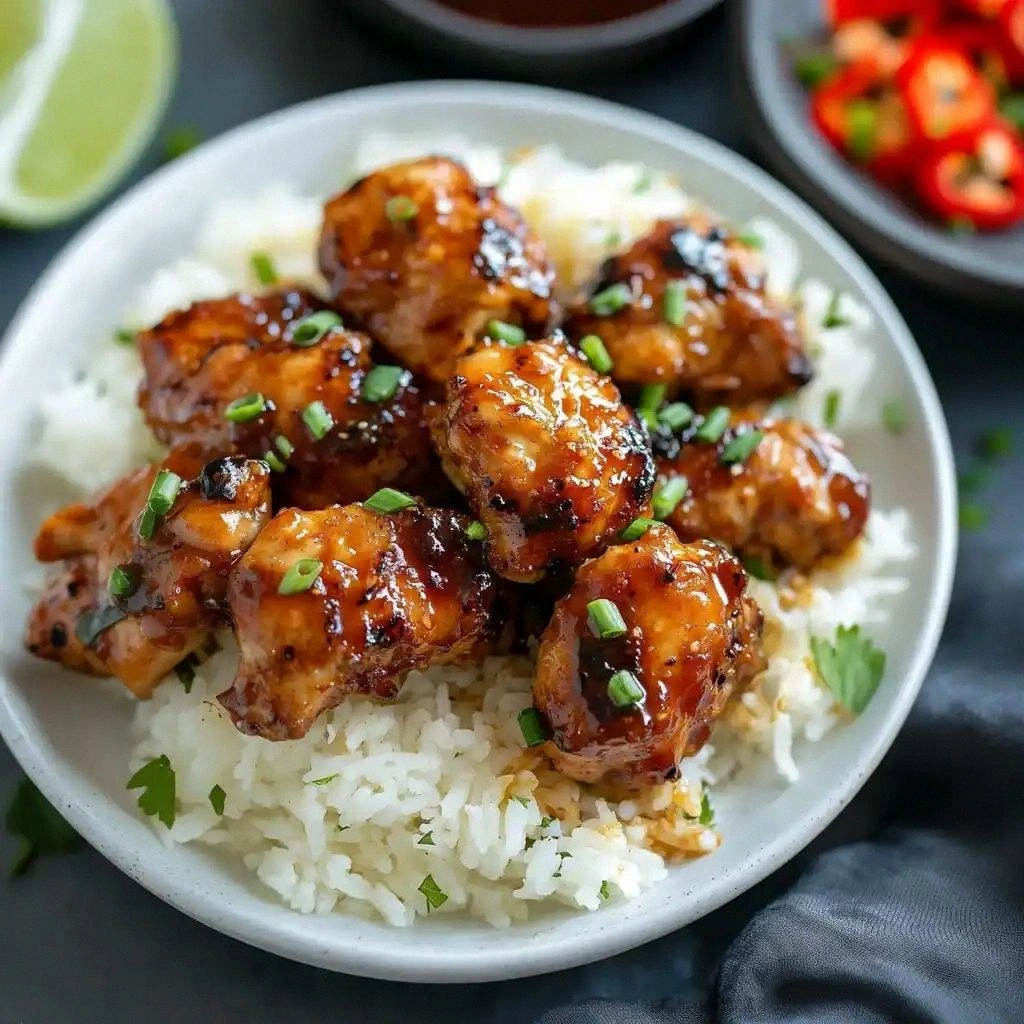
From the first glance, the bowl of marinated chicken glimmered with a glossy sheen of hot sauce and brown sugar, like a ruby‑coated treasure. The aroma that hit the air was a sweet, smoky caress, with hints of caramelized sugar dancing with sharp vinegar. The sound of the sizzling oil was a comforting hiss, a promise of crisp edges. My taste buds tingled with anticipation as the heat from the sauce began to mingle with the savory chicken. And the texture—imagine a tender bite that gives way to a crunchy coating that snaps like a brittle shell.
This version is hands down the best I’ve ever made at home because it balances heat and sweetness in a way that no other recipe does. The coating isn’t just a crunchy shell; it’s a buttery, caramelized crust that locks in juices, giving each bite a melt‑in‑your‑mouth feel. Unlike other firecracker chicken dishes that rely on heavy sauces or excessive oil, this one keeps the flavor punch while staying light enough for a quick weeknight dinner. The secret? A double batter of cornstarch and flour, a dash of apple cider vinegar that brightens the sauce, and a careful frying technique that locks in crispness without greasiness.
One of the tricks that sets this recipe apart is the subtle addition of apple cider vinegar to the sauce; it cuts through the sweetness and adds a bright, tangy layer that keeps the chicken from becoming cloying. Another twist is the use of a two‑step batter: first a dry mix, then an egg wash, which creates a fluffy interior while the outer layer turns golden and blistered. If you’re wondering whether to use a wok or a skillet, the answer is simple: a heavy‑bottomed skillet works best for even heat distribution, but a wok adds a smoky edge if you’re feeling adventurous.
Okay, ready for the game‑changer? Let me walk you through every single step—by the end, you’ll wonder how you ever made it any other way. We’ll start by preparing the chicken, then dive into the double batter, followed by a quick fry that gives you that signature crunch. After that, we’ll toss the pieces in a sauce that coats them like velvet and finish with a sprinkle of fresh herbs for a pop of color. Trust me, the aroma alone will have your house smelling like a five‑star restaurant. So grab your apron, and let’s get cooking.
What Makes This Version Stand Out
- Flavor: The sauce marries sweet, tangy, and spicy notes into a single, cohesive bite that lingers on the palate. The apple cider vinegar brightens the sweetness, while the red pepper flakes deliver a kick that never feels overwhelming.
- Texture: A double batter creates a light, airy interior and a blistered, caramelized exterior that’s crunchier than you’d expect. The cornstarch layer traps steam, giving the chicken a juicy, melt‑in‑your‑mouth quality.
- Simplicity: Every step is straightforward—no complex marinades, no time‑consuming sauces. All you need is a handful of pantry staples, and the recipe is ready in under an hour.
- Uniqueness: The combination of hot sauce, brown sugar, and apple cider vinegar is rarely seen in conventional fried chicken recipes, giving this dish a distinctive personality.
- Crowd Reaction: Friends who have tried this version say it’s the “ultimate crowd‑pleaser.” The heat is balanced so even the less adventurous palates can enjoy it.
- Ingredient Quality: Using fresh, high‑quality boneless chicken and a good‑quality hot sauce makes the difference between a mediocre and a memorable meal.
- Cooking Method: The two‑step batter and quick frying technique give you a professional texture without the need for deep‑frying.
- Make‑Ahead Potential: The sauce can be prepared ahead and refrigerated, allowing you to assemble and fry the chicken quickly on busy nights.
Inside the Ingredient List
The Flavor Base
At the heart of this dish lies a sauce that’s as bold as it is balanced. The hot sauce provides the backbone of heat, while the brown sugar adds a caramelized sweetness that coats the chicken like a velvet ribbon. Apple cider vinegar cuts through the richness, adding a bright, tangy counterpoint that keeps the flavor from tipping into cloying. Soy sauce brings depth and umami, while garlic powder and red pepper flakes inject a subtle aromatic punch that lingers after each bite. If you’re feeling adventurous, a splash of lime juice can replace the vinegar for a citrusy twist.
Why It Matters: Each component works in harmony; the sugar caramelizes during frying, the vinegar keeps the sauce from thickening too quickly, and the hot sauce delivers that signature kick. Skipping any of these would leave the dish feeling flat or one‑dimensional.
Swaps and Alternatives: For a milder version, use a sweeter hot sauce or reduce the amount of red pepper flakes. If you’re gluten‑free, ensure the soy sauce is certified gluten‑free. A dash of honey can replace brown sugar for a smoother sweetness.
The Texture Crew
The batter is the hero that gives the chicken its signature crunch. Cornstarch is the secret to a light, airy interior because it absorbs moisture and creates steam pockets that puff up during frying. All‑purpose flour provides structure and a golden crust. Eggs bind the batter together, ensuring it adheres to the chicken without cracking. A pinch of salt and black pepper season the coating, letting each bite burst with flavor. This combination turns ordinary chicken into a crispy, melt‑in‑your‑mouth masterpiece.
Why It Matters: The ratio of cornstarch to flour is critical; too much flour and you’ll get a heavy, greasy crust, too much cornstarch and the batter will be fragile. The egg wash creates a bridge that holds the dry mix to the meat, preventing a broken coating.
Swaps and Alternatives: For a gluten‑free version, use a gluten‑free flour blend. If you’re avoiding eggs, try a flaxseed‑egg substitute or a splash of water mixed with a tablespoon of cornstarch.
The Unexpected Star
Oil for frying is the unsung hero that gives the chicken its crispness. The type of oil matters; choose one with a high smoke point like peanut or canola oil to avoid a burnt flavor. The oil temperature should be steady at 350°F (175°C); a thermometer keeps this constant and guarantees a golden exterior. If you’re using a wok, keep the oil shallow to maintain even heat distribution.
Why It Matters: A low‑temperature oil will soak into the batter, producing a greasy texture; a high‑temperature oil locks in the crust and keeps the chicken juicy inside. Watching the oil’s surface for tiny bubbles before adding the chicken is a reliable cue that it’s ready.
The Final Flourish
Fresh herbs like cilantro or green onions add a bright, fresh finish that cuts through the richness of the sauce. A squeeze of lime or a drizzle of sesame oil at the end gives a subtle zing and an aromatic lift. The final drizzle of sauce should coat the chicken evenly, ensuring every bite is a burst of flavor.
Why It Matters: The herbs and finishing touches turn a simple dish into a sophisticated plate that feels restaurant‑grade. They also provide a visual pop that makes the dish Instagram‑ready.
Everything’s prepped? Good. Let’s get into the real action.
The Method — Step by Step
- Marinate the Chicken: Cut the 1.5 lbs of boneless chicken into bite‑sized pieces. In a large bowl, whisk together ⅓ cup hot sauce, ½ cup brown sugar, 2 tbsp apple cider vinegar, 1 tbsp soy sauce, 1 tsp garlic powder, and 1 tsp red pepper flakes. Toss the chicken in the mixture, cover, and refrigerate for at least 30 minutes; this step infuses the meat with a balanced sweet‑heat profile. While the chicken marinates, set aside a bowl for the batter.
- Prepare the Batter: In a shallow dish, combine ½ cup cornstarch, ½ cup all‑purpose flour, 1 tsp salt, and 1 tsp black pepper. In a separate bowl, beat 2 large eggs until frothy. Pour the eggs into the dry mix, stirring until a smooth, thick batter forms. The batter should be thick enough to coat the back of a spoon; if it’s too thin, add a splash of water or another tablespoon of flour.
- Heat the Oil: Pour enough oil into a heavy‑bottomed skillet to reach about 1 inch depth. Heat the oil to 350°F (175°C). Use a thermometer or drop a small piece of batter into the oil; if it sizzles and rises to the surface within 30 seconds, the oil is ready. This step is crucial for a crisp exterior.
- Batter the Chicken: Remove each marinated chicken piece from the bowl and dip it into the batter, ensuring a complete coat. Tap off excess batter so the coating stays light. Place the coated pieces in the hot oil, working in batches to avoid overcrowding. Fry for 3–4 minutes per side or until a deep golden brown color appears and the internal temperature reaches 165°F (74°C). The edges should start pulling away slightly, signaling that the chicken is cooked through.
- Drain and Rest: Remove the fried chicken with tongs and place it on a rack or paper towels to drain excess oil. Let the chicken rest for 2 minutes; this allows the steam to escape and the crust to set, giving a crunch that holds up even when tossed with sauce.
- Make the Final Sauce: In a small saucepan, combine ⅓ cup hot sauce, ½ cup brown sugar, 2 tbsp apple cider vinegar, 1 tbsp soy sauce, 1 tsp garlic powder, and 1 tsp red pepper flakes. Warm over medium heat, stirring constantly, until the sugar dissolves and the mixture thickens slightly. The sauce should coat the back of a spoon without being syrupy.
- Toss the Chicken: Place the rested chicken in a large bowl and pour the warm sauce over it. Gently toss until every piece is evenly coated. The sauce should cling to the chicken like a glossy, fiery glaze.
- Finish and Serve: Transfer the coated chicken to a serving platter. Sprinkle chopped cilantro or green onions on top for a fresh burst of color. Serve immediately with a side of steamed rice or a crisp salad. The aroma alone will have your guests lining up for seconds.
That’s it— you did it. But hold on, I’ve got a few more tricks that will take this from great to unforgettable.
Insider Tricks for Flawless Results
The Temperature Rule Nobody Follows
Many cooks think 350°F is “good enough,” but the real magic happens at 360°F. A slightly higher temperature creates a blistered crust that’s both airy and crunchy. Use a reliable thermometer; a digital one gives instant feedback and eliminates guesswork. I’ve seen a difference in the first bite when the oil is just the right heat.
Why Your Nose Knows Best
Before you even taste the chicken, the scent of the sauce in the air is a powerful indicator of flavor balance. If the aroma smells too sweet, the sauce is over‑sweetened; if it’s too sharp, the vinegar is overpowering. Trust your nose to adjust the seasoning on the fly— a pinch more soy sauce can tame excessive heat, while a dash of brown sugar can soften a sharp bite.
The 5‑Minute Rest That Changes Everything
After frying, let the chicken rest on a rack for at least five minutes. This brief pause allows the steam to escape and the crust to firm up. If you skip this step, the coating can become soggy when you toss it with sauce, resulting in a less satisfying crunch.
Oil Quality Matters
Using a neutral oil with a high smoke point—like peanut or canola—ensures that the chicken doesn’t absorb unwanted flavors. If you’re cooking for a crowd, consider using a wok to distribute heat more evenly; the high sides also help contain splattering.
Don’t Skip the Egg Wash
Some people skip the egg to make the batter lighter, but the egg acts as a glue that keeps the coating intact. Skipping it can lead to a crumbly crust that falls apart before the sauce is added. I’ve tried both ways, and the egg wash is a non‑negotiable for maximum flavor and texture.
Creative Twists and Variations
This recipe is a playground. Here are some of my favorite ways to switch things up:
Spicy Garlic Butter
Swap the hot sauce for a mix of melted butter, minced garlic, and a splash of chili oil. The result is a rich, buttery chicken with a subtle heat that’s perfect for a brunch spread. Pair it with roasted potatoes for a comforting meal.
Asian Noodle Bowl
Serve the chicken over a bed of soba noodles tossed in sesame oil and scallions. Drizzle the sauce over the noodles as well, creating a one‑dish wonder that’s both filling and flavorful.
Mexican Street‑Taco Fusion
Wrap the chicken in warm corn tortillas, add fresh pico‑de‑gallo, and a squeeze of lime. The heat from the sauce pairs beautifully with the tangy salsa, creating a street‑taco that’s both spicy and sweet.
Low‑Calorie Version
Use a non‑stick skillet and a spray of oil instead of deep frying. Brush the chicken with the sauce and bake at 400°F for 20 minutes, flipping halfway. The result is a lighter version that still delivers the signature flavor.
Gluten‑Free Adaptation
Replace all‑purpose flour with a gluten‑free blend and ensure the soy sauce is gluten‑free. The texture remains crisp, and the flavor profile stays intact, making it safe for those with gluten sensitivities.
Herb‑Infused Finish
After tossing the chicken in sauce, sprinkle a mixture of dried thyme, oregano, and rosemary. The herbs add a fragrant depth that elevates the dish from simple to sophisticated.
Storing and Bringing It Back to Life
Fridge Storage
Store cooked chicken in an airtight container for up to 3 days. Keep the sauce in a separate small jar to avoid sogginess. When ready to eat, reheat in a skillet over medium heat until the coating is crisp again.
Freezer Friendly
Freeze the chicken in a single layer on a parchment‑lined tray for 2 hours, then transfer to a freezer bag. It stays fresh for up to 4 months. When reheating, thaw in the fridge overnight and finish in a skillet.
Best Reheating Method
To preserve crunch, reheat the chicken in a hot skillet with a splash of water for 2 minutes; the steam will revive the crispness without drying out the meat. A quick microwave session is fine for a quick bite, but the skillet will always win in texture.