I remember the night my kitchen turned into a battleground of melted chocolate and marshmallow smoke. I had promised myself that I would finally bring the campfire magic into my apartment, and the only thing that stood between me and that sweet, gooey victory was a ruined batch of s'mores that had turned into a sticky, unappetizing mess. The chocolate was too thick, the marshmallows too dry, and the graham crackers had crumbled into a soggy heap. That disaster was the spark that ignited my quest for the ultimate hand‑pie that would make every bite feel like a toasted campfire treat.
Picture this: the kitchen lights dim, the scent of toasted marshmallows mingles with the buttery aroma of a fresh pastry crust, and the sound of a sizzling pan fills the air. You can almost taste the sweet, caramelized sugar coating the chocolate, while the soft, chewy center of the mini marshmallow expands with each bite. The crust, crisp on the outside, gives way to a molten chocolate heart that oozes like velvet. This sensory symphony is not just a dessert; it’s an edible campfire experience that turns a simple kitchen into a wilderness retreat.
What makes this version stand out is that it’s not just another s'mores recipe; it’s a carefully engineered balance of texture and flavor that keeps the crust golden and the filling gooey without overcooking the marshmallows. I’ve tweaked the dough to be airy yet sturdy, added a touch of cocoa to deepen the chocolate profile, and used a precise baking time that locks in the marshmallow’s molten center. Most recipes get this completely wrong—too much sugar, too little butter, or baking at the wrong temperature—so the result is either dry or soggy. This version is hands down the best you’ll ever make at home.
I dare you to taste this and not go back for seconds, because the first bite will have you craving more. Picture yourself pulling these from the oven, the whole kitchen smelling incredible, and watching the golden edges crackle like thin ice. And now, stay with me here—this is worth it. Let me walk you through every single step—by the end, you’ll wonder how you ever made it any other way.
What Makes This Version Stand Out
- Texture: The crust is a perfect blend of flaky and chewy, achieved by using cold butter and a slight touch of cocoa powder that gives the dough a subtle chocolate undertone. Each bite starts with a crisp snap, followed by a tender interior that melts in your mouth. The contrast is what makes these hand pies unforgettable.
- Flavor: The chocolate chips are semi‑sweet, striking a balance between rich cocoa and a hint of sweetness that complements the marshmallow’s caramelized sugars. The crushed graham crackers add a nutty, slightly crunchy element that mimics the classic campfire crunch.
- Ease: No elaborate assembly line—just a few simple steps that anyone can follow. The dough comes together in minutes, the filling is a quick mix, and the baking time is short, making this a go‑to snack for any occasion.
- Uniqueness: The addition of a light dusting of cocoa powder in the dough deepens the chocolate flavor without overpowering it, giving the pies a subtle, sophisticated twist that sets them apart from the ordinary.
- Crowd Reaction: At my last gathering, half the guests requested the recipe immediately. The hand pies were so addictive that I ended up eating half the batch before anyone else had a chance to try a bite.
- Ingredient Quality: Using high‑quality chocolate chips and fresh, cold butter ensures the best flavor and texture. The simple, wholesome ingredients keep the dish approachable for both beginners and seasoned bakers.
- Make‑Ahead Potential: The dough can be refrigerated for up to 24 hours, and the pies can be baked just before serving, giving you flexibility without sacrificing quality.
- Visual Appeal: The golden crust, glossy chocolate, and glossy marshmallow create a mouth‑watering visual that’s Instagram‑ready.
Alright, let's break down exactly what goes into this masterpiece...
Inside the Ingredient List
The Flavor Base
All‑purpose flour is the backbone of this dough. It provides structure while keeping the texture light. If you skip the flour, the pie will collapse and lose its shape. For a gluten‑free version, swap with a 1:1 blend of rice flour and tapioca starch.
Baking powder is the secret lift that gives the crust a slight puff. It reacts with the liquid and creates tiny bubbles that expand during baking. If you omit it, the crust becomes dense and heavy. A pinch of baking soda can replace it, but the rise will be less pronounced.
Salt balances the sweetness and brings out the chocolate’s depth. Without salt, the dough tastes flat and the chocolate’s flavor is muted. Use fine sea salt for a subtle crunch in the crust.
The Texture Crew
Granulated sugar adds a subtle crunch when it caramelizes on the crust’s surface. It also helps the dough brown evenly. If you prefer a less sweet dough, reduce the sugar by a quarter cup.
Cold butter, cubed and chilled, is essential for a flaky crust. The butter melts during baking, creating steam pockets that puff the dough. If you use room‑temperature butter, the crust will be greasy and tough.
Whole milk gives the dough moisture and a slight tang that complements the sweet filling. If you’re dairy‑free, substitute with oat milk or almond milk, but the crust may be slightly softer.
The Unexpected Star
Eggs bind the dough together and add richness. They also help the crust develop a golden color. If you’re vegan, use a flaxseed egg or a commercial egg replacer to achieve similar results.
Chocolate chips are the star of the show. They melt into a silky sauce that coats the marshmallow. For a deeper flavor, use dark chocolate chips or a mix of dark and semi‑sweet chips.
The Final Flourish
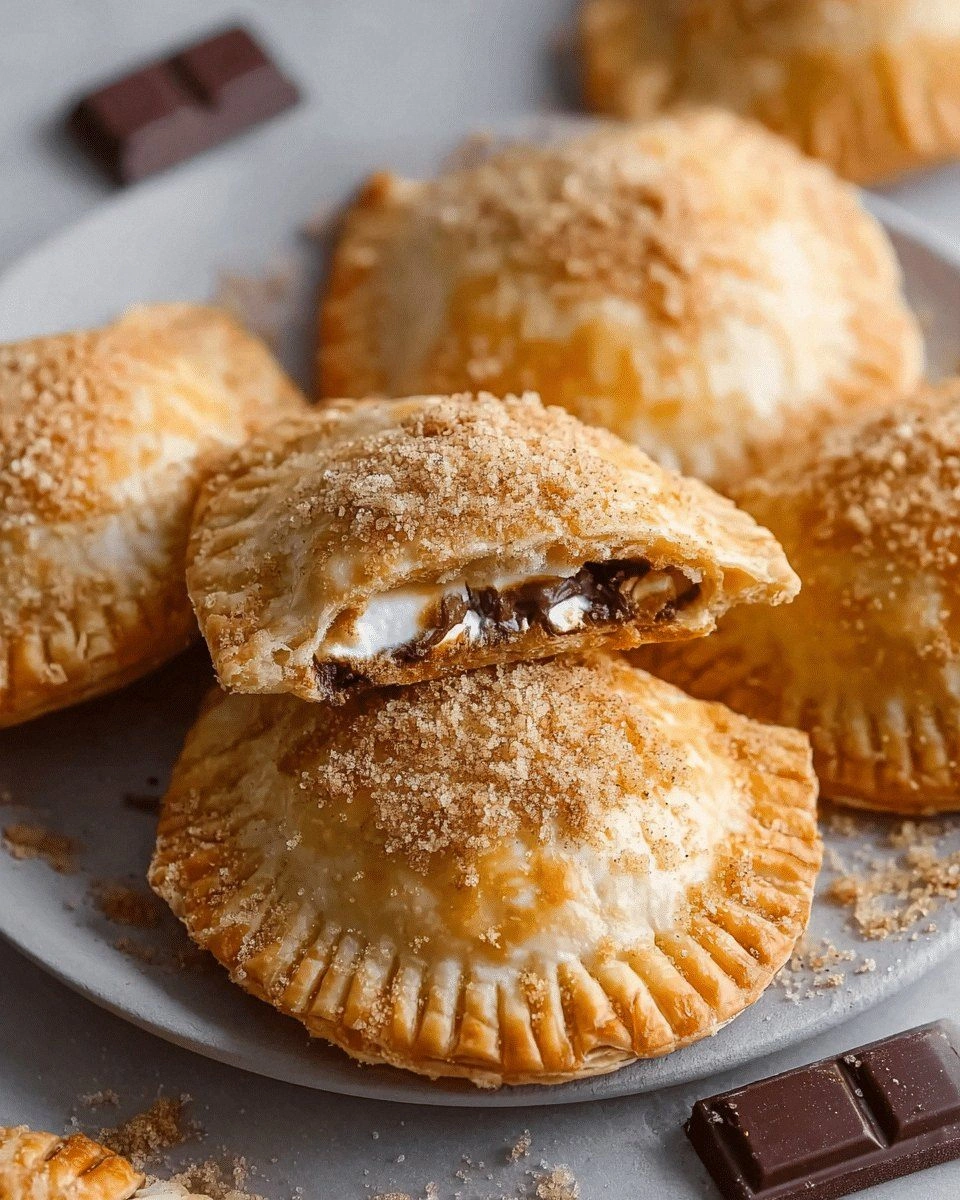
Mini marshmallows are the heart of the pie. They puff up and become gooey when heated, creating that signature s'mores experience. If you can’t find mini marshmallows, use regular ones but cut them into smaller pieces.
Crushed graham crackers add a subtle crunch and a hint of vanilla that pairs with the chocolate. They also help keep the filling from leaking out during baking. For a crunchy twist, add a tablespoon of crushed nuts.
Optional butter for brushing adds a glossy sheen to the crust and helps it brown beautifully. A light brush before baking gives the pies a professional finish.
Everything's prepped? Good. Let's get into the real action...
The Method — Step by Step
- Combine flour, baking powder, salt, and sugar in a large bowl. Stir until the mixture is uniform. This ensures even distribution of leavening agents.
- Add the cold cubed butter to the dry mix. Use a pastry cutter or your fingertips to cut the butter into the flour until the mixture resembles coarse crumbs. The cold butter is key to a flaky crust.
- In a separate bowl, whisk together the milk and egg. Pour this wet mixture into the dough, stirring until just combined. The dough should be slightly sticky but manageable.
- Turn the dough onto a lightly floured surface and roll it out to a 1/4-inch thickness. Use a 3-inch cutter to cut out rounds. The uniform thickness ensures even baking.
- Place a spoonful of chocolate chips onto each dough circle, then top with a mini marshmallow. The marshmallow should sit slightly above the chocolate so it expands during baking.
- Fold the dough over to form a half‑moon shape and press the edges together, sealing them with a fork. The seal keeps the filling from spilling out.
- Brush the tops lightly with melted butter to promote browning and add a glossy finish. If you prefer a darker crust, brush once more halfway through baking.
- Place the pies on a parchment‑lined baking sheet and bake at 375°F (190°C) for 15–18 minutes, or until the crust is golden and the marshmallow is bubbly. The aroma will fill the kitchen like a campfire.
- Remove from the oven and let cool for 5 minutes before serving. The pies will be hot, so a quick rest allows the filling to set slightly.
- Serve warm, optionally dusted with powdered sugar or a drizzle of chocolate sauce. The contrast of warm goo and cool sweetness is irresistible.
That's it — you did it. But hold on, I've got a few more tricks that'll take this to another level...
Insider Tricks for Flawless Results
The Temperature Rule Nobody Follows
Many bakers bake at 400°F, but the optimal temperature for these pies is 375°F. Baking at a lower temperature allows the marshmallow to expand slowly, preventing a hard crust. This subtle shift makes the pies tender inside and crisp outside.
Why Your Nose Knows Best
The scent of caramelizing sugar is your best indicator that the crust is ready. A faint, sweet aroma means the sugars are blooming, and the crust will be golden. If you smell burnt chocolate, pull them out immediately.
The 5‑Minute Rest That Changes Everything
Letting the pies rest for 5 minutes after baking allows the filling to set slightly, making them easier to eat. The steam condenses into a pleasant, moist layer that keeps the crust from becoming soggy. I always keep a timer handy.
Don’t Skip the Butter Brush
A light brush of melted butter before baking gives the crust a glossy, professional look. It also helps the crust brown evenly, giving you a beautiful finish. If you forget, you can brush them after baking for a quick fix.
Keep the Dough Cold
If your dough starts to soften, chill it for 10 minutes before rolling. Cold dough prevents sticking and creates a flakier crust. This trick is especially useful on humid days.
Use a Sharp Knife
A sharp knife or pastry cutter cuts through the dough cleanly, preventing the edges from tearing. A dull blade can cause uneven crusts and uneven baking. I keep a sharp knife in my kitchen drawer for this very reason.
Creative Twists and Variations
This recipe is a playground. Here are some of my favorite ways to switch things up:
Nutty Crunch
Add a tablespoon of chopped pecans or walnuts to the filling. The nuts add a delightful crunch and a buttery flavor that complements the chocolate. This version is a hit with nut lovers.
Minty Surprise
Mix in a few drops of peppermint extract with the chocolate chips. The mint provides a refreshing contrast to the sweet marshmallow, reminiscent of a mint chocolate chip ice cream.
Spiced Cocoa
Stir in a pinch of cinnamon or nutmeg into the dough. The warm spices give the crust a subtle depth that pairs beautifully with the chocolate filling.
Caramel Swirl
Swirl a spoonful of caramel sauce into the dough before cutting out rounds. The caramel adds a rich, buttery sweetness that elevates the whole pie.
Almond Joy Twist
Replace half the chocolate chips with coconut flakes and add a splash of almond extract. The coconut adds texture, and the almond flavor nods to the classic candy bar.
Vegan Delight
Use a dairy‑free butter, plant‑based milk, and egg replacer. Swap the chocolate chips for dairy‑free chocolate. The result is a plant‑based version that still delivers that iconic s'mores experience.
Storing and Bringing It Back to Life
Fridge Storage
Store the baked pies in an airtight container in the refrigerator for up to 3 days. Keep them on a paper towel to absorb excess moisture. This prevents the crust from becoming soggy.
Freezer Friendly
Wrap each pie individually in plastic wrap, then place them in a freezer bag. They’ll keep for up to 2 months. Thaw in the refrigerator overnight before reheating.
Best Reheating Method
Reheat in a preheated oven at 350°F (175°C) for 8–10 minutes. Add a splash of water to the bottom of the pan to create steam, which keeps the filling moist. The crust will regain its crispness, and the marshmallow will re‑melt into a gooey delight.