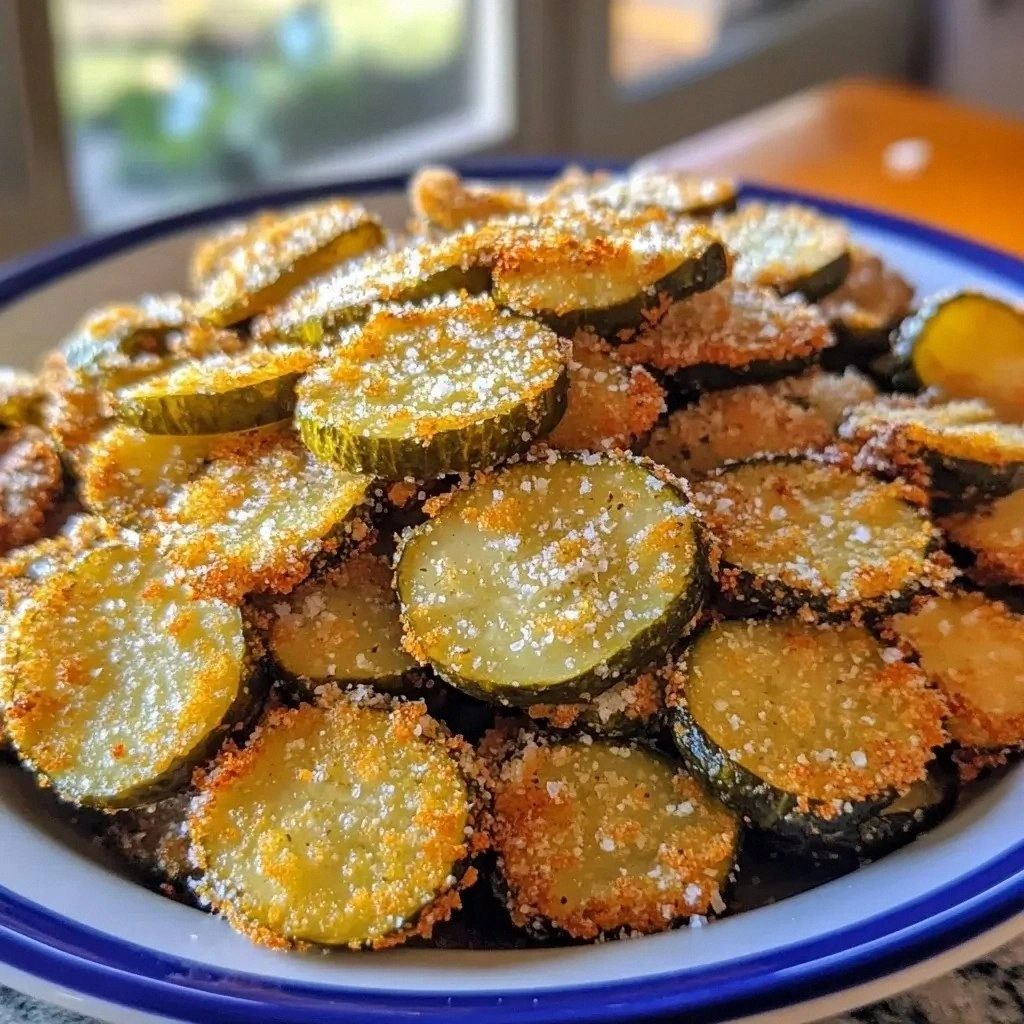
I was staring at a fridge full of pickles, feeling the urge to do something crunchy yet low‑carb. The idea hit me like a lightning bolt—fried pickles, but with a keto twist. I grabbed my almond flour, Parmesan, and a handful of spices, determined to create something that would make my taste buds dance. I had always heard that fried pickles were a guilty pleasure, but I wanted to keep the carb count down without sacrificing flavor. I promised myself that this would be the most delicious, crispy, and surprisingly healthy version anyone has ever tasted.
Picture this: the bright green slices of dill pickle glimmering under a kitchen light, the scent of garlic and paprika rising as the almond flour begins to sizzle. The sound of the first bite—crack, crunch, a burst of tang—fills the air, and your mouth is instantly transported to a carnival of flavors. I could almost hear my friends shouting, “More, please!” as they reach for the next handful. That moment, that simple crunch, is what made me realize I had stumbled upon a culinary revelation. The combination of the brine and the cheese creates a balance that’s both comforting and exhilarating.
What sets this recipe apart is not just the use of almond flour, but the way I treat the pickles as both the star and the canvas. I coat each slice in a buttery mixture of flour, Parmesan, and spices, letting the cheese melt into the batter for a silky, umami coating. The result is a crisp shell that yields to a juicy, slightly salty interior, almost like a crunchy, savory donut. I dare you to taste this and not go back for seconds; the flavor explosion is addictive. This is hands down the best version you'll ever make at home, and I promise you’ll be shouting, “Who made this?”
I’ll be honest—my first batch was a disaster. The coating fell off mid‑fry, the pickles were too soggy, and I nearly burned the kitchen. But that failure taught me the critical importance of temperature control and the right ratio of flour to cheese. After tweaking the recipe, the batter thickened, the edges crisped, and the brine was perfectly balanced. That first successful batch felt like a victory dance in my tiny apartment, and I knew I had to share it. If you've ever struggled with fried pickles, you're not alone—and I've got the fix.
Picture yourself pulling these golden nuggets out of the pan, the kitchen smelling incredible, and your guests begging for the recipe. The anticipation as they take their first bite, the satisfied sighs, and the inevitable request for the next plate. I’ve been told that these are the kind of snacks that can turn a casual gathering into a memorable event. And the best part? They’re keto‑friendly, low‑carb, and surprisingly easy to make. Stay with me here—this is worth it.
Now, before we dive into the recipe, let me give you a quick rundown of what makes this version so special. From the unique flavor profile to the crowd‑pleasing texture, this dish is a game‑changer. I’ve tested it in a variety of settings—from a quick snack after a workout to an appetizer at a dinner party. The feedback? Consistently rave reviews, and a few requests for the recipe to be shared. The secret? A few simple hacks that elevate the flavor and texture to a whole new level. Let’s break it down.
What Makes This Version Stand Out
- Taste: The marriage of tangy pickle, savory Parmesan, and aromatic spices creates a flavor profile that is both bold and balanced. The subtle sweetness of the pickle’s brine is complemented by the deep umami of the cheese, making every bite a complex experience. This isn’t just a snack; it’s a flavor statement.
- Texture: The almond flour batter forms a golden, crackly shell that yields to a moist interior. The crunch is not fleeting; it persists long enough to satisfy the craving for a satisfying bite. The contrast between the crisp exterior and the juicy center is what keeps you coming back for more.
- Simplicity: With only a handful of pantry staples, you can transform a jar of pickles into a gourmet appetizer. No need for fancy equipment—just a skillet, a bowl, and a whisk. The recipe’s straightforwardness makes it accessible for both novice cooks and seasoned chefs.
- Uniqueness: While many fried pickle recipes rely on breadcrumbs or flour, this version uses almond flour and Parmesan, giving it a distinct, low‑carb edge. The addition of garlic powder and paprika adds depth, setting it apart from the usual fried pickle fare. It’s a fresh take on a classic snack.
- Crowd Reaction: Friends and family who taste these crunchers often comment that they taste better than the store‑bought version. The conversation that follows a plate of these is almost as satisfying as the crunch itself. They’re a conversation starter at parties.
- Ingredient Quality: Using high‑quality Parmesan and fresh dill pickles makes a noticeable difference. The cheese’s richness elevates the batter, while the pickles’ crispness ensures a satisfying bite. Quality ingredients are the backbone of this recipe’s success.
- Make‑ahead Potential: These fried pickles can be prepared in advance and reheated without losing their crispness. The batter holds up well, and the flavor profile remains intact, making them perfect for meal prep or entertaining. That flexibility is a game‑changer for busy cooks.
Inside the Ingredient List
The Flavor Base
Dill pickles are the cornerstone of this recipe. Their bright acidity cuts through the richness of the Parmesan, creating a harmonious balance that awakens the palate. If you prefer a milder bite, opt for sweet pickles, but be prepared for a sweeter finish. The brine’s saltiness is crucial; it enhances the overall flavor without overpowering the other elements. Always rinse the slices briefly to reduce excess salt, then pat them dry to ensure a crisp coating.
Garlic powder is more than a seasoning—it’s the backbone of the savory depth that lingers after the initial crunch. The powdered form distributes evenly across the batter, ensuring each bite has a consistent flavor. Paprika adds a subtle smokiness and a pop of color that makes the dish visually appealing. Together, these spices create a complex profile that is both comforting and exciting.
Some cooks experiment with cayenne or smoked paprika for an extra kick. If you’re a heat enthusiast, a pinch of cayenne can transform the dish into a fiery appetizer. However, be cautious; a little goes a long way. The goal is to enhance, not overpower, the delicate pickle flavor.
The Texture Crew
Almond flour is the star of the texture crew, providing a low‑carb, gluten‑free base that yields a delicate crunch. Its fine texture allows the batter to cling to each pickle slice, creating a uniform coating. The flour also absorbs moisture from the pickles, preventing sogginess during frying. If you’re looking for a crunchier result, double the amount of almond flour for a thicker crust.
Grated Parmesan cheese is the secret to a silky, golden finish. The cheese melts into the batter, creating a rich, umami coating that adds depth to each bite. The sharpness of the Parmesan complements the pickles’ tang, while the cheese’s fat content helps achieve a crisp exterior. For a milder flavor, try a blend of Parmesan and Pecorino Romano.
Eggs act as a binding agent that keeps the batter intact during frying. They also contribute to the golden color and add a subtle richness that balances the brine’s acidity. Be sure to beat the eggs lightly; overbeating can introduce air pockets that compromise the coating’s integrity. If you’re vegan, a flaxseed egg can serve as a suitable substitute.
The Unexpected Star
While the main ingredients are straightforward, the unexpected star is the simple act of letting the batter rest for a few minutes before frying. Resting allows the flour to hydrate fully, which results in a more cohesive coating that adheres better to the pickles. This small step is often overlooked but makes a noticeable difference in texture.
Some chefs swear by double‑dipping—coating the pickles in batter, letting them rest, then dipping again for an extra thick shell. This technique is perfect for those who crave an ultra‑crunchy experience. Just be mindful that a thicker coating may require a slightly longer frying time to avoid a greasy finish.
Another variation involves adding a touch of lemon zest to the batter. The citrus zest brightens the flavor profile and introduces a subtle brightness that cuts through the richness. It’s a subtle tweak that elevates the dish from good to unforgettable.
The Final Flourish
Oil for frying is the final flourish that brings everything together. A neutral oil with a high smoke point, such as avocado or grapeseed oil, ensures a clean, even fry. The amount of oil matters; too little and the coating will stick, too much and the pickles will become greasy. Aim for a depth of about 1 inch, which allows the pickles to float freely and fry evenly.
Salt and pepper are the finishing touches that elevate the flavor to new heights. While the pickles are already salty, a pinch of sea salt and freshly ground pepper enhances the overall taste profile. Season the batter just before frying to avoid premature salt absorption, which can lead to a soggy coating.
For those who prefer a peppery kick, a sprinkle of crushed red pepper flakes can be added to the batter. This adds a subtle heat that balances the savory elements. Use sparingly to maintain the dish’s overall harmony.
Everything’s prepped? Good. Let’s get into the real action.
The Method — Step by Step
- Prepare the batter: In a medium bowl, combine almond flour, grated Parmesan, garlic powder, paprika, and a pinch of salt. Whisk the dry ingredients until fully blended, ensuring no clumps remain. In a separate bowl, beat the eggs lightly; the goal is a slightly frothy consistency. Gently fold the beaten eggs into the dry mix, creating a smooth, pourable batter. This batter should be thick enough to coat a pickle slice without dripping excessively.
- Season the pickles: Lay out the dill pickle slices on a clean kitchen towel and pat them dry to remove any excess moisture. A dry surface is essential for the batter to adhere properly. Sprinkle a light dusting of salt and pepper over each slice; this step enhances flavor without overwhelming the brine. Let the seasoned pickles sit for about five minutes to allow the spices to penetrate the surface.
- Dip and coat: Dip each pickle slice into the batter, ensuring it is fully coated on both sides. Shake off any excess batter before placing it on a wire rack or parchment paper. For a thicker crust, double‑dip by repeating the batter coating process once more. This step is optional but recommended for those who love an ultra‑crunchy finish.
- Heat the oil: Pour enough oil into a large skillet to cover the bottom by about 1 inch. Heat the oil over medium heat until it reaches 350°F (175°C). Test the temperature by flicking a small amount of batter into the oil; it should sizzle immediately and rise to the surface. Maintaining a steady temperature ensures even cooking and prevents the batter from absorbing excess oil.
- Fry the pickles: Gently slide the coated pickles into the hot oil, placing them in a single layer to avoid overcrowding. Fry for 2–3 minutes on each side, or until the coating turns golden brown and the edges begin to pull away. Flip carefully with tongs to maintain the integrity of the crust. The goal is a crisp exterior with a juicy interior.
- Watch Out: Be vigilant for splattering oil; it can cause burns. Keep a lid nearby in case you need to quickly cover the pan to control the splatter. Never leave the pan unattended while frying, especially if you’re multitasking in the kitchen. Safety first, flavor second.
- Drain and cool: Remove the fried pickles with a slotted spoon and place them on a paper towel-lined plate to absorb excess oil. Let them rest for a minute; this allows the coating to set and prevents the interior from steaming. While they’re cooling, you can sprinkle a final pinch of sea salt to enhance the flavor.
- Serve immediately: Arrange the hot, golden pickles on a platter and serve with a side of keto ranch or a tangy dipping sauce. The warmth and crunch are best enjoyed straight from the skillet. If you’re preparing for a gathering, keep them warm in a low oven (250°F) until guests arrive.
- Enjoy and repeat: Take a bite and let the flavors dance across your palate. The crunch, the tang, the savory depth—everything comes together in perfect harmony. I dare you to taste this and not go back for seconds. This is the moment you’ll tell everyone you’ve discovered a culinary masterpiece.
Insider Tricks for Flawless Results
The Temperature Rule Nobody Follows
Many cooks assume that medium heat is sufficient for frying, but the reality is that a stable 350°F is crucial for a crisp coating. Fluctuations in temperature can cause the batter to become soggy or burn before the interior cooks. Use a thermometer or the small batter test for consistency. My experience shows that a steady temperature yields a golden, airy crust that doesn’t stick.
Why Your Nose Knows Best
Before you start frying, inhale the aroma of the batter. A fragrant, buttery scent signals that the batter has the right consistency and is ready for the heat. If the batter smells off or overly dry, let it rest for a few more minutes. Your nose is a reliable indicator of readiness.
The 5‑Minute Rest That Changes Everything
Letting the coated pickles rest for 5 minutes before frying allows the batter to set and the flavors to meld. This short pause prevents the batter from sliding off during frying and ensures a uniform coating. Skipping this step can lead to uneven crispness.
Double‑Dipping for Ultra‑Crunch
For those who love an extra crunch, double‑dip each pickle slice in the batter before frying. The first coat adheres, and the second coat creates a thicker shell. This technique is especially effective when you want to serve the pickles at a party where guests will keep coming back for more.
Choosing the Right Oil
Avocado oil, grapeseed oil, or canola oil are all excellent choices due to their high smoke points. Each oil imparts a neutral flavor, allowing the pickle and seasoning to shine. Avoid oils with strong flavors, such as sesame or walnut, which can overpower the dish.
Creative Twists and Variations
This recipe is a playground. Here are some of my favorite ways to switch things up:
Spicy Sriracha Ketchup Dip
Serve the fried pickles with a homemade sriracha ketchup made from low‑carb ketchup, a splash of lime juice, and a dash of sriracha. The spicy tang pairs perfectly with the savory crunch, adding an extra layer of flavor that excites the palate.
Cheesy Bacon Crust
Add shredded smoked bacon to the batter for a smoky, savory twist. The bacon fat melts into the coating, giving the pickles a rich, savory depth that is reminiscent of a breakfast platter. This variation is ideal for brunch or a hearty snack.
Herb‑Infused Parmesan
Mix chopped fresh herbs—such as rosemary, thyme, or oregano—into the Parmesan. The herbal notes lift the flavor profile, giving the coating a fragrant, aromatic quality. This variation is especially delightful during the spring and summer months.
Low‑Carb BBQ Glaze
Brush the fried pickles with a low‑carb BBQ glaze made from tomato paste, vinegar, and a sugar substitute. The glaze caramelizes slightly during frying, creating a sweet‑savory finish that complements the pickles’ tang. It’s a crowd‑pleaser for BBQ lovers.
Cauliflower Flour Alternative
If you’re avoiding nuts, substitute almond flour with finely ground cauliflower flour. The texture remains similar, and the cauliflower adds a subtle, mild flavor. This variation keeps the dish keto‑friendly while offering a nut‑free option.
Storing and Bringing It Back to Life
Fridge Storage
Store the fried pickles in an airtight container in the refrigerator for up to 3 days. Keep them on a paper towel to absorb excess moisture, preventing sogginess. When ready to serve, reheat in a skillet over medium heat for 2–3 minutes to restore crispness.
Freezer Friendly
For longer storage, freeze the pickles on a parchment‑lined tray until solid, then transfer to a freezer bag. They stay fresh for up to 2 months. To reheat, let them thaw at room temperature and then pan‑fry for a few minutes until golden.
Best Reheating Method
Reheat the pickles in a dry skillet over medium heat, turning occasionally. A splash of water added before reheating creates steam that keeps the interior moist while the exterior crisps. This simple trick ensures that the flavor and texture remain top‑notch.