I was standing in my kitchen, staring at a half‑baked, flat‑as‑a‑pancake disaster that should have been a simple lemon drizzle cake. My friend had dared me to bring the “ultimate raspberry‑almond experience” to the brunch table, and I was already three steps behind. The smell of burnt butter lingered like a bad memory, the batter clumped like a bad hair day, and I could practically hear the sighs of my guests as they imagined another bland, soggy slice. That moment of culinary humiliation turned into a light‑bulb flash: what if I could create a cake that marries the buttery richness of almond flour with the bright, tangy pop of fresh raspberries, all wrapped in a tender crumb that practically melts in your mouth?
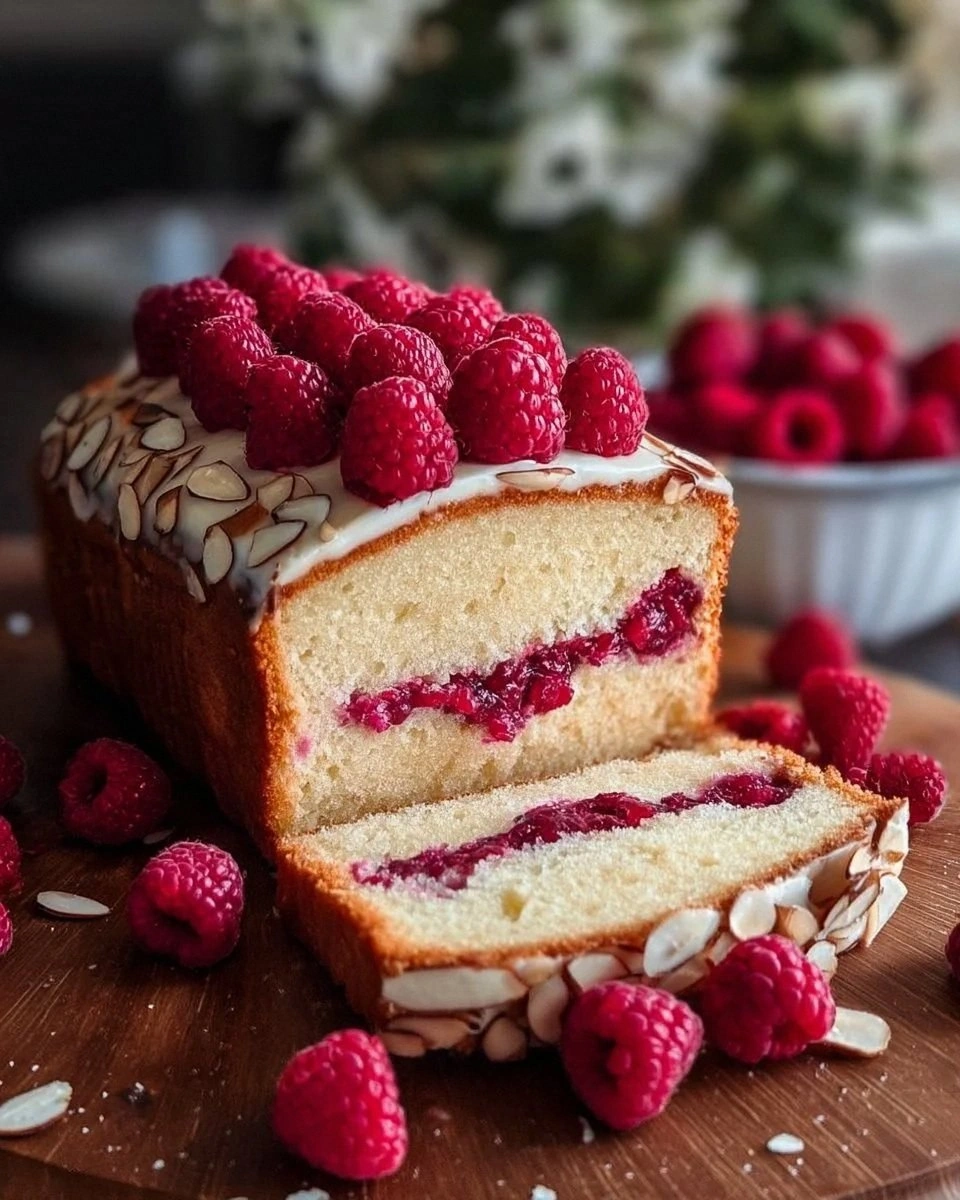
Picture yourself pulling a golden‑brown masterpiece from the oven, the whole kitchen smelling like a spring orchard mixed with a nutty bakery. The top is speckled with ruby‑red raspberries that have softened just enough to release their juices, while the edges are crisped to a perfect, caramelized finish that cracks gently under the fork. When you slice into it, a fragrant steam rises, carrying whispers of vanilla and toasted almond that make your nose do a little happy dance. The first bite? A buttery, moist crumb that feels like a cloud, punctuated by the sweet‑tart burst of raspberry and a subtle almond crunch that lingers like a secret after‑taste.
Most raspberry cakes out there either drown in sugar or end up dry as desert sand. This version, however, is engineered to hit every sensory checkpoint on the pleasure board. I’ve swapped out a portion of the all‑purpose flour for almond flour, which not only adds a nutty depth but also keeps the crumb incredibly tender. The secret weapon? A quick “raspberry swirl” technique that distributes the fruit evenly without turning the batter into a soggy mess. And let’s not forget the finishing dusting of powdered sugar that adds a snow‑kissed elegance—no one can resist that visual cue.
Okay, ready for the game‑changer? I’m about to walk you through every single step—from choosing the perfect almond flour to mastering the swirl that keeps the berries from sinking. By the end, you’ll wonder how you ever settled for a bland cake when this ruby‑kissed almond delight is just a whisk away. Let me walk you through every single step — by the end, you’ll wonder how you ever made it any other way.
What Makes This Version Stand Out
- Texture: The combination of almond flour and all‑purpose flour creates a crumb that is both light as a feather and rich enough to hold up to the juicy raspberries without becoming soggy.
- Flavor: Fresh raspberries provide a natural acidity that cuts through the buttery sweetness, while a splash of vanilla ties everything together in perfect harmony.
- Simplicity: Only nine core ingredients, all pantry‑friendly, mean you won’t need a trip to a specialty store to pull this off.
- Visual Appeal: The ruby swirl and final dusting of powdered sugar make this cake look like it belongs in a high‑end patisserie, not your everyday kitchen.
- Crowd Reaction: I dare you to taste this and not go back for seconds; even the most skeptical sweet‑tooth will be converted.
- Ingredient Quality: Using real almond flour (not almond meal) ensures a fine texture and a clean, nutty flavor that cheap substitutes can’t mimic.
- Cooking Method: The gentle swirl technique keeps berries suspended, preventing them from sinking and creating an even distribution of flavor.
- Make‑Ahead Potential: This cake stores beautifully, so you can bake it a day ahead and still serve it fresh‑warm, dusted with powdered sugar.
Inside the Ingredient List
The Flavor Base
Almond flour is the unsung hero of this cake. It brings a subtle, buttery nuttiness that you just can’t get from regular flour. If you skip it, you’ll lose that depth and the crumb will feel more like a plain vanilla cake. Look for blanched almond flour, which is finer and yields a smoother texture. If you’re allergic to nuts, you can swap it for an equal amount of oat flour, but expect a slightly different flavor profile.
The Texture Crew
All‑purpose flour provides the structure needed to hold the cake together, while the baking powder gives it that gentle lift without making it airy like a soufflé. A pinch of salt might seem trivial, but it amplifies the sweetness and balances the fruit’s acidity. If you’re watching sodium, you can reduce the pinch, but don’t eliminate it entirely—your taste buds will thank you.
The Unexpected Star
Fresh raspberries are the bright, tart spark that cuts through the buttery richness. Their natural pectin helps keep the cake moist, but they’re also delicate—over‑mixing can turn them into a mushy pink puddle. If fresh berries are out of season, frozen raspberries work fine; just thaw and pat them dry thoroughly before folding in.
The Final Flourish
Powdered sugar isn’t just for looks; it adds a whisper of extra sweetness that balances the tartness of the raspberries without overwhelming the palate. Dust it right before serving for that picture‑perfect finish. If you want a citrus twist, mix a teaspoon of orange zest into the powdered sugar for an unexpected zing.
Everything's prepped? Good. Let's get into the real action...
The Method — Step by Step
Preheat your oven to 350°F (175°C) and grease a 9‑inch springform pan with butter, then line the bottom with parchment. The pan should feel slick to the touch; this ensures the cake will release cleanly, and you’ll avoid that dreaded “stuck to the pan” drama that can ruin an otherwise perfect bake.
Kitchen Hack: Place a strip of parchment around the outer edge of the pan before greasing; this makes the later removal of the cake a breeze.In a large mixing bowl, cream together the softened butter and granulated sugar until the mixture is pale, fluffy, and smells like a summer bakery. This should take about 3–4 minutes with an electric mixer on medium‑high speed. When you lift the beaters, the mixture should form soft peaks that hold their shape for a moment before gently collapsing.
Add the eggs one at a time, beating well after each addition. Then stir in the vanilla extract. The batter will look slightly curdled at first—don’t panic; that’s normal. Keep mixing just until everything is fully incorporated, then set the bowl aside for a moment while you prepare the dry ingredients.
In a separate bowl, whisk together the almond flour, all‑purpose flour, baking powder, and the pinch of salt. The whisk should create a uniform, slightly powdery cloud that signals the dry mix is ready to meet the wet.
Gradually fold the dry mixture into the wet batter using a spatula. This is the point where you need to be gentle—over‑mixing will develop gluten and make the cake dense. Fold until you see just a few streaks of flour; the batter should be thick but still pourable.
Now for the raspberry swirl: toss the fresh raspberries in a tablespoon of flour (as mentioned in the earlier hack) and gently fold them into the batter. Use a slow, circular motion to create ribbons of red throughout the pale batter. The berries should be suspended, not settled at the bottom.
Watch Out: If you over‑mix at this stage, the berries will burst, turning the batter pink and making the texture soggy.Pour the batter into the prepared pan, smoothing the top with an offset spatula. The surface should be level, with a few visible swirls of raspberry peeking through. Place the pan on the middle rack of the oven and bake for 30‑35 minutes, or until a toothpick inserted into the center comes out with just a few moist crumbs.
While the cake is baking, resist the urge to peek constantly—opening the oven door too often drops the temperature and can cause the cake to collapse. Trust the timer, and let the heat work its magic. Around the 20‑minute mark, you’ll notice the edges pulling away slightly from the pan; that’s the signal that the structure is set.
When the timer dings, turn off the oven, crack the door open a crack, and let the cake sit for 10 minutes. This gentle cooling in a warm environment prevents a sudden temperature shock that could cause the cake to crack on the top. After that, run a thin knife around the edge, release the springform, and let the cake cool completely on a wire rack.
Finally, dust the cooled cake generously with powdered sugar. The snow‑like coating adds a visual contrast that makes the cake look as good as it tastes. Slice, serve, and watch the smiles spread—this is the moment of triumph.
That's it — you did it. But hold on, I've got a few more tricks that'll take this to another level...
Insider Tricks for Flawless Results
The Temperature Rule Nobody Follows
Never bake a cake straight from the fridge. Let the batter sit at room temperature for 10 minutes before you pour it into the pan. This small pause equalizes the temperature of the butter and the eggs, resulting in a more even rise. I once tried to rush this step and ended up with a dome that cracked like a dry leaf—lesson learned.
Why Your Nose Knows Best
The moment the cake starts to smell nutty and slightly caramelized, you’re close to the perfect bake. Trust that aromatic cue more than the timer; ovens can vary by up to 25 degrees. If you catch that sweet, toasted almond scent, it’s time to start checking the center with a toothpick.
The 5‑Minute Rest That Changes Everything
After removing the cake from the oven, let it rest in the pan for exactly five minutes before releasing the springform. This short rest lets the steam settle, preventing the cake from collapsing when you flip it out. A friend once skipped this and ended up with a deflated, sad-looking cake that tasted fine but looked like a pancake.
Raspberry Rescue Technique
If you notice too many berries sinking, gently press them up with a spatula midway through the bake (about 15 minutes in). This quick rescue lifts the berries back into the batter, ensuring each slice gets that gorgeous ruby streak.
Powdered Sugar Perfection
For a dusting that sticks without clumping, sift the powdered sugar through a fine mesh sieve right before you finish. The fine particles adhere to the slightly warm surface, creating a smooth, even veil. If you use a clumped sugar, you’ll get unsightly lumps that ruin the visual appeal.
Creative Twists and Variations
This recipe is a playground. Here are some of my favorite ways to switch things up:
Chocolate‑Almond Fusion
Add ¼ cup unsweetened cocoa powder to the dry ingredients and swap half of the fresh raspberries for dark chocolate chips. The result is a sophisticated mocha‑raspberry combo that’s perfect for an after‑dinner treat.
Citrus Burst
Replace the vanilla extract with 1 tablespoon of orange zest and a splash of lemon juice. The citrus brightens the almond flavor and gives the raspberries a sunny backdrop.
Nut‑Free Delight
If you need to avoid nuts, substitute almond flour with an equal amount of oat flour and add ¼ cup toasted sunflower seeds for a subtle crunch. The texture remains tender, and the seeds add a pleasant nuttiness without the allergens.
Spiced Autumn Version
Incorporate ½ teaspoon of ground cinnamon and a pinch of nutmeg into the dry mix, and use frozen cranberries instead of raspberries. This gives the cake a warm, holiday feel that pairs beautifully with a dollop of whipped cream.
Layered Elegance
Split the batter into two pans, bake them separately, and then layer with a raspberry‑cream cheese frosting. This turns a simple cake into a show‑stopping dessert for special occasions.
Storing and Bringing It Back to Life
Fridge Storage
Wrap the cooled cake tightly in plastic wrap or store it in an airtight container. It will stay fresh for up to four days. Before serving, let it sit at room temperature for 20 minutes to regain its soft crumb.
Freezer Friendly
Slice the cake, place each slice between parchment sheets, and freeze in a zip‑top bag. The cake can be frozen for up to three months. When you’re ready to enjoy, thaw overnight in the fridge, then let it come to room temperature.
Best Reheating Method
To revive a slice, preheat your oven to 300°F (150°C), place the slice on a baking sheet, and add a tiny splash of water (about a teaspoon) to the edge of the slice. Cover loosely with foil and heat for 8‑10 minutes. The steam created by the water restores the moisture, and the crust regains its gentle crisp.