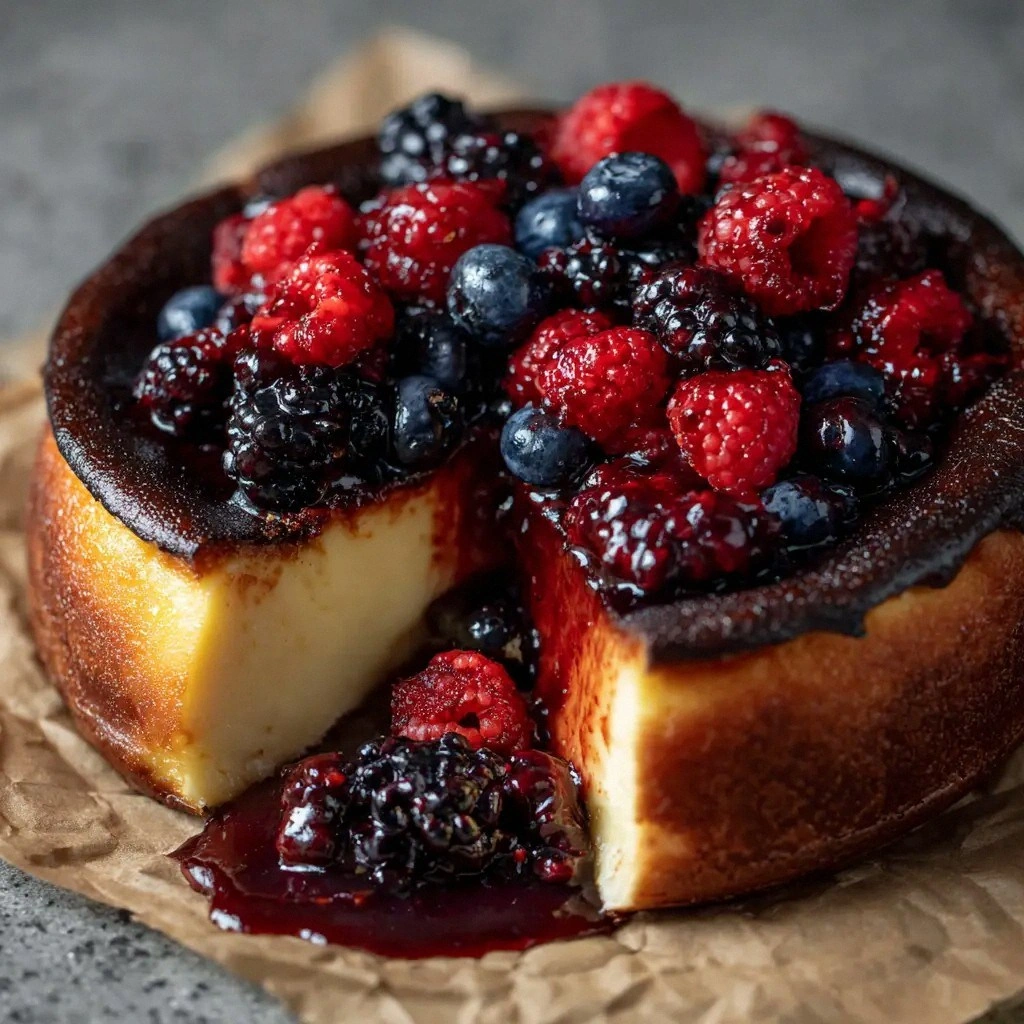
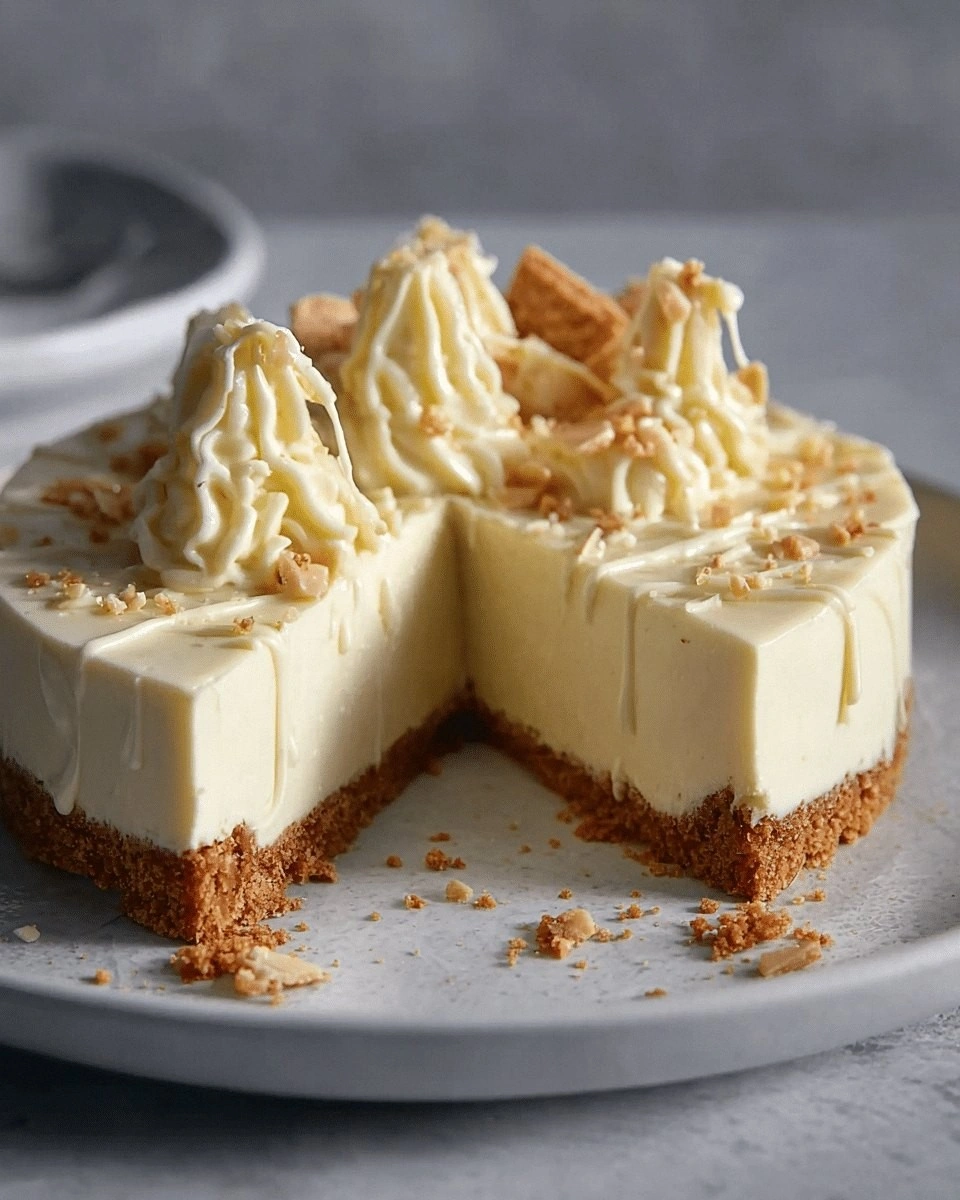
Ever had a dessert that feels like a hug in a bowl? I’m talking about a vegan white chocolate cheesecake that doesn’t just taste good—it feels like a celebration in every bite. I was in the middle of a late‑night bake session, the kitchen lights flickering, when my roommate’s voice burst through the door: “I’m craving something sweet, but I’m on a plant‑based diet.” I stared at the fridge, saw the handful of almonds, coconut milk, and a bag of white chocolate chips, and thought, “Why not combine them into the most decadent dessert ever?”
The moment I cracked the first piece of white chocolate, the room filled with a sweet, buttery aroma that made my heart race. The texture of the creamy filling was silky, almost like a cloud that melts on the tongue, and the subtle citrus undertone from the lemon juice cut the richness just enough to keep each bite from feeling heavy. The crust, made from crushed graham crackers and a hint of coconut oil, added a buttery crunch that balanced the smoothness of the filling. I could hear the faint pop of the oven timer and feel the heat radiating from the pan—an orchestra of senses that promised something extraordinary. If you’ve ever tasted a cheesecake that left you wanting more, you’ve already tasted the ordinary; this is the next level.
I’ll be honest—my first attempt was a disaster. The filling was too runny, the crust too soggy, and the whole thing looked like a sad, melted mess. But that’s how I discovered the secret: the right ratio of soaked cashews to coconut cream, the precise baking temperature, and the trick of letting the cheesecake cool slowly in the oven. Now, after countless tweaks, I can confidently say this is hands down the best vegan white chocolate cheesecake you’ll ever make at home. And it’s not just about the taste; it’s about the experience of creating something that feels indulgent yet guilt‑free.
Picture yourself pulling this out of the oven, the whole kitchen smelling incredible, and the cheesecake gleaming like a polished marble. The first slice will look like a glossy, ivory cloud, and the second will be a silky, dreamy dessert that makes your taste buds sing. The moment you taste it, the sweet, creamy texture will coat your palate, the citrus notes will lift the richness, and the subtle almond flavor will linger like a whispered secret. I dare you to taste this and not go back for seconds. Stay with me here—this is worth it.
What Makes This Version Stand Out
- Texture: The combination of soaked cashews and coconut milk creates a velvety filling that’s firmer than typical vegan cheesecakes but still melts in your mouth.
- Flavor: A splash of lemon juice brightens the white chocolate’s sweetness, turning the dessert from indulgent to balanced.
- Crust: A buttery graham cracker crust that is crisp on the edges and chewy in the middle, giving a satisfying contrast.
- Ingredient Quality: Only the best plant‑based ingredients—organic almonds, fair‑trade maple syrup, and vegan white chocolate—are used to ensure the richest flavor.
- Make‑ahead Potential: The cheesecake can be prepared up to 48 hours in advance, allowing the flavors to meld beautifully.
- Visual Appeal: The glossy ivory surface and subtle swirl of white chocolate make it Instagram‑ready.
- All‑Day Versatility: Serve it at brunch, dinner parties, or a midnight snack—every setting is a perfect match.
- Health Conscious: Low in refined sugars, free of dairy, and packed with healthy fats from nuts and coconut.
Inside the Ingredient List
The Flavor Base
White Chocolate Chips (1/2 cup): They are the heart of the cheesecake, providing a sweet, creamy backdrop that mimics dairy. Without them, the dessert would lack depth. If you use a lower‑grade brand, the flavor may feel flat, so opt for a reputable vegan chocolate line. You can substitute with dairy‑free dark chocolate if you prefer a slightly bitter edge.
Vegan Vanilla Extract (1 tsp): This subtle aroma lifts the overall profile and balances the sweetness of the white chocolate. A high‑quality vanilla extract adds a nuanced depth that a cheap imitation cannot match. If you’re allergic, a pinch of almond extract works well, though it will shift the flavor slightly.
Lemon Juice (1 tbsp): A bright, acidic note that cuts through the richness, preventing the cheesecake from feeling cloying. It also helps the filling set by slightly acidifying the mixture. If you prefer a sweeter version, reduce to 1 tsp, but the texture will be slightly softer.
The Texture Crew
Raw Cashews (1 cup, soaked): The cashews are the base that gives the cheesecake its creamy, dense body. Soaking them for at least 4 hours or overnight softens them, allowing for a smoother blend. If you can’t soak them, blanching for 2 minutes and rinsing will help, but the texture will be less silky.
Coconut Milk (1 cup, full‑fat): It adds richness and helps bind the mixture. Full‑fat coconut milk gives the dessert a luscious mouthfeel. If you’re on a low‑fat diet, use a light version, but expect a less creamy texture.
Coconut Oil (1/4 cup, melted): This fat component ensures the filling remains silky and prevents it from becoming too dense. Melted coconut oil also helps the crust set properly. If you prefer a neutral flavor, substitute with a small amount of neutral oil, though the coconut undertone will be reduced.
The Unexpected Star
Almond Flour (1 1/2 cups): Almond flour is used in the crust, providing a subtle nutty flavor and a tender crumb. It also adds healthy fats and protein to the dessert. If you’re gluten‑free, this flour is a great alternative; if you’re allergic, swap with oat flour, but adjust the amount slightly.
Maple Syrup (1/4 cup): This natural sweetener balances the sweetness of the white chocolate while adding a caramel undertone. It’s also a healthier alternative to refined sugar. If you’re vegan and prefer a less sweet taste, reduce to 2 tbsp.
The Final Flourish
Graham Cracker Crumbs (1 cup): They form the base of the crust, giving it structure and a buttery, slightly sweet flavor. Crush them finely for an even crust. If you can’t find graham crackers, use digestive biscuits or vanilla crackers.
Sea Salt (pinch): A pinch of sea salt enhances all the flavors, making the sweetness pop. It also balances the richness. If you’re watching sodium, use a low‑sodium option.
Everything's prepped? Good. Let's get into the real action...
The Method — Step by Step
- Preheat your oven to 325°F (165°C). Line a 9‑inch springform pan with parchment paper, ensuring the paper extends a few inches above the rim. This step guarantees a smooth release later. The oven should be fully preheated before you start mixing; otherwise, the batter may set too quickly.
- In a mixing bowl, combine the almond flour, graham cracker crumbs, and melted coconut oil. Stir until the mixture resembles fine sand. The crumbly texture is essential for a crisp crust. Press the mixture into the bottom of the prepared pan, forming an even layer. Use the back of a spoon to tamp it down firmly.
- Bake the crust for 10 minutes, then remove from the oven and set aside to cool. The crust should be golden brown at the edges. This step ensures the crust has a firm base that won’t crumble when you pour the filling. Let it cool completely before adding the filling.
- While the crust cools, soak the cashews in hot water for at least 4 hours or overnight. If you’re short on time, blanch them in boiling water for 2 minutes and rinse. Soaking softens them for a smoother blend. Drain well before proceeding.
- In a high‑speed blender, combine the soaked cashews, coconut milk, melted coconut oil, maple syrup, vanilla extract, lemon juice, and a pinch of sea salt. Blend until the mixture is completely smooth, taking about 2 minutes. Scrape down the sides as needed to ensure even blending. The result should be a silky, thick batter.
- Fold in the white chocolate chips until they are evenly distributed. The chips should melt slightly but not fully liquefy; this creates a beautiful marbled effect. If the mixture looks too thick, add a tablespoon of coconut milk to reach the desired consistency.
- Pour the filling over the cooled crust, smoothing the top with a spatula. Tap the pan gently on the counter to release any trapped air bubbles. This ensures an even surface for a flawless finish. The filling should be poured slowly to avoid splashing.
- Place the pan on a baking sheet to catch any drips and bake for 35–40 minutes, or until the edges are set and the center still has a slight wobble. The center should not be completely hard; a gentle jiggle indicates it’s ready. The baking time may vary slightly depending on your oven.
- Turn off the oven and leave the cheesecake inside with the door slightly ajar for 1 hour. This gradual cooling prevents cracks and ensures the filling sets properly. The cheesecake will continue to thicken as it cools.
- Remove from the oven, let it cool to room temperature, then refrigerate for at least 4 hours, preferably overnight. The cold will firm up the cheesecake, making it easier to slice. When ready to serve, run a knife around the edges before releasing the springform to avoid sticking.
That's it — you did it. But hold on, I've got a few more tricks that'll take this to another level...
Insider Tricks for Flawless Results
The Temperature Rule Nobody Follows
Many bakers think a higher oven temperature gives a better crust, but it actually causes the filling to set too quickly, leading to cracks. Keep the oven at 325°F (165°C) for the entire bake. This gentle heat allows the cheesecake to set slowly and evenly, preventing any sudden expansion.
Why Your Nose Knows Best
During the final 10 minutes of baking, pay close attention to the aroma. A warm, buttery scent signals the cheesecake is ready. If it smells like burnt sugar, it’s overdone. Trust your nose; it’s a reliable indicator of doneness.
The 5-Minute Rest That Changes Everything
After removing the cheesecake from the oven, leave it in the warm oven with the door ajar for 60 minutes. This gradual cooling step is critical for preventing cracks and ensuring a smooth surface. Skipping this step often results in a cracked top.
How to Slice Like a Pro
Before cutting, run a thin, sharp knife around the edges of the springform pan. Then, use a long knife or a pizza cutter to slice through the center. This technique keeps slices clean and prevents the filling from tearing.
Serving Temperature Matters
Serve the cheesecake slightly chilled, not at room temperature. A chilled dessert feels firmer and more refreshing, especially on a hot day. If you prefer a softer texture, let it sit at room temperature for 15 minutes before serving.
Creative Twists and Variations
This recipe is a playground. Here are some of my favorite ways to switch things up:
Berry Burst Variation
Fold in a cup of fresh blueberries before baking. The berries add a pop of color and a subtle tartness that complements the sweetness. They also create a beautiful marbled look as they disperse through the filling.
Minty Fresh Twist
Add a teaspoon of peppermint extract to the batter. The mint pairs wonderfully with white chocolate, creating a refreshing aftertaste. This variation is perfect for holiday parties.
Almond Joy Edition
Replace the graham cracker crust with a blend of almond flour and shredded coconut. Top the finished cheesecake with chopped toasted almonds and a drizzle of dark chocolate. The nutty crunch elevates the dessert’s texture.
Chocolate‑Covered Surprise
After baking, drizzle a thin layer of melted dark chocolate over the top. Let it set before slicing. The contrast between the white chocolate filling and dark chocolate drizzle adds depth and visual appeal.
Citrus Zest Finale
Grate a tablespoon of orange zest into the batter. The citrus aroma intensifies the lemon note, giving the cheesecake a bright, sun‑kissed flavor. This variation works well for summer gatherings.
Spiced Cinnamon Dream
Stir in half a teaspoon of ground cinnamon and a pinch of nutmeg before baking. The warm spices create a cozy, comforting dessert. It’s a great choice for fall or winter menus.
Storing and Bringing It Back to Life
Fridge Storage
Wrap the cheesecake tightly in plastic wrap and store it in the refrigerator for up to 5 days. The cold keeps the filling firm and prevents mold growth. When you’re ready to serve, let it sit at room temperature for 10 minutes to soften slightly.
Freezer Friendly
For longer storage, place the cheesecake in a freezer‑safe container and freeze for up to 3 months. Thaw overnight in the refrigerator before serving. A quick thaw ensures the texture remains creamy.
Best Reheating Method
To reheat, place the cheesecake on a baking sheet and warm in a preheated oven at 300°F (150°C) for 10 minutes. Add a splash of coconut milk to the top before reheating; this steams the cheesecake back to perfection and restores moisture.