Crispy tortillas packed with juicy chicken, melty cheese, and a fresh salsa drizzle—comfort food with a fiesta twist.
I still remember the first time I tasted a perfectly cooked quesadilla on a breezy evening in San Antonio. The sizzle of the tortilla, the aroma of smoky chicken mingling with melted cheese, and that bright burst of fresh salsa— it was a moment that turned a simple snack into a treasured memory. Since then, I’ve been on a quest to capture that magic in my own kitchen, tweaking flavors, perfecting textures, and finally landing on a version that feels both authentic and uniquely mine.
Chicken quesadillas are a staple of Mexican-American cuisine, bridging the comfort of a grilled cheese with the bold, vibrant flavors of Latin cooking. Traditionally they’re a street‑food favorite, rolled or folded and cooked on a griddle until the edges are crisp and the interior is gooey. What makes this recipe stand out is the addition of a tangy homemade salsa and a dollop of cool sour cream, creating a harmonious balance of heat, acidity, and richness.
In this guide you’ll learn how to build layers of flavor— from seasoning the chicken with cumin and paprika to crafting a salsa that sings with cilantro and lime. I’ll walk you through each step, share troubleshooting tips, and explain the science behind achieving that perfect golden crust without drying out the filling. By the end, you’ll be equipped to serve a dish that dazzles both the eyes and the palate.
So roll up your sleeves, preheat your skillet, and let’s bring a little fiesta to your table!
🌟 Why This Recipe Will Win Your Heart
Whether you’re feeding a hungry family or impressing friends at a game night, these quesadillas deliver comfort, excitement, and a burst of fresh flavors in every bite.
- ✨ Quick Weeknight Solution: Ready in under 40 minutes, the recipe uses pantry staples and fresh produce, making it perfect for busy evenings when you need a wholesome, satisfying meal without a long grocery run.
- ✨ Balanced Nutrition: Lean chicken breast provides high‑quality protein, while the salsa adds antioxidants from tomatoes and cilantro, and the cheese offers calcium— a well‑rounded plate without heavy cream sauces.
- ✨ Customizable Heat: Adjust the spice level by adding jalapeños or chipotle powder. The base flavor profile stays stable, letting you cater to mild palates or spice lovers alike.
- ✨ Crowd‑Pleaser Presentation: The golden, slightly charred tortilla edges create an irresistible visual cue, while the bright salsa adds a pop of color that makes the dish Instagram‑ready.
- ✨ Easy Ingredient Swaps: Substitute chicken with shredded pork, black beans, or tofu for vegetarian options, and swap cheese varieties to explore new taste dimensions.
- ✨ Leftover Magic: Leftover quesadillas reheat beautifully, and the salsa can be stored for up to a week, giving you a ready‑made topping for tacos, grilled fish, or salads.
🥗 Ingredients
📝 Complete Ingredient List
For the Chicken Filling:
For the Quesadilla Assembly:
For the Fresh Salsa & Sour Cream:
🔍 Focus on Key Ingredients
Chicken Breast
Chicken breast is the lean protein backbone of this dish. Choose breasts that are pinkish‑white with a firm texture; avoid any that feel slimy or have a gray tint. Pat them dry before seasoning to ensure the spices adhere properly and the sear forms a flavorful crust. The thin slices cook quickly, staying juicy while absorbing cumin and smoked paprika.
Cheddar Cheese
A sharp cheddar provides a robust, tangy melt that complements the salsa’s acidity. For extra stretch, blend with Monterey Jack or mozzarella. Look for cheese that’s freshly shredded rather than pre‑shredded, which often contains anti‑caking agents that can affect melt quality.
Fresh Salsa
The salsa’s freshness is crucial. Use ripe tomatoes that yield a slight give when pressed, and balance the acidity with lime juice. Cilantro adds an herbaceous lift, while jalapeño introduces a gentle heat that can be omitted for milder palates. Salt enhances all the flavors, making the salsa a bright counterpoint to the rich quesadilla.
🔄 Quick Substitutions
| If you don’t have... | Use instead... |
|---|---|
| Flour tortillas | Corn tortillas (slightly smaller, adjust cooking time) |
| Chicken breast | Shredded rotisserie chicken or tofu for a vegetarian version |
| Cheddar | Monterey Jack, pepper jack, or a vegan cheese blend |
👨🍳 Step‑by‑Step Instructions
Follow these detailed steps to create perfectly crispy quesadillas with a luscious interior. Each phase builds flavor and texture, ensuring a restaurant‑quality result at home.
📋 Phase 1: Preparation & Mise en Place
Gather and prep all components before you start cooking to keep the process smooth.
Season and Cook the Chicken
Pat the chicken breasts dry with paper towels. In a small bowl, combine 1 tsp ground cumin, ½ tsp smoked paprika, ¼ tsp salt, and a pinch of black pepper. Rub the mixture evenly over both sides of the chicken. Heat 1 tbsp olive oil in a large skillet over medium‑high heat. Add the chicken and sear for 4‑5 minutes per side, or until the internal temperature reaches 75 °C (165 °F) and the exterior is golden. Remove from heat, let rest for 5 minutes, then slice thinly against the grain.
Prepare the Fresh Salsa
In a mixing bowl, combine diced tomatoes, minced red onion, lime juice, and chopped cilantro. If you enjoy heat, stir in finely chopped jalapeño. Season with a pinch of salt, then gently toss. Let the salsa sit while you assemble the quesadillas; the flavors will meld and brighten.
🔥 Phase 2: Assembly & Cooking
Layer the ingredients and achieve that perfect golden crust.
Assemble the Quesadillas
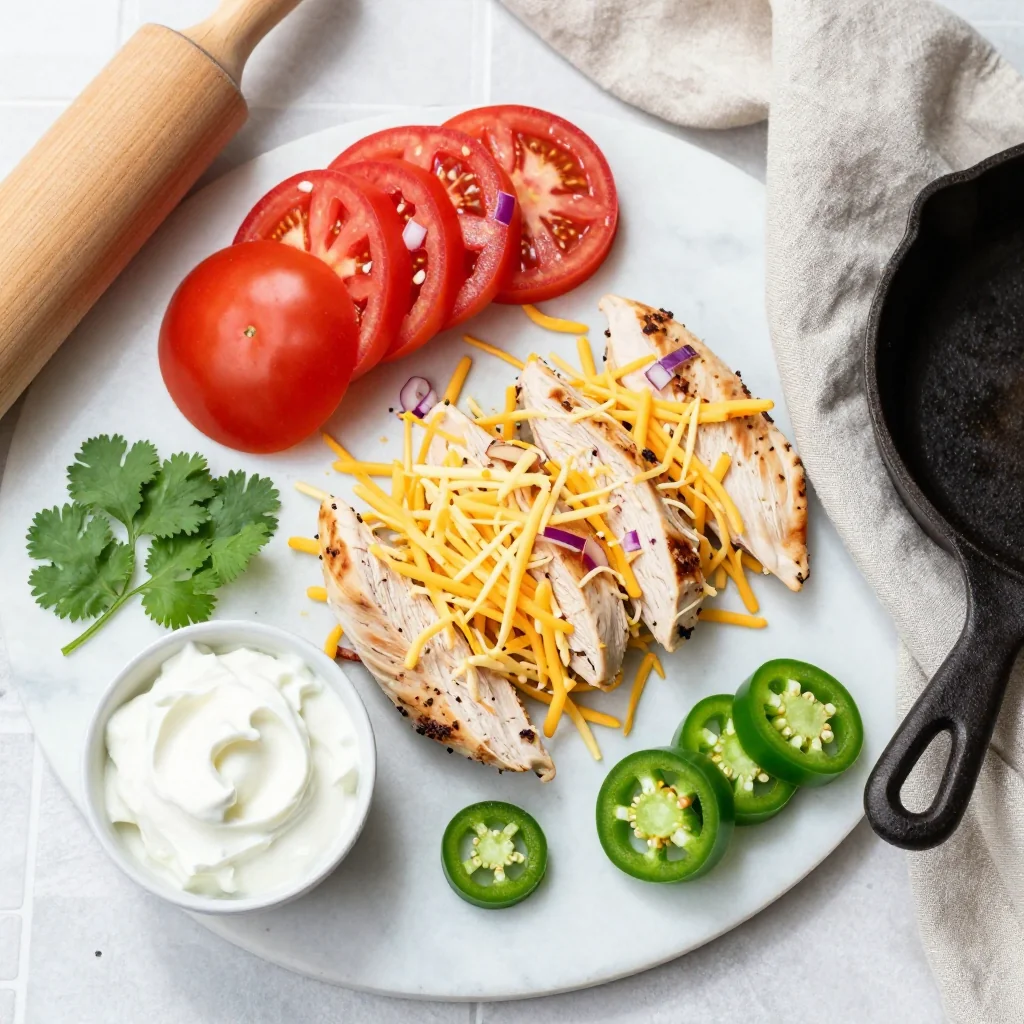
Lay a tortilla flat on a clean surface. Sprinkle a thin layer of shredded cheddar (about ¼ cup) over half of the tortilla. Add a handful of sliced chicken, diced red bell pepper, chopped onion, and a sprinkle of fresh cilantro. Top with another ¼ cup of cheese and fold the tortilla in half, pressing gently to seal.
Cook the Quesadillas
Heat a clean non‑stick skillet over medium heat. Lightly brush the surface with a drizzle of olive oil. Place the folded quesadilla in the pan and cook for 2‑3 minutes per side, pressing gently with a spatula. The tortilla should turn a deep golden‑brown, and the cheese should be fully melted. Transfer to a cutting board and repeat with remaining tortillas.
Warm the Sour Cream
While the quesadillas rest, gently warm the sour cream in a small saucepan over low heat for 1‑2 minutes, just until it becomes slightly fluid. This makes it easier to drizzle and prevents it from solidifying on the hot quesadilla.
✨ Phase 3: Finishing & Plating
Give the dish its final touches before serving.
Check for Doneness
Cut a small wedge from one quesadilla to verify the cheese is fully melted and the interior is steaming hot. The tortilla should be crisp yet pliable, not soggy.
Plate the Quesadillas
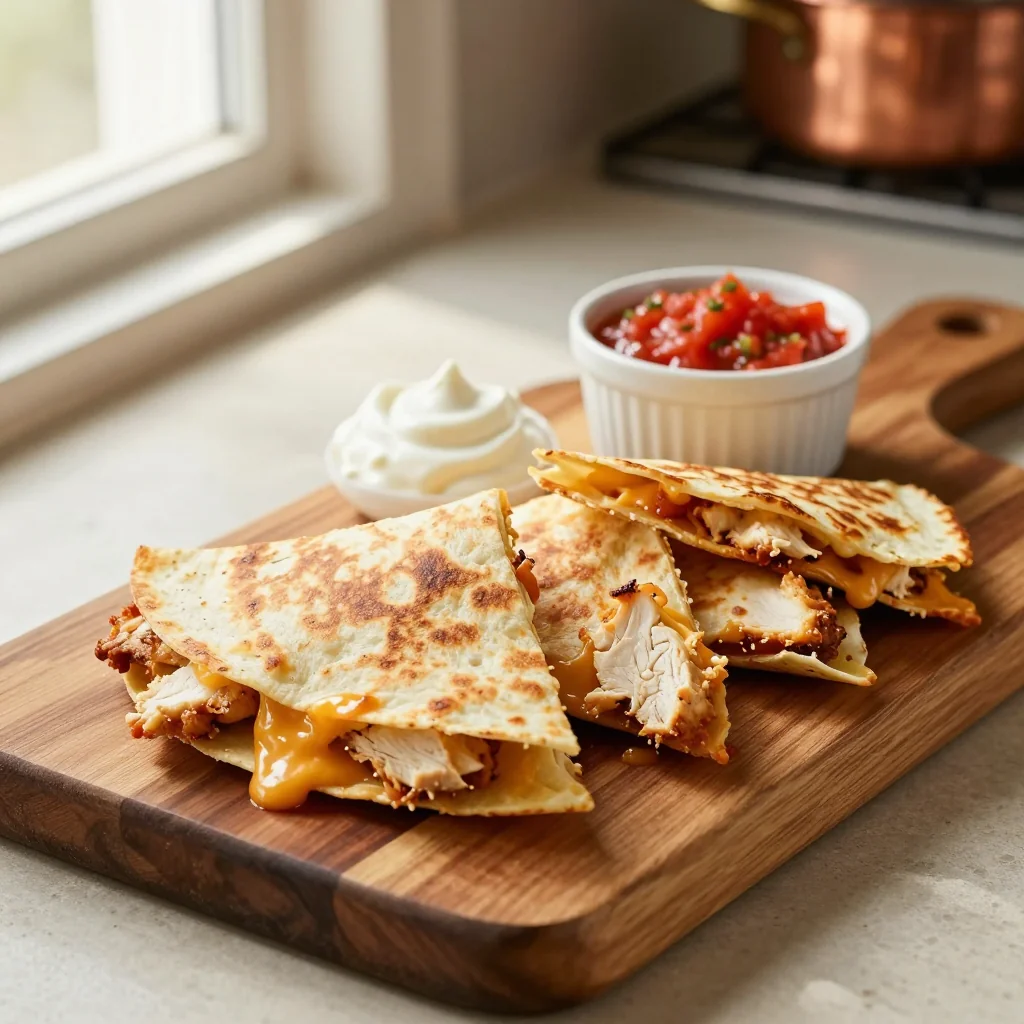
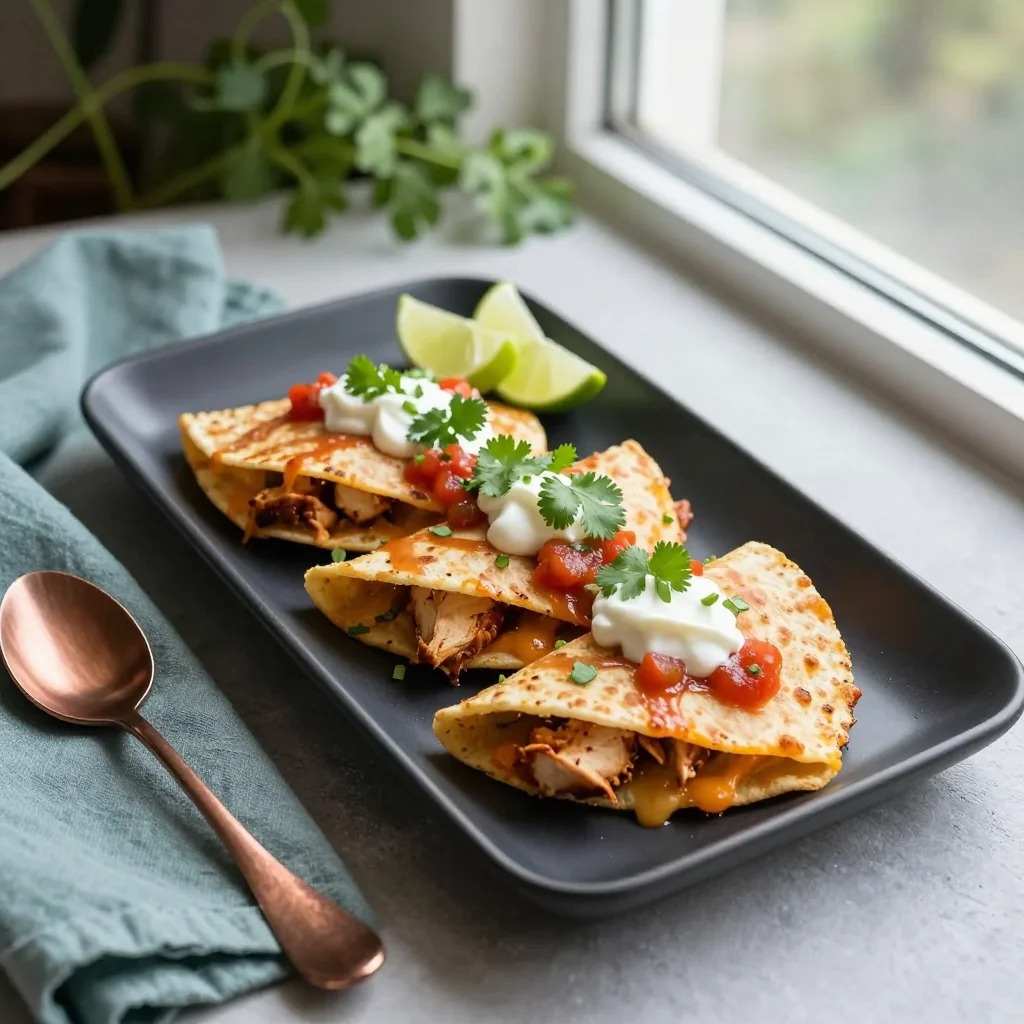
Slice each quesadilla into three triangular wedges. Arrange the wedges on a large serving platter, alternating colors for visual appeal. Spoon generous dollops of fresh salsa over the top, and drizzle the warmed sour cream in decorative ribbons.
Garnish and Serve
Finish with a final sprinkle of chopped cilantro and a few lime wedges on the side. The citrus will add a bright pop when squeezed over the quesadilla just before eating.
💡 Expert Tips & Tricks
🛒 Choosing the Best Ingredients
Opt for organic, free‑range chicken when possible; the meat will be more flavorful and less prone to dryness. When selecting tortillas, feel them— they should be pliable but not overly thick. Fresh cilantro should have bright green leaves without wilting, and ripe tomatoes should yield slightly under pressure. For cheese, a blend of sharp cheddar and Monterey Jack offers both flavor depth and meltability.
🔪 Preparation Techniques
Slice the chicken against the grain to keep each piece tender. Dice the bell pepper and onion uniformly to ensure even cooking. When mixing salsa, avoid over‑mashing the tomatoes; you want a chunky texture that holds up under the quesadilla’s heat. Keep all components at room temperature before assembly to prevent the tortilla from cracking when it hits a hot pan.
🌡️ Mastering the Cooking Process
Preheat the skillet fully before adding the quesadilla; this creates an instant sear that locks moisture inside. Use medium heat to avoid burning the tortilla before the cheese melts. If you prefer a deeper char, finish the quesadilla under a broiler for 30 seconds, watching closely. A light brush of oil on the tortilla’s outer surface promotes an even golden hue.
🍽️ Presentation & Service
For a restaurant‑style look, arrange the wedges in a fan shape on a rectangular platter. Drizzle salsa in a zig‑zag pattern and add a contrasting swirl of sour cream. Garnish with a few whole cilantro leaves and lime wedges for color contrast. Serve with a side of guacamole or a simple mixed green salad to balance the richness.
🏆 Pro Tips
Professional chefs differentiate their dishes through precision, technique, and thoughtful adjustments.
- 🎯 Control Moisture in the Filling: Pat the cooked chicken dry with paper towels before slicing. Excess moisture can steam the tortilla, preventing crispness. A dry filling also allows the cheese to melt uniformly without creating soggy pockets.
- 🎯 Use a Cast‑Iron Skillet: Cast iron retains heat better than stainless steel, delivering a more consistent crust. Pre‑heat the skillet for at least 2 minutes; this ensures the tortilla instantly starts to crisp upon contact.
- 🎯 Layer Cheese Strategically: Place a thin layer of cheese directly on the tortilla, then the chicken, and finish with another cheese layer. This sandwich technique creates a seal that traps steam, melting the interior while keeping the exterior dry.
- 🎯 Adjust Heat for Desired Browning: If the quesadilla browns too quickly, lower the heat to medium‑low and cover the pan briefly. The cover traps heat, helping the cheese melt without over‑browning the tortilla.
- 🎯 Rest Before Cutting: Allow the quesadilla to rest for 1‑2 minutes after cooking. This lets the cheese set slightly, preventing it from spilling out when you slice.
- 🎯 Flavor‑Infused Oil: Add a crushed garlic clove and a pinch of smoked paprika to the oil before brushing the skillet. This subtle infusion adds an extra layer of aroma without overwhelming the primary flavors.
"The secret to great Mexican street food is simplicity and balance— each ingredient must shine on its own while supporting the whole." — Chef Alejandro Martínez
🔄 Variations & Adaptations
This recipe is a versatile canvas. Below are several ways to tailor it to dietary preferences, flavor cravings, and family needs.
🥬 Vegetarian/Vegan Version
Replace the chicken with a mixture of black beans, corn, and diced zucchini. Use a plant‑based cheese such as cashew‑based mozzarella and substitute sour cream with coconut‑milk yogurt or a vegan sour cream alternative. The salsa remains unchanged, providing the same bright acidity.
- 1 can (400 g) black beans, rinsed and drained
- 1 cup corn kernels (fresh or frozen)
- 1 small zucchini, diced
- Vegan cheese blend (200 g)
- Vegan sour cream (200 g)
🌶️ Flavor Variations
Switch up the flavor profile with regional twists. Add smoky chipotle in adobo for a deeper heat, or incorporate roasted poblano peppers for a milder, earthy note. For a Mediterranean spin, use feta cheese, olives, and a drizzle of tzatziki.
Spicy Version:
Add 1 tsp chipotle powder to the chicken seasoning and increase jalapeño in the salsa to two peppers. Finish with a dash of hot sauce on the plate.
Mediterranean Version:
Substitute cheddar with crumbled feta, add sliced Kalamata olives to the filling, and serve with a side of tzatziki instead of sour cream.
Asian‑Inspired Version:
Marinate the chicken in soy sauce, ginger, and a splash of sesame oil. Replace the salsa with a quick cucumber‑sesame salad, and drizzle with a drizzle of sriracha mayo.
⚠️ Dietary Adaptations
Gluten‑Free:
Use certified gluten‑free corn tortillas. Ensure the cheese and salsa contain no hidden gluten additives.
Lactose‑Free:
Swap cheddar for a lactose‑free cheese alternative and replace sour cream with lactose‑free Greek yogurt.
Low‑Calorie:
Use low‑fat cheese, reduce the amount of oil for cooking, and serve with a side salad instead of extra sour cream. Opt for whole‑wheat or low‑carb tortillas to lower the carbohydrate load.
👶 Kid‑Friendly Version
For younger palates, omit jalapeño and use mild cheddar. Cut the quesadillas into smaller, bite‑size wedges and serve with a mild yogurt dip instead of sour cream. Adding a few shredded carrots into the filling can boost nutrition without altering flavor drastically.
📦 Storage & Reheating
🧊 Conservation
Refrigerator:
- Duration: 3 days
- Recommended container: Airtight plastic container or zip‑lock bag
- Tip: Place a paper towel between layers to absorb excess moisture.
Freezer:
- Duration: 2 months
- Method: Wrap each quesadilla individually in parchment paper, then seal in a freezer‑safe bag.
- Defrosting: Transfer to the refrigerator overnight or use the microwave’s defrost setting.
💡 Note: Salsa stays fresh for up to 5 days in the fridge; keep it in a separate container to prevent sogginess.
♨️ Reheating
🔥 Oven (Recommended):
- Preheat to 180 °C (350 °F).
- Place quesadillas on a baking sheet lined with parchment.
- Cover loosely with foil to retain moisture.
- Heat for 10 minutes, then remove foil and bake an additional 5 minutes to crisp the edges.
⚡ Microwave (Quick):
- Place quesadilla on a microwave‑safe plate.
- Cover with a microwave‑safe lid or another plate.
- Heat on medium power for 45 seconds, flip, then heat another 30 seconds.
- Check for even warmth; add extra time in 15‑second bursts if needed.
🍳 Stovetop:
Heat a dry skillet over medium heat. Add the quesadilla and press gently with a spatula. Cook 2‑3 minutes per side until the cheese re‑melts and the tortilla regains its crispness.
🍷 Perfect Pairings
🥗 Side Dishes
- Mexican Street Corn Salad: Char‑grilled corn mixed with lime, cilantro, and a light mayo dressing adds sweetness and crunch.
- Simple Green Avocado Salad: Mixed greens, sliced avocado, and a citrus vinaigrette provide a refreshing contrast.
- Black Bean & Mango Salsa: A sweet‑savory side that mirrors the main salsa’s brightness while adding tropical notes.
🍷 Wine & Beverage Pairings
- Rosé (dry, chilled): Its bright acidity complements the salsa and cuts through the cheese richness.
- Light Lager: The crisp carbonation refreshes the palate between bites.
- Non‑Alcoholic: A sparkling lime‑mint agua fresca offers a sweet‑tart balance.
🍰 Complementary Courses
Start with a light cucumber‑lime gazpacho or a fresh fruit salad featuring pineapple and watermelon. For dessert, serve a caramel flan or a citrus‑infused panna cotta to keep the meal lively and finish on a sweet, tangy note.
❓ Frequently Asked Questions
Q: Can I use frozen chicken instead of fresh?
Yes, you can thaw frozen chicken breasts in the refrigerator overnight or use the defrost function on your microwave. Pat them dry before seasoning to avoid excess moisture, which can prevent a good sear. The cooking time may increase by 2‑3 minutes if the pieces are slightly colder.
Q: How do I prevent the tortilla from tearing?
Ensure the tortilla is at room temperature before cooking; cold tortillas are more brittle. Lightly brush both sides with oil and avoid over‑filling. A gentle press with a spatula while cooking helps seal the edges without tearing.
Q: What if I don’t have a skillet large enough for the whole tortilla?
Cook the quesadillas one at a time using a smaller skillet. Keep the finished ones warm in a low oven (about 90 °C/200 °F) while you finish the rest. This maintains crispness without over‑cooking.
Q: Can I make the salsa ahead of time?
Absolutely. The salsa improves after a few hours as the flavors meld. Store it in an airtight container in the refrigerator for up to 3 days. Add fresh cilantro just before serving to retain its bright color and aroma.
Q: How can I make the dish gluten‑free?
Replace the flour tortillas with certified gluten‑free corn tortillas. Verify that the cheese and any added sauces are gluten‑free, as some processed cheeses contain trace wheat starch. The rest of the recipe is naturally gluten‑free.
Q: Is there a way to reduce the calorie count?
Use low‑fat cheese, reduce the amount of oil, and opt for whole‑wheat or low‑carb tortillas. Serve with a side salad instead of additional sour cream. Swapping sour cream for Greek yogurt cuts calories while maintaining creaminess.
🎉 Let’s Get Cooking!
This Chicken Quesadilla recipe marries the comforting familiarity of melted cheese with the bright, fresh flavors of homemade salsa and cool sour cream. By following the step‑by‑step guide, you’ll achieve a perfectly crisp exterior, a juicy chicken filling, and a balanced flavor profile that satisfies both casual diners and food enthusiasts alike. Remember, the key lies in proper seasoning, a hot pan, and respecting the rest periods—these small details elevate a simple dish into a memorable meal.
I can’t wait to see how you make this recipe your own. Share your photos, tweaks, and stories in the comments below. If you loved it, please rate it and let others know why it deserves a spot on their weekly menu!
Have you tried this recipe?
Leave a comment and rating below! Share your photos on Instagram with #QuesadillaFiesta to be featured.
Chicken Quesadillas with Salsa and Sour Cream
Crispy tortillas packed with juicy chicken, melty cheese, and fresh salsa—comfort food with a fiesta twist.
📝 Ingredients
Chicken Filling
Quesadilla Assembly
Salsa & Sour Cream
👨🍳 Instructions
- 1Season chicken with cumin, smoked paprika, salt, and pepper, then sear in olive oil until golden and cooked through.
- 2Let the chicken rest, then slice thinly against the grain.
- 3Combine diced tomatoes, red onion, lime juice, cilantro, and optional jalapeño to make salsa; season with salt.
- 4Lay a tortilla, sprinkle cheese, add chicken, bell pepper, onion, cilantro, then top with more cheese and fold.
- 5Cook each quesadilla in a hot skillet with a light brush of oil, 2‑3 minutes per side until crisp and cheese melts.
- 6Warm sour cream gently; it will drizzle nicely over the finished quesadillas.
- 7Slice quesadillas into wedges, arrange on a platter, and top with salsa and sour cream.
- 8Garnish with extra cilantro and lime wedges for a fresh finish.
- 9Serve immediately with optional sides like corn salad or avocado greens.
- 10Enjoy the burst of flavors and share your creation with friends!
🥗 Nutritional Information (per serving)
*Values are estimates based on standard ingredient brands.
📚 You Might Also Like
Spicy Shrimp Tacos
Chicken Enchilada Casserole
Vegetarian Black Bean Quesadilla