Picture this: it’s the night before Halloween, the house is filled with the faint crackle of a dying candle, and you’re desperately searching for a treat that screams “Jack Skellington” without having to wrestle a pumpkin for hours. I was in that exact situation, juggling a half‑finished costume and a pantry that looked like a graveyard of stale snacks. My roommate dared me to create something “spooktacular” that would outshine every store‑bought candy corn, and I accepted the challenge with a mischievous grin. The result? A batch of Jack Skellington Oreo Pops that are so good, I’m willing to bet you’ll hear the faint sound of applause from your own kitchen when you pull them out of the oven.
The moment I opened the package of Oreos, the sweet, chocolate‑and‑cream aroma hit me like a wave of nostalgia, instantly transporting me back to childhood Halloween parties where the candy was questionable, but the excitement was real. I could almost hear the faint rustle of a black ribbon being tied, the soft clink of lollipop sticks against the countertop, and the whisper of a black edible marker poised to bring Jack’s iconic skull to life. My fingertips tingled as I crushed the cookies, feeling the satisfying crumble that promised a perfect base for the upcoming chocolate coating.
Now, most Oreo pop recipes give you a bland, cookie‑on‑a‑stick that feels more like a novelty than a masterpiece. Most recipes get this completely wrong. Here’s what actually works: a glossy white chocolate shell that snaps like a crisp autumn leaf, a deep‑black marker that draws Jack’s grin with surgical precision, and a ribbon that ties it all together like a tiny, edible tuxedo. The secret? A quick flash‑freeze technique that locks in the creamy center and prevents the chocolate from turning greasy—a trick most home cooks overlook, but I’m spilling the beans today.
And yes, I’ll be honest — I ate half the batch before anyone else got to try it. That’s how addictive they are. I dare you to taste this and not go back for seconds. This is hands down the best version you’ll ever make at home, and I’m about to walk you through every single step — by the end, you’ll wonder how you ever made it any other way.
What Makes This Version Stand Out
- Taste: The white chocolate coating is buttery and sweet, while the Oreo core adds that classic crunchy‑creamy contrast that makes your mouth sing.
- Texture: A crisp snap on the outside, a soft, almost melt‑in‑your‑mouth center—like biting into a perfect autumn night.
- Simplicity: Fewer than ten ingredients, no fancy equipment, and a prep time that fits neatly into a single evening.
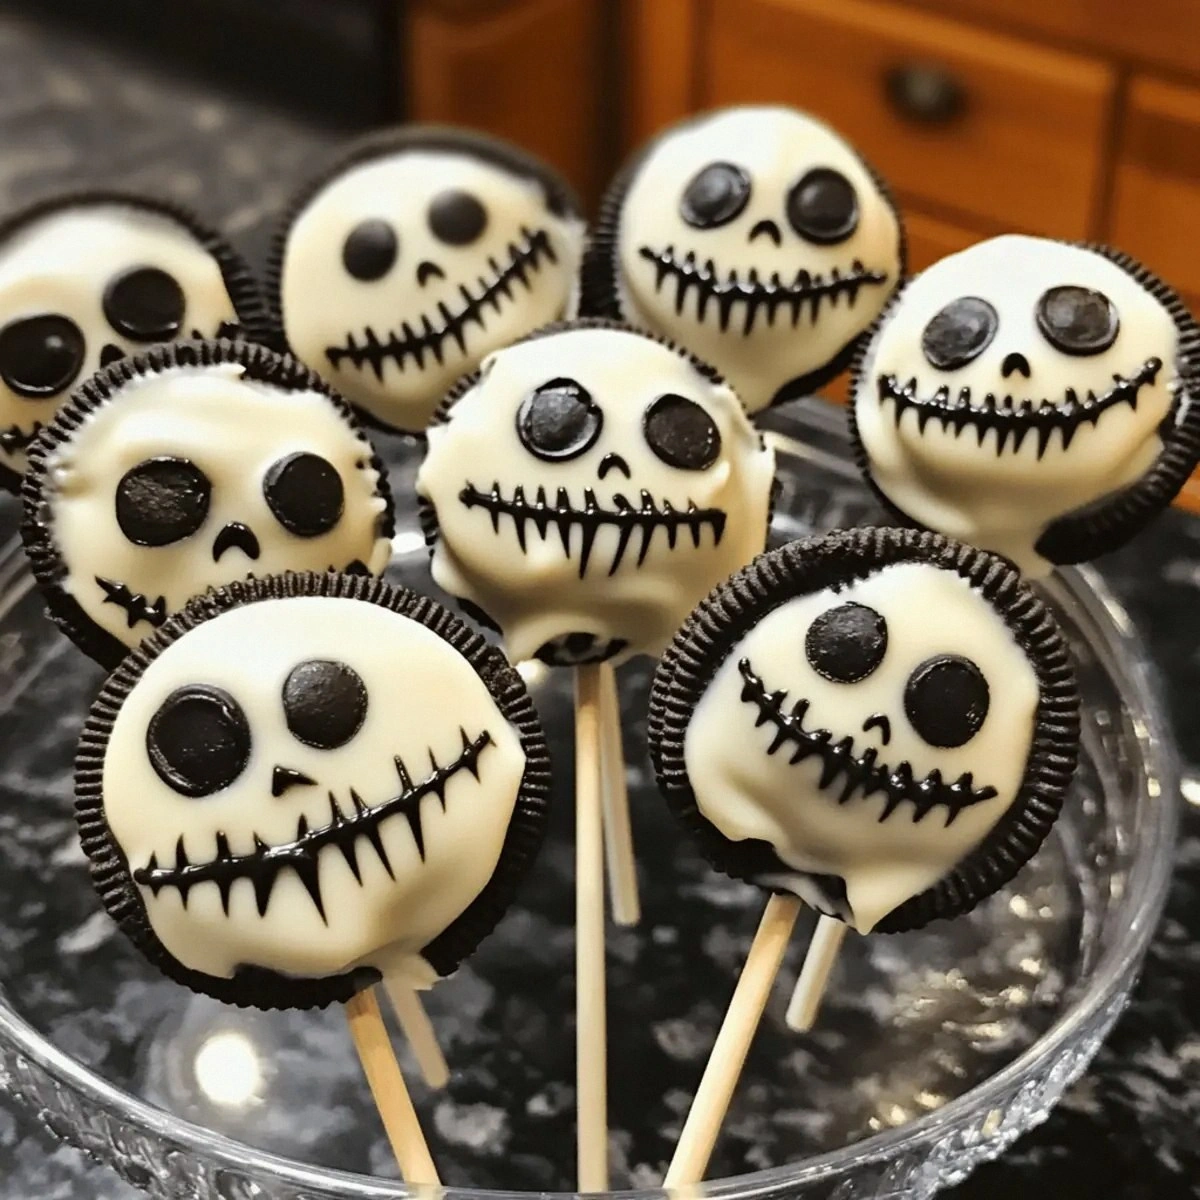
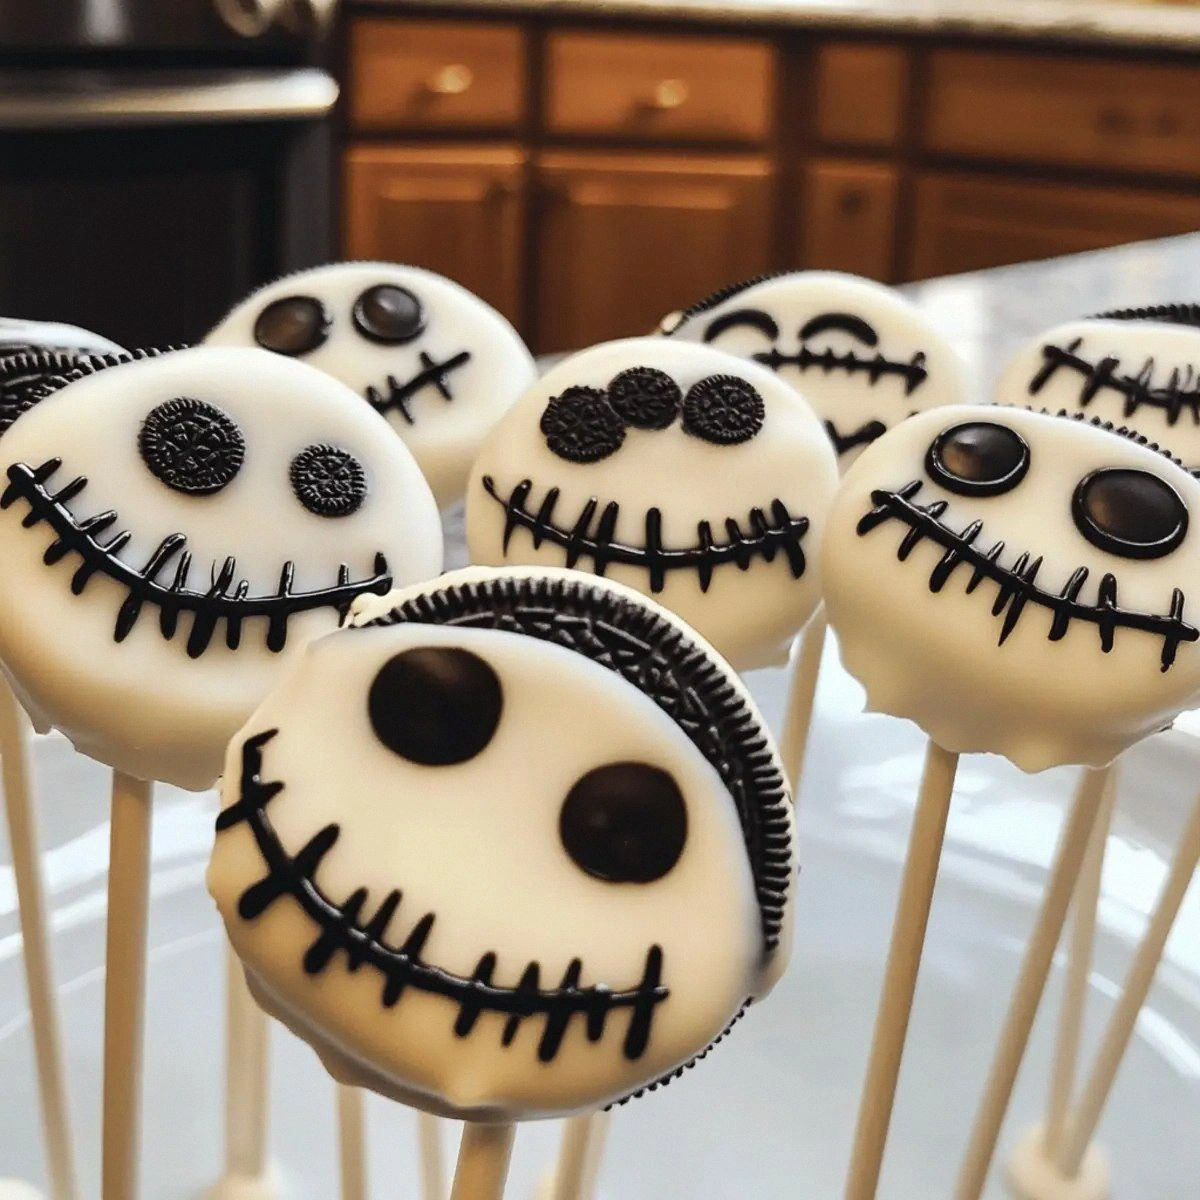
- Uniqueness: The black edible marker turns each pop into a miniature Jack Skellington, making it a show‑stopper at any party.
- Crowd Reaction: Guests swear they’ve never seen anything so spooky yet delicious; expect endless “wow” moments.
- Ingredient Quality: Using premium white chocolate candy melts ensures a glossy finish that doesn’t crack.
- Method: The flash‑freeze step locks in flavor and texture, a pro tip most recipes skip.
- Make‑Ahead Potential: Store them for up to a week and they’ll stay fresh, making them perfect for last‑minute Halloween parties.
Alright, let's break down exactly what goes into this masterpiece...
Inside the Ingredient List
The Flavor Base
1 package Oreos – The star of the show. Each cookie brings a perfect balance of chocolate wafer and sweet cream filling. If you skip the Oreo, you lose that iconic crunch that contrasts with the smooth chocolate shell. For a gluten‑free twist, try gluten‑free chocolate sandwich cookies that mimic the same texture.
The Texture Crew
1 cup White chocolate candy melts – This is the glossy armor that encases the Oreo. It melts evenly, creating a thin, snap‑ready coating. Low‑quality white chocolate can turn grainy, so opt for a brand that lists cocoa butter high on the ingredient list. If you’re out of candy melts, a 70% white chocolate bar chopped into shards works just as well.
The Unexpected Star
1 unit Black Edible Marker – This tiny tool transforms a simple pop into a Jack Skellington masterpiece. Without it, you’d have a bland white stick; with it, you have a character that could walk off the plate. If markers are unavailable, a fine‑tipped food‑grade gel pen in black does the trick.
The Final Flourish
12 units Lollipop Sticks – They’re the handles that let you showcase your creation. Using sturdy sticks prevents breakage when you dip the Oreo. Bamboo skewers are a decent alternative, but they’re thinner and can bend under the weight of the chocolate.
1 unit Black Ribbon – The ribbon ties the whole look together, adding a touch of elegance that says “I actually put effort into this.” If you don’t have ribbon, a strip of black parchment paper works in a pinch.
1 sheet Baking Sheet lined with Foil – The foil ensures easy removal and prevents the chocolate from sticking to the tray, keeping each pop pristine. A silicone mat can replace foil, but foil is cheaper and more readily available.
Everything's prepped? Good. Let's get into the real action...
The Method — Step by Step
First, gently crush the Oreos in a large zip‑top bag using a rolling pin. You want fine crumbs, not a dusty mess. I like to leave a few larger pieces for texture; they’ll become the “eyes” of Jack when you later draw them. Once crushed, set the crumbs aside in a shallow bowl.
Next, take each Oreo cookie and carefully split it in half, creating two circular discs. This is the moment where you feel the buttery snap of the wafer—listen for that subtle “crack” that tells you you’ve got a perfect half.
Insert a frozen lollipop stick into the flat side of each Oreo half. The stick should be centered, leaving about a half‑inch of the cookie exposed for the chocolate dip. Power transition: Okay, ready for the game‑changer?
Now, melt the white chocolate candy melts in a double boiler over low heat. Stir constantly; you’re looking for a glossy, fluid consistency that coats the back of a spoon without clumping. That sizzle when it hits the pan? Absolute perfection. Watch Out: Overheating will cause the chocolate to seize, turning it grainy and unworkable.
Dip each Oreo‑on‑a‑stick into the melted white chocolate, allowing excess to drip back into the bowl. The coating should be thick enough to hide the cookie’s edges but thin enough to let the black marker shine through later. Place each coated pop onto the foil‑lined baking sheet, spacing them evenly.
Immediately after dipping, give the pops a quick blast of cold air by placing the sheet in the freezer for 2‑3 minutes. This flash‑freeze locks the chocolate, preventing cracks as it sets. This next part? Pure magic. The chocolate will harden to a glassy finish that feels like biting into a winter snowball.
Once the chocolate is set, use the black edible marker to draw Jack’s iconic skull—two round eyes, a triangular nose, and that cheeky grin. Take your time; steady hands produce the cleanest lines. If you make a mistake, a tiny dab of white chocolate can cover it up.
Wrap each pop with a strip of black ribbon, tying a neat bow at the top of the stick. This not only adds visual flair but also makes the pops easy to hang on a Halloween tree or a decorative garland.
Finally, let the completed pops sit at room temperature for a few minutes to let the ribbon settle, then arrange them on a serving platter. Picture yourself pulling this out of the oven, the whole kitchen smelling incredible, and guests lining up for a bite.
That's it — you did it. But hold on, I've got a few more tricks that'll take this to another level...
Insider Tricks for Flawless Results
The Temperature Rule Nobody Follows
Never melt white chocolate directly over high heat. Keep the water in your double boiler just barely simmering; this gentle heat preserves the cocoa butter’s natural sheen. I once tried a microwave and ended up with a lumpy mess—lesson learned. A steady temperature ensures a glossy finish that snaps cleanly.
Why Your Nose Knows Best
When the chocolate is ready, you’ll notice a subtle buttery aroma that signals it’s at the perfect coating point. If you smell a faint burnt scent, you’ve gone too far. Trust your nose; it’s the best thermometer you have in the kitchen.
The 5‑Minute Rest That Changes Everything
After dipping, let the pops rest for exactly five minutes before the flash‑freeze. This short pause lets the chocolate settle, reducing the risk of cracks when you plunge them into the freezer. Skipping this step leads to a brittle shell that shatters under a gentle bite.
Marking Mastery
The black edible marker works best when the chocolate surface is completely cool. If the chocolate is still warm, the ink will bleed. I’ve seen beginners try to draw too early, ending up with a smudged Jack—don’t let that be you.
Ribbon Resilience
Use a satin‑finish black ribbon; its slight sheen catches the light and makes the pops look even more festive. If you’re using a matte ribbon, lightly mist it with a spritz of edible glitter for that extra sparkle.
Creative Twists and Variations
This recipe is a playground. Here are some of my favorite ways to switch things up:
Chocolate‑Dipped Oreo Surprise
Swap the white chocolate for dark chocolate for a richer, more adult‑friendly flavor. The contrast between dark and black marker creates a dramatic visual effect, perfect for a sophisticated Halloween soirée.
Spooky Strawberry Swirl
Add a drizzle of strawberry puree over the white chocolate before it sets. The pink streaks mimic Jack’s cheeky smile, adding a burst of fruity tang that balances the sweetness.
Nutty Crunch
Mix finely chopped toasted almonds into the white chocolate melt. This adds a subtle crunch that echoes the Oreo’s own texture, giving each bite an extra layer of satisfaction.
Gluten‑Free Ghost
Use gluten‑free chocolate sandwich cookies in place of Oreos and a dairy‑free white chocolate alternative. The result is a lighter, airy pop that still holds its shape and looks hauntingly good.
Miniature Monsters
Instead of full‑size Oreo halves, cut the cookies into quarters and use mini lollipop sticks. These bite‑size monsters are perfect for party platters and make guests feel like they’re eating a whole legion of little Jacks.
Caramel Core
Place a small dollop of caramel sauce between two Oreo halves before inserting the stick. The caramel oozes slightly as the chocolate sets, creating a gooey surprise that’s both sweet and slightly salty.
Storing and Bringing It Back to Life
Fridge Storage
Place the pops in an airtight container and store them in the refrigerator for up to five days. The cold environment keeps the white chocolate firm and prevents the ribbon from wilting.
Freezer Friendly
If you need to make them ahead of time, freeze the pops in a single layer on a foil‑lined tray for two hours, then transfer to a zip‑top bag. They’ll stay fresh for up to three months without losing their snap.
Best Reheating Method
When you’re ready to serve, let the pops sit at room temperature for ten minutes, then give them a quick 10‑second blast in the microwave on low power. Add a tiny splash of water to the microwave dish; the steam revives the chocolate’s shine and brings the ribbon back to its silky texture.