I was halfway through a boring Tuesday night when my roommate dared me to create something that could make a grown adult weep with joy and then immediately sprint to the fridge for seconds. I stared at a sack of onions, a block of cream cheese, and a lone jalapeño that had been hiding in the back of the fridge for weeks. The kitchen was humming with the low‑grade sound of the exhaust fan, the countertops were speckled with flour from a failed pancake attempt, and my mind was racing with the memory of that one time I tried to fry onion rings and ended up with soggy, flavorless circles that could have passed for sad rubber bands. I thought, “What if I could take the comforting crunch of a classic onion ring and stuff it with the decadent, melty heat of a jalapeño popper? Could that be the culinary love child that finally ends my snack‑time indecisiveness?”
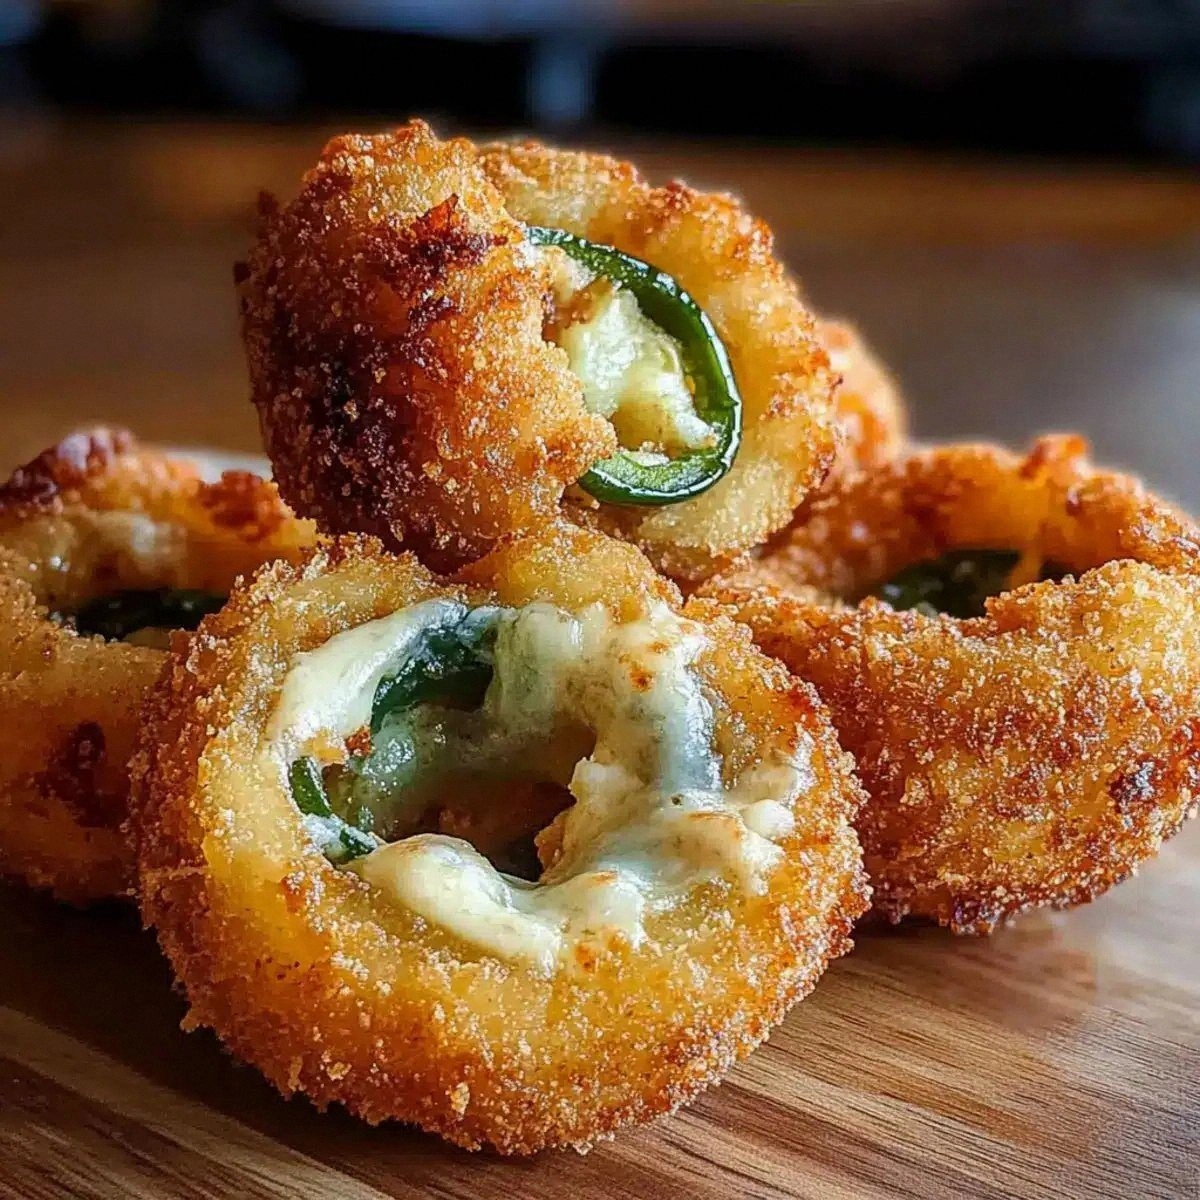
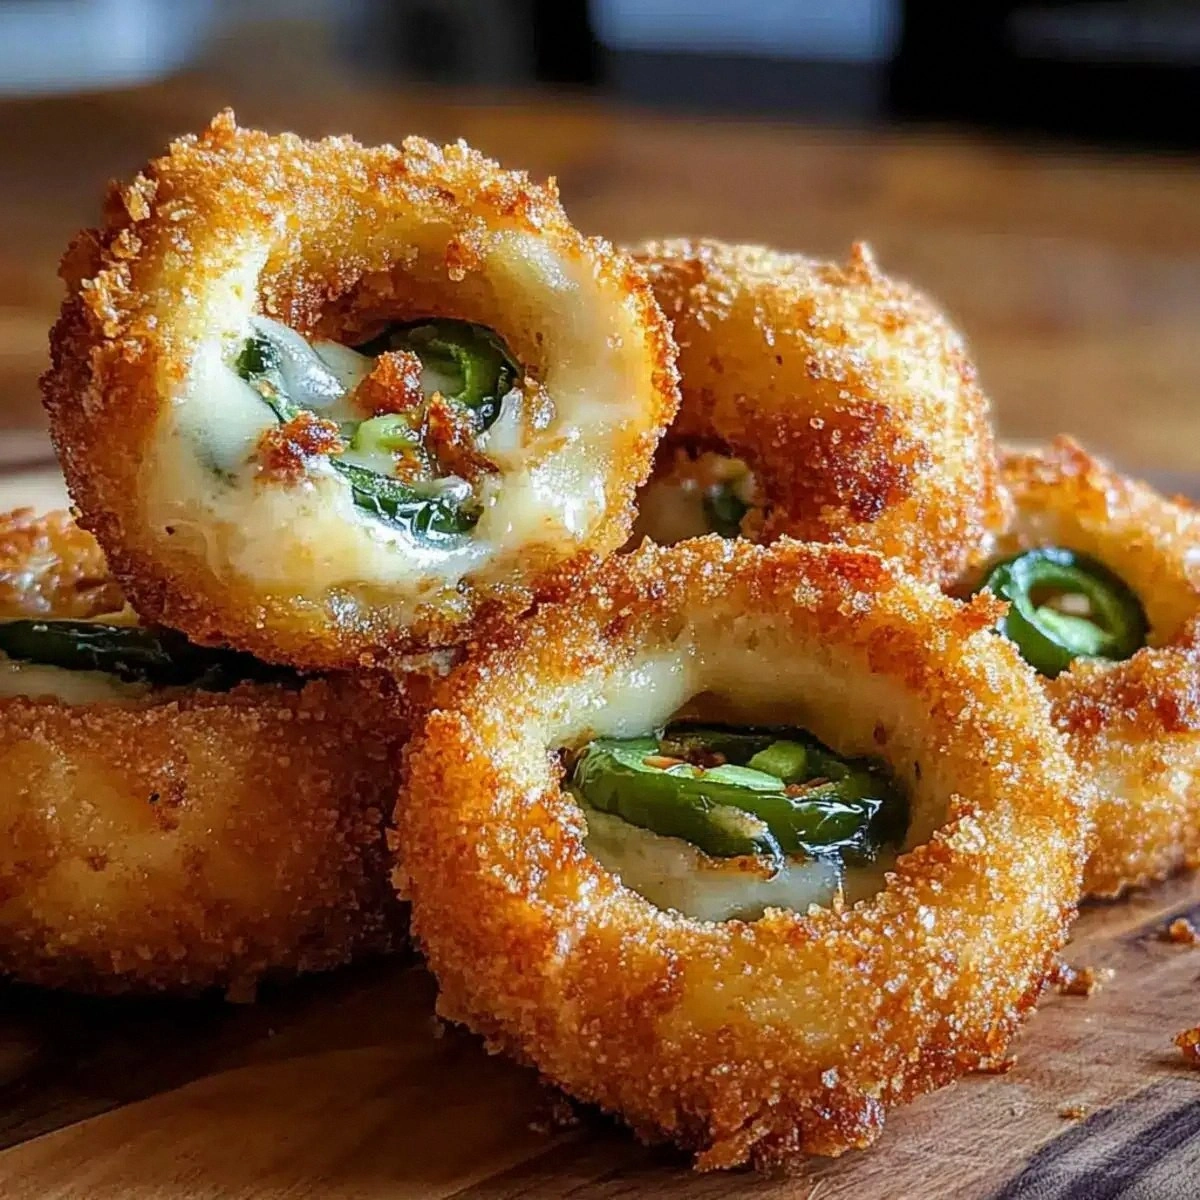
Picture this: the first bite is a golden‑brown, crackling shell that shatters like thin ice under the pressure of your teeth, immediately giving way to a creamy, tangy center that sings with the bright heat of jalapeño and the richness of melted cheddar. The aroma that hits you as the rings sizzle in oil is a heady mix of sweet onion caramelization and a faint, smoky peppery whisper that makes your nostrils do a little dance. When you finally pull the ring from the pan, the steam rises like a fragrant veil, and you can almost hear the cheese sighing as it stretches across the onion’s surface. It’s a sensory rollercoaster that makes you forget the world outside your kitchen, and trust me, I’ve never felt that kind of bliss from a snack before.
Most recipes for jalapeño popper‑stuffed onion rings either drown the onion in cheese or leave the popper flavor as an afterthought. I’ve tried a handful of “quick hacks” that promised a shortcut, only to end up with soggy, unevenly coated rings that looked like they’d been through a hurricane. The secret to this version is a three‑step coating process that locks in moisture while creating that coveted crunch, plus a surprise ingredient that gives the cheese filling a silky, almost buttery texture you won’t believe. I’m about to spill the beans (and the cheese) on why this method works and how you can nail it every single time.
I’m not just sharing a recipe; I’m handing you a ticket to the ultimate snack showdown. I dare you to taste this and not go back for seconds. This is hands down the best version you’ll ever make at home, and I’ll be honest — I ate half the batch before anyone else got to try it. Okay, ready for the game‑changer? Let me walk you through every single step — by the end, you’ll wonder how you ever made it any other way.
What Makes This Version Stand Out
- Flavor Explosion: The combination of sweet onion, spicy jalapeño, and sharp cheddar creates a layered taste profile that evolves with each bite, delivering heat that never overwhelms.
- Crunch Factor: A double‑dip in flour and breadcrumbs creates a crust that stays crisp even after the cheese melts, unlike the soggy outcomes you see elsewhere.
- Simplicity: All ingredients are pantry‑friendly, and the steps use basic techniques—no fancy equipment required.
- Unique Twist: Adding a splash of cream cheese to the popper filling gives a buttery silkiness that ordinary shredded cheese alone can’t achieve.
- Crowd Reaction: These rings disappear faster than free pizza at a party; expect applause, high‑fives, and possibly a request for a second batch.
- Ingredient Quality: Using fresh jalapeños and high‑quality cheddar makes a noticeable difference in flavor intensity and melt.
- Cooking Method: Frying in oil at the right temperature locks in moisture while the outer coating turns to a perfect golden hue.
- Make‑Ahead Potential: You can prep the stuffed onions up to a day ahead and freeze them, then fry when you’re ready to serve.
Inside the Ingredient List
The Flavor Base
The star of this dish is undeniably the onion. Choosing a large yellow or sweet onion gives you a natural sweetness that balances the jalapeño’s heat. If you pick a red onion, expect a sharper bite that can dominate the cheese, so stick with yellow for that mellow, caramel‑like undertone. When you slice the onion into rings, make sure each piece is about a quarter‑inch thick; too thin and they’ll fall apart, too thick and the interior won’t heat through evenly. A quick tip: soak the sliced rings in cold water for a minute, then pat them dry—this removes excess sulfur and gives you a cleaner flavor.
The Texture Crew
Flour, eggs, and breadcrumbs form the classic three‑step coating that creates that coveted crunch. All‑purpose flour acts as the first adhesive layer, binding the egg wash to the onion and creating a barrier that prevents the breadcrumbs from sliding off during frying. The eggs add richness and help the breadcrumbs adhere, while the seasoned breadcrumbs or panko deliver a light, airy crust that stays crisp. If you crave extra crunch, toast the breadcrumbs lightly before using them; this adds a nutty depth that elevates the whole bite.
The Unexpected Star
Cream cheese might seem like an odd addition to a jalapeño popper, but it’s the secret to a silky, melt‑in‑your‑mouth filling. The 8‑ounce block should be softened to room temperature; this ensures it mixes smoothly with the shredded sharp cheddar, creating a homogeneous blend that doesn’t separate during frying. The sharp cheddar contributes that tangy bite and a beautiful orange hue, while the cream cheese tempers the heat of the jalapeños, making the overall flavor more balanced. If you’re lactose‑intolerant, a dairy‑free cream cheese works, but expect a slightly different texture.
The Final Flourish
Jalapeños bring the heat, and their bright, vegetal flavor is what makes this snack unforgettable. Slice them thinly, remove the seeds if you prefer a milder kick, and sauté them briefly to soften their edge before mixing them into the cheese. Optional add‑ins like crisp bacon bits, a pinch of garlic powder, or chopped scallions can be tossed in for extra layers of flavor; just remember, each addition changes the balance, so add sparingly at first. The oil you choose for frying—vegetable or canola—should have a high smoke point; this ensures the rings fry quickly without burning, preserving that perfect golden crust.
Everything's prepped? Good. Let's get into the real action...
The Method — Step by Step
Slice the onions into rings about ¼‑inch thick and separate them carefully. Place the rings in a bowl of ice water for 60 seconds; this not only reduces the sting of the onion but also firms them up, preventing tears later on. After soaking, pat each ring dry with paper towels—any moisture will cause the coating to slip.
Kitchen Hack: Use a clean kitchen towel to gently press the rings, removing excess water without crushing them.While the onions rest, prepare the filling. In a medium bowl, combine the softened cream cheese, shredded sharp cheddar, and finely diced jalapeños. If you like a smoky note, toss in a pinch of smoked paprika. Mix until the cheese is smooth and the jalapeños are evenly distributed. This mixture should be thick enough to hold its shape when spooned onto the onion.
Take each onion ring and, using a small spoon, place a generous dollop of the cheese mixture in the center of the ring. Gently fold the ring over the filling, overlapping the edges so the cheese is sealed inside. The goal is to create a “pocket” that won’t leak during frying. If the ring refuses to stay closed, secure it with a toothpick—just remember to remove them before serving.
Set up a three‑stage dredging station: a shallow bowl of all‑purpose flour, a second bowl whisking together two eggs (add a splash of milk if you like a richer coat), and a third bowl filled with seasoned breadcrumbs or panko. Roll each stuffed ring first in flour, shaking off excess, then dip into the egg wash, and finally coat thoroughly with breadcrumbs. For extra crunch, press the breadcrumbs gently into the surface with your fingers.
Heat 2 cups of oil in a deep, heavy‑bottomed skillet over medium‑high heat. The oil should reach 350°F (175°C); you can test this by dropping a breadcrumb in—if it sizzles and rises to the surface within 10 seconds, you’re good to go. This temperature is crucial: too low and the rings absorb oil, too high and the coating burns before the cheese melts.
Carefully lower a handful of coated rings into the hot oil, making sure not to crowd the pan. Fry for 2‑3 minutes per side, or until the exterior turns a deep golden‑brown and the cheese inside is bubbling. Listen for that satisfying sizzle that signals a perfect crust forming. Use a slotted spoon to transfer the rings onto a wire rack set over a baking sheet; this lets excess oil drip away, preserving crispness.
While the rings finish cooking, keep an eye on the temperature; if the oil starts to smoke, reduce the heat slightly. This is where many home cooks go wrong—letting the oil overheat leads to burnt crumbs and a greasy interior. A quick tip: if you notice the crumbs turning darker too fast, pull the pan off the burner for a few seconds to let the temperature settle.
Watch Out: If the cheese begins to ooze out during frying, your coating wasn’t sealed properly—next time, press the edges together more firmly.Once all the rings are fried, sprinkle them lightly with sea salt while they’re still hot; this enhances the flavor and adds a subtle crunch. Serve immediately with a dipping sauce of your choice—ranch, chipotle mayo, or a simple squeeze of lime works wonders. The aroma will fill the kitchen, and you’ll hear the faint crackle as the crust settles—a true sensory finale.
That’s it — you did it. But hold on, I’ve got a few more tricks that'll take this to another level. From finishing salts to a quick glaze, these final touches will make your rings the talk of any gathering.
Insider Tricks for Flawless Results
The Temperature Rule Nobody Follows
Maintaining a steady oil temperature is the single most important factor for perfect onion rings. Use a candy thermometer and keep the heat between 350°F and 365°F. If the temperature drops when you add the rings, give the oil a minute to recover before adding the next batch. This prevents soggy interiors and ensures each ring gets that uniform golden crust.
Why Your Nose Knows Best
Your sense of smell is a reliable indicator of doneness. When the rings start to emit a nutty, toasted scent, you’re within seconds of a perfect finish. If you notice a faint burnt smell, pull the pan off the heat immediately—overcooked breadcrumbs will turn bitter and ruin the delicate cheese filling.
The 5‑Minute Rest That Changes Everything
After frying, let the rings rest on a wire rack for at least five minutes. This short rest allows the steam inside to redistribute, preventing the cheese from spilling out when you bite in. It also lets the crust firm up a bit more, giving you that satisfying snap.
The Secret of the Double‑Coat
I once tried a single‑coat method to save time, only to end up with a soggy, breadcrumb‑laden mess. The double‑coat—flour, egg, breadcrumbs, then a second light dusting of flour before the final breadcrumb layer—creates a barrier that locks moisture inside while keeping the exterior crisp. Trust me, the extra step is worth every second.
The Finish Line: Finishing Salt
A light dusting of flaky sea salt right after frying does more than add flavor; it adds a delicate crunch that contrasts beautifully with the soft cheese interior. Use a fine mesh shaker to get an even distribution without overpowering the jalapeño heat.
Creative Twists and Variations
This recipe is a playground. Here are some of my favorite ways to switch things up:
Bacon‑Wrapped Bliss
Wrap each stuffed onion ring with a half‑slice of crispy bacon before coating. The bacon adds smoky depth and an extra crunch, turning the snack into a hearty appetizer perfect for brunch gatherings.
Cheesy Chipotle Kick
Swap the jalapeños for chipotle peppers in adobo sauce, and add a teaspoon of the adobo sauce to the cheese mixture. This gives a smoky, slightly sweet heat that pairs beautifully with the sharp cheddar.
Veggie‑Boosted Version
Add finely diced red bell pepper and corn kernels to the filling for a burst of sweetness and color. This not only stretches the filling further but also adds a pleasant crunch.
Gluten‑Free Crunch
Replace the all‑purpose flour with a gluten‑free blend and use gluten‑free panko. The texture remains just as satisfying, making the dish accessible to those with dietary restrictions.
Spicy Ranch Dip
Blend a packet of ranch seasoning into a cup of Greek yogurt, then stir in a dash of hot sauce. This dip adds a cool, tangy contrast that balances the heat of the jalapeños.
Herb‑Infused Oil
Infuse the frying oil with a sprig of rosemary or thyme for a subtle aromatic note that lifts the entire flavor profile. Just be sure to strain the oil before heating to avoid burning the herbs.
Storing and Bringing It Back to Life
Fridge Storage
Place cooled rings in an airtight container lined with a paper towel to absorb excess moisture. They’ll stay fresh for up to three days. Reheat in a preheated 375°F oven for 8‑10 minutes to revive the crunch.
Freezer Friendly
Arrange the fried rings on a parchment‑lined tray and freeze until solid, then transfer to a zip‑top bag. They can be stored for up to two months. When ready to serve, fry directly from frozen for an extra‑crispy exterior.
Best Reheating Method
For the ultimate revival, use a hot skillet with a splash of fresh oil and a brief 2‑minute fry on each side. Add a tiny splash of water to the pan and cover for 30 seconds; the steam helps melt the cheese without drying it out, delivering that just‑cooked feeling.