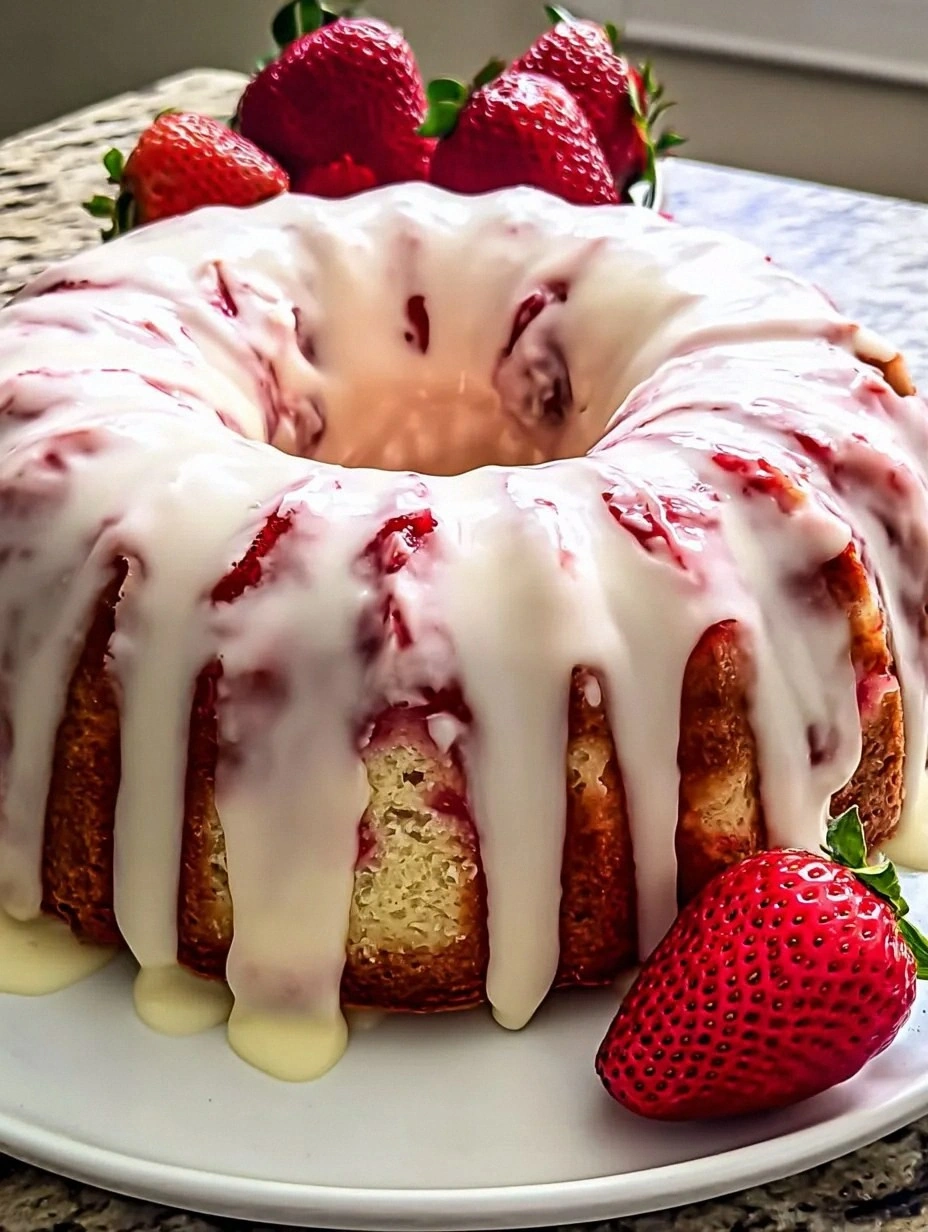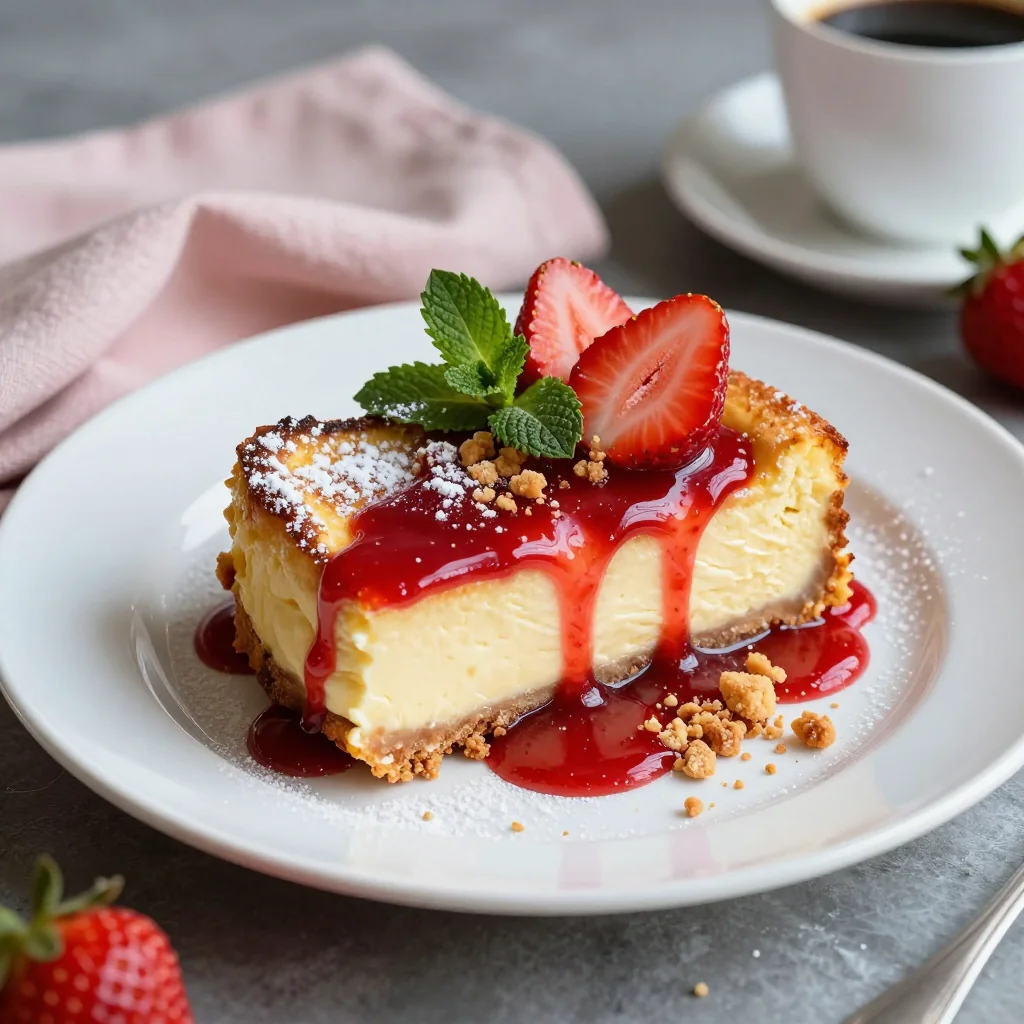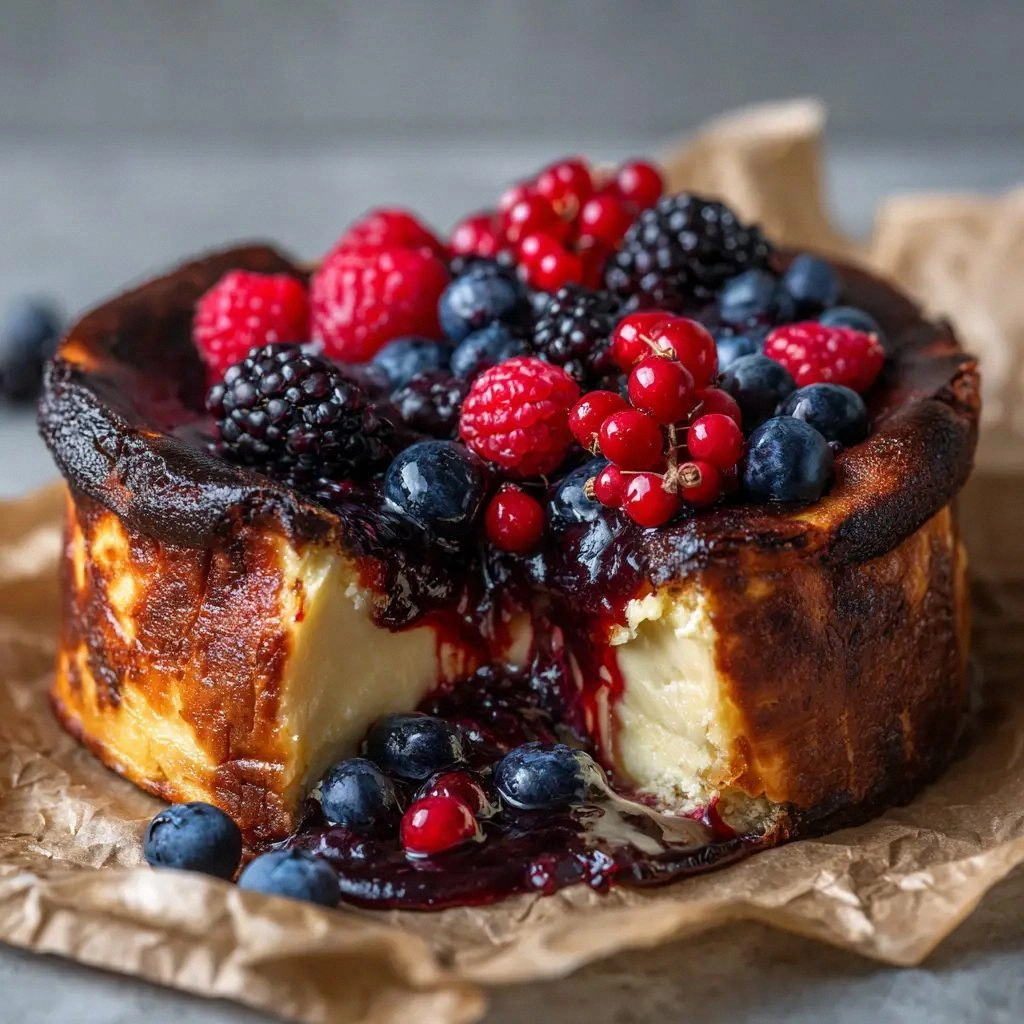
I was staring at a half‑cooked cheesecake on the stove, the batter looking more like a soggy pancake than a luscious dessert, when my friend dared me to turn it into something that would make our entire apartment smell like a summer orchard. That night, I crumbled 32 ounces of full‑fat cream cheese into a bowl, tossed in a splash of citrus zest, and decided to let the batter scorch at the bottom of the pan until it sang a caramelized anthem. The result was a cheesecake that looked like it had just walked out of a Michelin‑star kitchen, with a dark, blistered crust that clung to the pan like a secret, and a creamy, citrus‑infused center that tingled the palate with every bite. If you’ve ever thought that burnt is a bad thing, think again; this is a dessert that celebrates the art of controlled char.
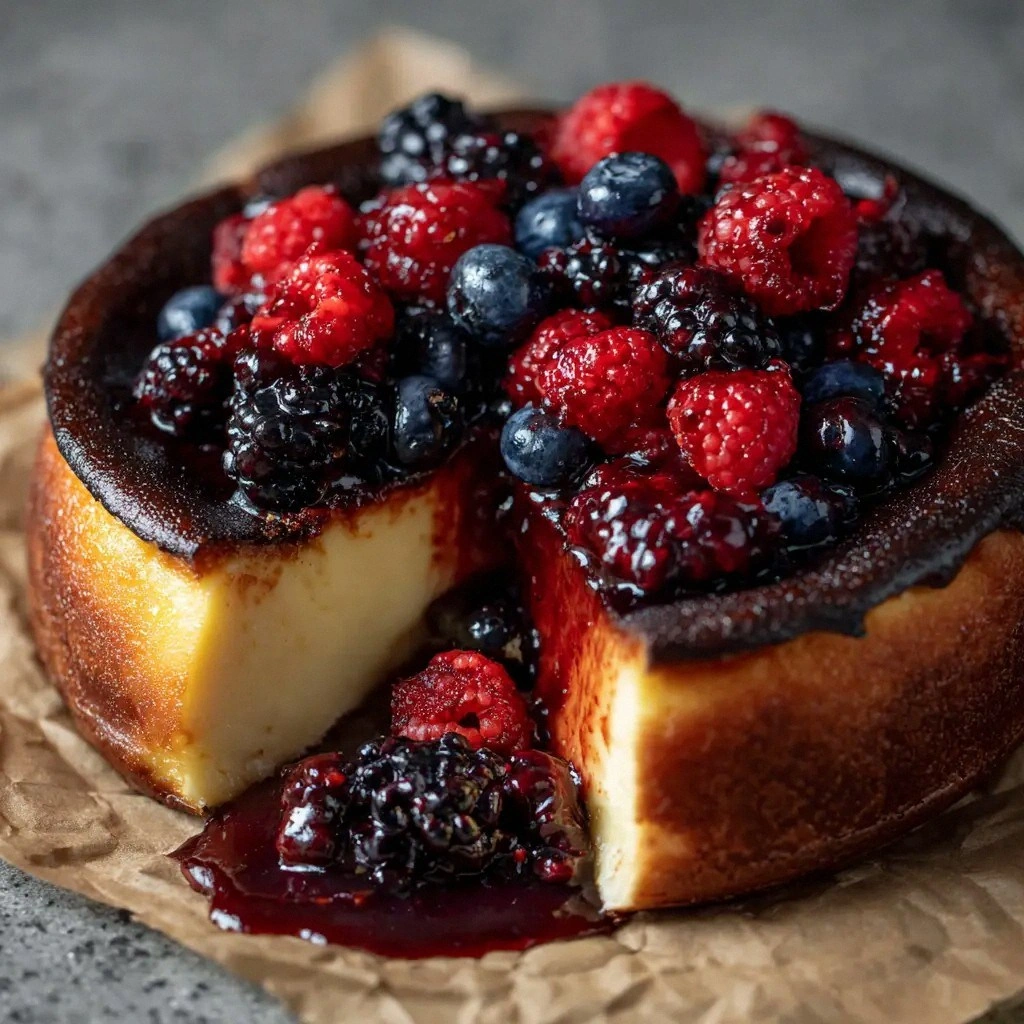
Picture this: the first bite melts on your tongue, the creamy custard swirls with a bright burst of lemon and orange, and the berries burst like tiny fireworks, their sweet‑tart juices mingling with the buttery base. The aroma is a heady mix of toasted sugar, citrus oils, and the faint perfume of fresh berries that drifts into every corner of the kitchen. The texture is a study in contrasts—crisp, caramelized edges that crackle softly under your teeth, a silky interior that feels like velvet, and the occasional pop of berry that adds a refreshing snap. I swear the sound of that first bite is the kind of satisfying crunch you hear at the end of a perfect movie scene.
Most cheesecake recipes are all about creamy, indulgent richness, but this version flips the script by introducing a subtle char and a bright, citrusy punch that lifts the whole flavor profile. The burnt edges create a caramelized depth that balances the sweetness, while the zest and berries bring a fresh, almost tropical vibe that keeps the dessert from feeling heavy. I dare you to taste this and not go back for seconds; the first bite will have you wondering why you ever settled for ordinary. This is hands down the best version you’ll ever make at home, and I’m here to walk you through every single step so you can replicate that kitchen magic.
We’re about to dive into a recipe that’s as visually striking as it is delicious. From the moment you pour the batter into the pan to the final garnish of berries, each stage is a chance to elevate the ordinary into something unforgettable. If you’ve ever struggled with achieving that perfect crust or felt like your cheesecake was too bland, you’re not alone—and I’ve got the fix. Let’s get started, and by the end of this, you’ll wonder how you ever made it any other way.
What Makes This Version Stand Out
- Charred Perfection: The intentional scorch on the crust creates a caramelized flavor that adds depth and a subtle smoky note, turning a simple cheesecake into a gourmet experience.
- Citrus Brightness: Lemon and orange zest lift the richness of cream cheese with a zesty, aromatic punch that keeps the dessert from feeling heavy.
- Berry Burst: Mixed berries add a juicy, sweet‑tart contrast, giving the cheesecake a refreshing finish that feels like a summer garden in every bite.
- Texture Contrast: The burnt edges crackle softly while the interior remains silky, offering a multi‑sensory experience that engages sight, sound, and taste.
- Simple Yet Sophisticated: The recipe requires no fancy equipment—just a standard oven and a baking pan—yet delivers a dessert that would impress at any dinner party.
- Make‑Ahead Friendly: The cheesecake can be prepared ahead of time and refrigerated for up to 48 hours, making it a stress‑free option for busy evenings.
- Ingredient Quality Focus: Using full‑fat cream cheese and fresh berries ensures the richest flavors; the recipe thrives on quality over quantity.
- Visual Appeal: The dark, caramelized crust contrasts beautifully with the pale, creamy filling, making it Instagram‑ready and conversation‑starting.
Alright, let’s break down exactly what goes into this masterpiece…
Inside the Ingredient List
The Flavor Base
Full‑fat cream cheese is the star that anchors the entire flavor profile. Its rich, tangy character provides a silky texture that melts in your mouth, while its fat content allows the citrus zest to infuse without becoming greasy. Skipping the cream cheese would leave you with a bland custard that lacks depth. If you’re looking for a lighter version, you can substitute part of it with ricotta, but the mouthfeel will change noticeably.
The Sweetness Engine
Granulated sugar does more than sweeten; it helps create the classic cheesecake texture by binding the eggs and cream cheese into a smooth matrix. A little too much sugar can make the dessert overly sweet, while too little can leave it underdeveloped. If you prefer a lower‑sugar option, consider using a sugar substitute that measures equal volume, but remember the caramelization will differ.
The Texture Crew
Eggs are the glue that holds everything together, ensuring a firm yet creamy finish. Five large eggs are ideal for a 32‑ounce cream cheese base; reducing them can compromise structural integrity. The heavy cream adds a velvety richness that balances the acidity of the citrus zest. The all‑purpose flour, though a small amount, helps stabilize the batter and prevents cracks during baking.
The Unexpected Star
Mixed berries are the secret weapon that introduces a bright, juicy contrast. They provide natural sweetness and a burst of tartness that cuts through the richness of the cream cheese. If you’re in a region where berries are out of season, you can use frozen berries; just thaw them and drain the excess liquid to avoid a watery cheesecake.
The Final Flourish
The lemon and orange zest infuse the batter with aromatic oils that elevate the flavor profile. The zest’s essential oils are concentrated in the outer skin, delivering a punch of citrus that’s far more vibrant than juice alone. A pinch of salt is also added to enhance the overall taste, bringing out the sweetness and balancing the tartness. Without it, the dessert can taste flat.
Everything’s prepped? Good. Let’s get into the real action…
The Method — Step by Step
- Preheat your oven to 425°F (220°C) and line a 9‑inch springform pan with parchment paper, leaving an extra inch hanging over the edges. This ensures a neat release later. While the oven heats, set a medium‑sized saucepan on low heat and melt the cream cheese in small batches, stirring constantly until it’s silky smooth. This step is crucial—over‑heating can cause the cheese to separate, ruining the texture.
- Whisk the eggs one at a time into the melted cream cheese, making sure each is fully incorporated before adding the next. The mixture should be smooth and glossy; any lumps will lead to a gritty texture. At this point, add the granulated sugar and stir until fully dissolved, which takes about two minutes. The batter should feel thick but pourable.
- Fold in the heavy cream, vanilla extract, lemon zest, orange zest, and a pinch of salt. Mix gently—over‑mixing can introduce too much air and cause cracks. The batter should be silky, with a slight sheen. If the mixture feels too thick, add a splash of heavy cream to reach the right consistency.
- Pour the batter into the prepared pan, smoothing the top with a spatula. The batter should reach the edges of the parchment. At this point, you can sprinkle the flour evenly across the surface; it helps the crust develop a desirable crackle and prevents a soggy bottom.
- Place the pan in the oven and bake for 20 minutes, then reduce the temperature to 350°F (175°C) and bake for an additional 25 minutes. The top should be a deep caramelized brown, and the edges should start pulling away from the pan. The center should still wobble slightly when you shake the pan—this is the sweet spot.
- Remove the cheesecake from the oven and let it cool on a wire rack for 10 minutes. During this time, the burnt edges will set and develop a crisp texture. Once cooled, carefully release the parchment and remove the springform ring. The cheesecake should feel firm yet springy to the touch.
- Let the cheesecake rest in the refrigerator for at least 4 hours, preferably overnight. This allows the flavors to meld and the texture to firm up. If you’re short on time, a 2‑hour chill will still yield a decent result, but the depth of flavor will be slightly diminished.
- Just before serving, top the cheesecake with a generous handful of mixed berries. The berries should be slightly bruised to release their juices, creating a glossy, fruity glaze that contrasts with the dark crust. A light drizzle of honey or a dusting of powdered sugar can add an extra finishing touch.
That’s it — you did it. But hold on, I’ve got a few more tricks that will take this to another level…
Insider Tricks for Flawless Results
The Temperature Rule Nobody Follows
Many bakers skip the temperature reduction after the initial high bake, which often leads to a burnt exterior and a soggy interior. By dropping the heat after 20 minutes, you give the cheesecake time to set without over‑cooking the center. I once tried a single‑temperature bake, and the result was a cake that looked burnt on the outside but was still gooey inside.
Why Your Nose Knows Best
The aroma of a cheesecake in the oven is a reliable indicator of its readiness. When you smell a caramelized, buttery scent with a hint of citrus, it’s time to pull it out. If you’re still waiting, the batter will continue to expand, and the edges may start to crack in an uneven way.
The 5‑Minute Rest That Changes Everything
After baking, let the cheesecake rest for 10 minutes before removing the parchment. This brief period allows the crust to set and prevents the center from shifting. I’ve seen cases where a cheesecake slid off the pan because it was still too hot and fluid when removed.
The “Don’t Skip the Flour” Trick
Flour may seem unnecessary, but it creates a slight crust on the top that enhances the char and gives the cheesecake a pleasant crunch. Skipping it often results in a smooth, uncrackled surface that feels too soft. If you’re avoiding gluten, use a gluten‑free all‑purpose blend; the effect remains the same.
The “Add a Pinch of Salt” Secret
Salt amplifies the sweetness and balances the tartness of the citrus and berries. Without it, the dessert can taste flat and overly sugary. A tiny pinch is all you need; too much will make it taste salty.
The “Cool in the Pan” Method
Cooling the cheesecake in the pan on a wire rack helps maintain its shape. If you move it too soon, the edges can sink, causing a misshapen dessert. I’ve learned the hard way that premature handling leads to a collapsed center.
Creative Twists and Variations
This recipe is a playground. Here are some of my favorite ways to switch things up:
Maple‑Infused Marvel
Replace the vanilla extract with a splash of pure maple syrup and drizzle a thin layer of maple glaze over the top after chilling. The maple adds a deep, caramel‑like sweetness that pairs wonderfully with the citrus zest.
Spiced Berry Explosion
Add a pinch of ground ginger or cinnamon to the batter and top with fresh blueberries and a sprinkle of toasted almonds. The spices add warmth, while the almonds provide crunch.
Chocolate‑Citrus Fusion
Fold in 2 ounces of dark chocolate chips into the batter before baking, and garnish with a dusting of cacao nibs. The bitterness of the chocolate balances the bright citrus, creating a complex flavor profile.
Pineapple‑Berry Surprise
Replace half of the mixed berries with diced fresh pineapple and add a splash of coconut milk to the batter. The tropical notes elevate the dessert to a beach‑side treat.
Lavender‑Lemon Twist
Stir in a teaspoon of culinary lavender buds into the batter and garnish with a sprig of fresh lavender. The floral undertones add an unexpected elegance.
Salted Caramel Finish
Drizzle a thin layer of salted caramel sauce over the chilled cheesecake before serving. The salty sweetness enhances the overall depth and makes the dessert feel indulgent.
Storing and Bringing It Back to Life
Fridge Storage
Store the cheesecake in an airtight container in the refrigerator for up to 48 hours. The dark crust will keep its crispness, while the interior remains creamy. If you’re planning a party, chill it the night before to ensure it’s fully set and ready to serve.
Freezer Friendly
For longer storage, wrap the cheesecake tightly in plastic wrap and then in aluminum foil before freezing. It can be kept for up to 3 months. Thaw in the refrigerator overnight before serving, and re‑warm briefly in a 325°F oven for 10 minutes to restore warmth.
Best Reheating Method
To revive a chilled cheesecake, place it in a preheated 325°F oven for 10 minutes. Add a splash of water to the pan before reheating; the steam will keep the interior moist and prevent it from drying out. After reheating, let it cool for a few minutes before slicing.