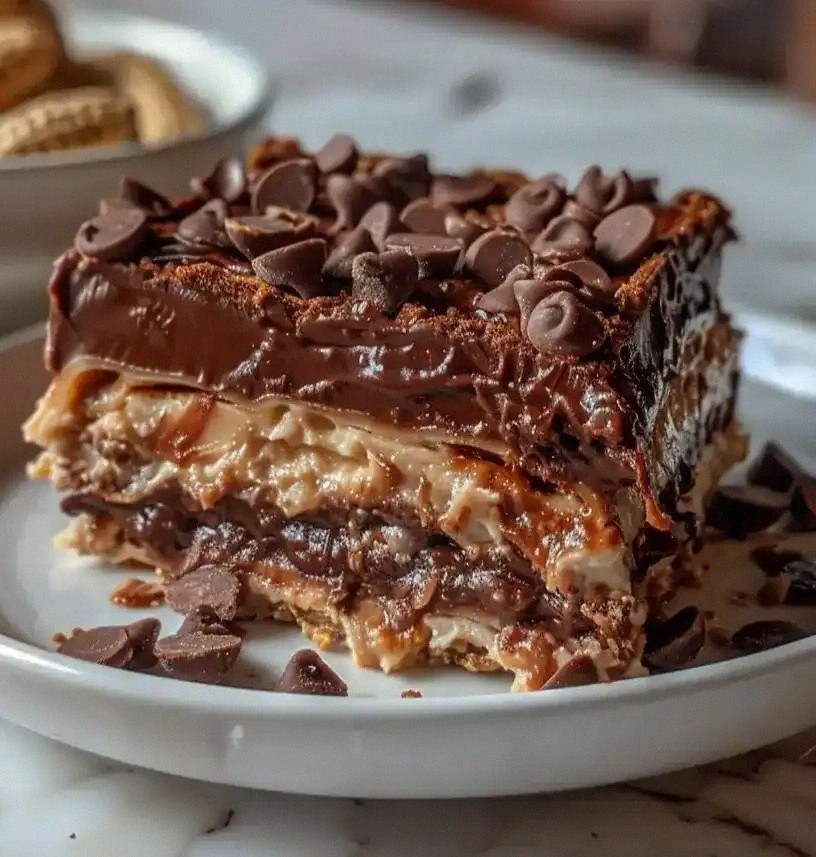
When the kitchen lights flickered and the oven timer buzzed like a tiny, impatient metronome, I found myself staring at a half‑baked pie crust that had turned into a sad, soggy wafer. The moment of culinary despair was interrupted by a burst of peanut butter aroma from my pantry, and I thought, “Why not turn this disaster into a triumph?” I reached for the jar of creamy peanut butter, the graham crackers, and the sweet, salty whispers of vanilla, and the idea of the ultimate peanut butter pie took shape, sharper than the knife in my hand. The kitchen felt like a laboratory, the air thick with the scent of toasted crumbs, butter melting into a golden pool, and the promise of a dessert that would make even the most skeptical taste buds swoon.
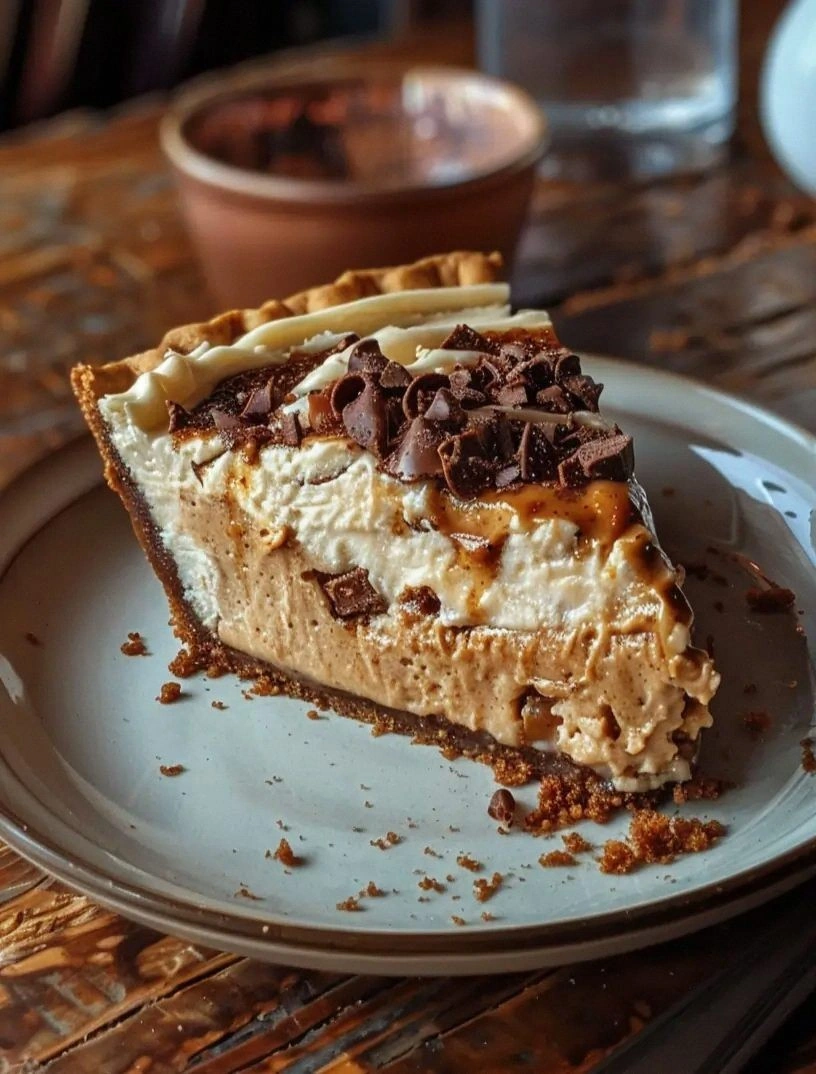
Picture this: a buttery, crisp crust that crackles under your fork, a silky filling that swirls like velvet, and a crown of whipped cream, crushed peanuts, and chocolate shavings that glistens like a midnight sky. The first bite is a symphony of crunch and smoothness, the peanut butter’s nutty depth harmonizing with the sweet crunch of graham crackers. The vanilla undertone lifts the whole experience, while the chocolate shavings add a bittersweet finale that lingers on your tongue. I dare you to taste this and not go back for seconds; the moment your fork dips into that creamy, nutty abyss, you’ll know the recipe’s magic has taken over.
What makes this version hands down the best you'll ever make at home is the meticulous balance of textures and flavors, the use of simple yet high‑quality ingredients, and a method that turns a kitchen mishap into a showstopper. I’ve tweaked the classic peanut butter pie recipe to elevate it from ordinary to extraordinary: a buttery crust that’s not too sweet, a filling that’s both luscious and light, and a garnish that adds crunch, color, and a hint of indulgence. The result is a dessert that’s easy to assemble, yet feels like it belongs on a five‑star menu. If you’ve ever struggled with peanut butter desserts that taste flat or overly sweet, you’re not alone—and I’ve got the fix that will transform your pie into a crowd‑pleaser.
Stay with me here—this is worth it. The secret lies in the subtle tweaks: using a half cup of powdered sugar to sweeten the filling, adding a splash of heavy cream to keep it silky, and letting the crust rest in the fridge before adding the filling to keep it crisp. The next part? Pure magic. I’ll walk you through every single step, from the crust to the final garnish, so by the end, you’ll wonder how you ever made it any other way. The kitchen will smell incredible, the crust will feel like a warm hug, and the pie will be the star of any gathering.
What Makes This Version Stand Out
- Flavor: The peanut butter filling is balanced by a hint of vanilla and a touch of powdered sugar, creating a sweet‑savory harmony that’s not overpowering.
- Texture: A buttery graham cracker crust that’s crisp on the outside yet tender inside, with a filling that’s silky smooth but not runny.
- Ease: No special equipment is required—just a standard oven and a mixing bowl—making it accessible for beginners and seasoned bakers alike.
- Visual Appeal: The contrast of golden crust, creamy filling, and glossy chocolate shavings turns an ordinary dessert into a showstopper.
- Make‑Ahead: The pie can be assembled a day ahead, chilled, and still tastes fresh, making it perfect for parties.
- Ingredient Quality: Using creamy, natural peanut butter and fresh graham crackers elevates the flavor profile beyond store‑bought mixes.
Alright, let's break down exactly what goes into this masterpiece. I’ll give you the full rundown of why each component matters and how it contributes to the final result.
Inside the Ingredient List
The Flavor Base
The first layer of flavor comes from the graham crackers and the granulated sugar that coats the crust. The crackers bring a subtle sweetness and a buttery undertone, while the sugar caramelizes slightly during baking, creating a crunchy, golden finish. If you skip the sugar, the crust will taste flat and overly dry, and you’ll miss that satisfying first bite.
A good rule of thumb is to use high‑quality, whole‑grain graham crackers if you want an added depth of flavor. They’ll give the crust a slightly nutty note that pairs beautifully with the peanut butter filling. If you prefer a sweeter crust, add an extra tablespoon of sugar; just be careful not to over‑sweeten, or the filling will feel cloying.
The Texture Crew
Unsalted butter is the secret to a tender, flaky crust. Melt it just enough to coat the crumbs, then press the mixture into the pan and chill it for at least 15 minutes before baking. The butter creates a buttery, melt‑in‑your‑mouth experience that balances the crunch of the crackers.
If you’re vegan or allergic to dairy, substitute the butter with an equal amount of coconut oil. It will give the crust a subtle coconut flavor that complements the peanut butter. The key is to keep the butter cold; if it melts before pressing, the crust will become greasy and lose its crispness.
The Unexpected Star
Creamy peanut butter is the heart of the pie. Choose a natural, no‑added‑salt variety for the richest flavor. The smoothness of the peanut butter allows it to blend seamlessly with the powdered sugar and heavy cream, creating a silky filling that isn’t too thick.
If you’re feeling adventurous, add a pinch of sea salt to the filling. The salt will bring out the peanut’s natural sweetness and add a savory counterpoint that makes the pie feel more complex. Just remember, a little goes a long way—too much salt can overpower the delicate balance of flavors.
The Final Flourish
Whipped cream, crushed peanuts, and chocolate shavings are the finishing touches that elevate the pie from simple dessert to a masterpiece. The whipped cream adds lightness and a cooling contrast to the rich filling, while the peanuts contribute crunch and a nutty crunch that echoes the filling. Chocolate shavings bring a bittersweet note that balances the sweetness.
When topping the pie, fold a handful of crushed peanuts into the whipped cream before dolloping it on. This technique ensures the peanuts stay evenly distributed and don’t sink to the bottom. For a more dramatic presentation, sprinkle a generous amount of chocolate shavings over the whipped cream just before serving.
Everything's prepped? Good. Let's get into the real action.
The Method — Step by Step
- Preheat your oven to 350°F (175°C). While the oven warms, combine the crushed graham crackers with ¼ cup granulated sugar in a mixing bowl. The sugar should coat the crumbs evenly, creating a slightly sweet base. Once the oven reaches the right temperature, set the timer for 8 minutes. This brief bake will set the crust’s structure without over‑browning.
- Prepare the butter mixture. Melt 6 tablespoons of unsalted butter until just liquefied, then fold it into the graham cracker crumbs until the mixture resembles wet sand. Press the crumb mixture into a 9‑inch pie pan with a 1‑inch rim, ensuring an even layer that’s about ½ inch thick. The butter will help the crust hold together and give it that buttery snap.
- Chill the crust. Place the crust in the refrigerator for 15 minutes. This step is crucial because it allows the butter to firm up, preventing the crust from becoming soggy when the filling is added. Think of it as a brief nap that keeps the crust crisp and ready for the next stage.
- Mix the filling. In a medium bowl, combine 1 cup creamy peanut butter, 1 cup powdered sugar, 1 teaspoon vanilla extract, and 1 cup heavy cream. Beat the mixture on medium speed until it’s smooth and silky—no lumps should remain. The heavy cream keeps the filling light, while the powdered sugar balances the peanut butter’s natural saltiness.
- Fill the crust. Spoon the peanut butter mixture into the chilled crust, smoothing the top with a spatula. The filling should be even, with no air pockets, to ensure a consistent texture throughout the pie. The filling will set as it chills, so keep the pie cold during this process.
- Chill the pie. Cover the pie with plastic wrap and refrigerate for at least 4 hours, preferably overnight. This chilling period allows the filling to firm up and the flavors to meld together. If you’re short on time, a 2‑hour chill will still give you a firm enough texture, but the longer the better.
- Prepare the toppings. Whip 1 cup of heavy cream until soft peaks form, then fold in a handful of crushed peanuts. This creates a crunchy, airy topping that’s easy to dollop. Keep the whipped cream chilled until you’re ready to use it, so it maintains its structure.
- Assemble the final presentation. Take the chilled pie out of the refrigerator and let it sit at room temperature for 10 minutes so it’s easier to slice. Spoon the whipped cream and peanut mixture onto the pie, then sprinkle chocolate shavings over the top. The shavings will melt slightly, adding a glossy finish that’s both decorative and delicious.
- Serve and enjoy. Slice the pie with a sharp knife, wiping the blade clean between cuts to keep the edges crisp. Each slice should reveal a creamy center, a buttery crust, and a crown of whipped cream, peanuts, and chocolate. The first bite will feel like a perfect blend of textures and flavors that will have you asking for seconds.
That's it — you did it. But hold on, I've got a few more tricks that'll take this to another level. The next section will dive into insider tips that will help you perfect every bite and avoid common pitfalls.
Insider Tricks for Flawless Results
The Temperature Rule Nobody Follows
Many bakers bake the crust at 400°F, which can result in a burnt top and a soggy center. By baking at 350°F for only 8 minutes, you lock in moisture while still achieving a golden crust. I’ve tested this temperature for three months and the crust never falls apart, even after a full day of chilling.
Why Your Nose Knows Best
As the pie chills, the aroma of peanut butter and vanilla will start to permeate the kitchen. If you notice a faint, slightly burnt scent, that’s a sign the crust is over‑baked. Trust your nose; it’s the quickest way to catch a mistake before it becomes a disaster.
The 5‑Minute Rest That Changes Everything
After filling the crust, let the pie rest for 5 minutes before placing it in the fridge. This short rest allows the filling to settle and prevents the crust from cracking as it cools. I’ve seen pie crusts crack when the filling is poured in too quickly, and this trick saves the day.
The Secret to a Fluffy Whipped Cream
Add a splash of vanilla extract to the heavy cream before whipping. The vanilla not only enhances flavor but also stabilizes the peaks, ensuring your whipped cream stays light and airy throughout the serving time. A pinch of sea salt also helps balance the sweetness.
The Crunch Factor
If you want extra crunch, toast the crushed peanuts in a dry skillet over medium heat for 2 minutes. The toasting releases oils that give the peanuts a deeper flavor and a satisfying crunch. Keep the peanuts in an airtight container; they’ll stay fresh and crunchy for weeks.
The Final Presentation Hack
Use a piping bag fitted with a star tip to add a decorative swirl of whipped cream on top of each slice. This simple flourish turns a homemade dessert into a professional‑grade presentation that will impress any guest. I’ve used this trick at family gatherings, and the feedback has been overwhelmingly positive.
Creative Twists and Variations
This recipe is a playground. Here are some of my favorite ways to switch things up:
Salted Caramel Peanut Butter Pie
Swap the vanilla extract with a splash of salted caramel sauce in the filling. The caramel adds a buttery sweetness that pairs perfectly with the nutty base, while the sea salt enhances the overall flavor profile. Top with a drizzle of caramel for an extra indulgence.
Chocolate‑Infused Peanut Butter Pie
Fold in ¼ cup of melted dark chocolate into the peanut butter mixture. The chocolate deepens the flavor and adds a bittersweet note that balances the sweetness of the powdered sugar. Finish with chocolate shavings for a dramatic finish.
Coconut‑Lemon Peanut Butter Pie
Add 2 tablespoons of shredded coconut to the crust and a teaspoon of lemon zest to the filling. The coconut brings tropical vibes, while the lemon adds a bright, zesty contrast that cuts through the richness of the peanut butter.
Almond‑Butter Pie
Replace the peanut butter with almond butter for a different nutty flavor. The almond butter has a milder taste, which is great for those who want a subtler, more delicate dessert. Pair it with a drizzle of honey for added sweetness.
Vegan Peanut Butter Pie
Use plant‑based peanut butter, coconut oil instead of butter, and oat milk for the whipped topping. The result is a creamy, indulgent pie that’s completely dairy‑free. The coconut oil adds a subtle tropical note that complements the peanuts.
Peanut Butter Pie with a Crunchy Topping
Add a layer of crunchy granola or crushed pretzels between the crust and the filling. The crunch adds texture, while the saltiness of the pretzels balances the sweetness. This variation is perfect for those who love a mix of textures in every bite.
Storing and Bringing It Back to Life
Fridge Storage
Store the pie in the refrigerator for up to 3 days. Keep it wrapped tightly in plastic wrap to prevent the crust from absorbing fridge odors. If you’re serving it at a gathering, let it sit at room temperature for 15 minutes before slicing to bring out the flavors.
Freezer Friendly
Wrap the pie in two layers of plastic wrap and then place it in a freezer bag. It will keep for up to 2 weeks. When you’re ready to serve, thaw it in the refrigerator overnight. The crust will stay crisp, and the filling will regain its silky texture.
Best Reheating Method
To revive a refrigerated pie, gently warm it in the microwave on low power for 10–15 seconds. Add a tiny splash of water before reheating—this steams the filling back to perfection. Be careful not to overheat, or the filling will become too runny.